快速指南
Cryptography with Python - Overview
密码学是两个用户之间通过编码消息进行通信的艺术。 密码学科学的出现基本动机是为从一方转移到另一方的机密信息提供安全保障。
密码学被定义为隐藏信息以引入信息安全性所承认的隐私和保密的艺术和科学。
密码学术语
这里解释了密码学中经常使用的术语 -
纯文本
纯文本消息是可读且可被所有用户理解的文本。 纯文本是经历密码学的消息。
密文
密文是在纯文本上应用加密后获得的消息。
加密(Encryption)
将纯文本转换为密文的过程称为加密。 它也被称为编码。
解密(Decryption)
将密文转换为纯文本的过程称为解密。 它也被称为解码。
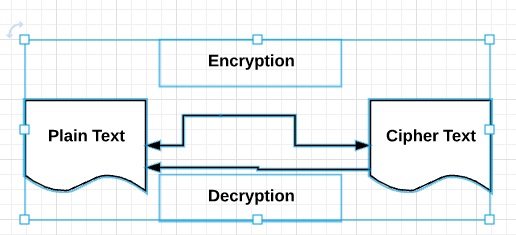
下面给出的图表显示了密码学的完整过程 -
现代密码学的特征
现代密码学的基本特征如下 -
它对比特序列进行操作。
它使用数学算法来保护信息。
它要求对安全通信渠道感兴趣的各方实现隐私。
Double Strength Encryption
双强度加密,也称为多重加密,是使用相同或不同的算法/模式对已加密的文本进行一次或多次加密的过程。
双强度加密的其他名称包括级联加密或级联加密。
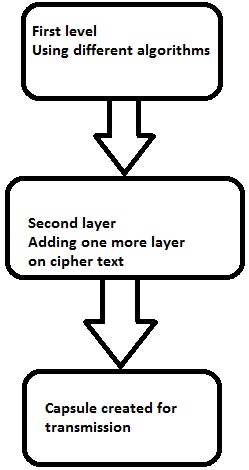
双强度加密的级别
双倍强度加密包括各种级别的加密,这些加密在此处解释 -
第一层加密
使用散列算法和对称密钥从原始可读消息生成密文。 以后的对称密钥在非对称密钥的帮助下加密。 此模式的最佳说明是将密文的哈希摘要组合到一个胶囊中。 接收器将首先计算摘要,然后解密文本以验证文本之间没有被篡改。
第二层加密
第二层加密是使用相同或不同的算法将一个层添加到密码文本的过程。 通常,32位字符长对称密码用于相同的密码。
第三层加密
在此过程中,加密的胶囊通过SSL/TLS连接传输到通信伙伴。
下图以图形方式显示了双重加密过程 -
混合密码学
混合密码术是通过包括每个密码的好处而将不同类型的多个密码一起使用的过程。 通常遵循一种通用方法来生成对称密码的随机密钥,然后通过非对称密钥密码加密该密钥。
由于这种模式,原始消息本身使用对称密码加密,然后使用密钥加密。 接收消息后的接收器首先使用密钥解密消息,使用他/她自己的私钥,然后使用指定的密钥解密消息。
Python Overview and Installation
Python是一种开源脚本语言,具有高级,解释,交互和面向对象的特点。 它的设计具有高可读性。 Python语言的语法易于理解,并且经常使用英语关键字。
Python语言的特点
Python提供以下主要功能 -
Interpreted
使用解释器在运行时处理Python。 执行前无需编译程序。 它类似于PERL和PHP。
Object-Oriented
Python遵循面向对象的样式和设计模式。 它包括具有各种功能的类定义,如封装和多态。
Python语言的关键点
Python编程语言的关键点如下 -
它包括功能和结构化编程和方法以及面向对象的编程方法。
它可以用作脚本语言或编程语言。
它包括自动垃圾收集。
它包括高级动态数据类型,并支持各种动态类型检查。
Python包含与C,C ++和Java等语言集成的功能。
Python语言的下载链接如下 - www.python.org/downloads它包含各种操作系统的软件包,如Windows,MacOS和Linux发行版。

Python Strings
字符串的基本声明如下所示 -
str = 'Hello World!'
Python Lists
python列表可以声明为复合数据类型,用逗号分隔并括在方括号([])中。
list = [ 'abcd', 786 , 2.23, 'john', 70.2 ]
tinylist = [123, 'john']
Python Tuples
元组是Python的动态数据类型,由逗号分隔的多个值组成。 元组用括号括起来。
tinytuple = (123, 'john')
Python Dictionary
Python字典是一种哈希表。 字典键几乎可以是Python的任何数据类型,通常是数字或字符串。
tinydict = {'name': 'omkar','code':6734, 'dept': 'sales'}
密码学包
Python包含一个名为cryptography的包,它提供加密配方和原语。 它支持Python 2.7,Python 3.4+和PyPy 5.3+。 密码包的基本安装是通过以下命令实现的 -
pip install cryptography
有各种包具有高级配方和低级接口,可用于常见的加密算法,如symmetric ciphers , message digests和key derivation functions.
在本教程中,我们将使用各种Python包来实现加密算法。
Cryptography with Python - Reverse Cipher
上一章概述了在本地计算机上安装Python的过程。 在本章中,您将详细了解反向密码及其编码。
反向密码算法
反向密码算法具有以下特征 -
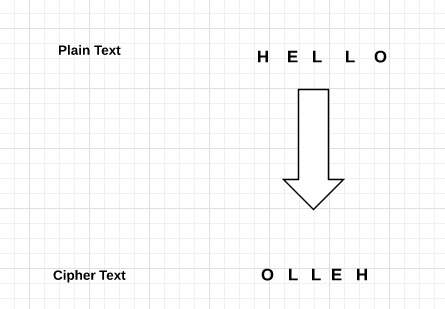
反向密码使用反转纯文本字符串的模式转换为密文。
加密和解密过程是一样的。
要解密密文,用户只需要反转密文即可获得纯文本。
Drawback
反向密码的主要缺点是它非常弱。 黑客可以轻松破解密文以获取原始消息。 因此,反向密码不被认为是维护安全通信信道的良好选择。
例子 (Example)
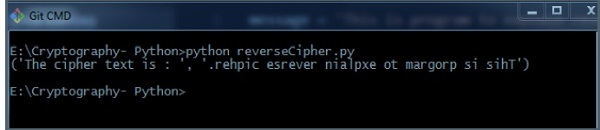
考虑一个示例,其中语句This is program to explain reverse cipher程序,将使用反向密码算法来实现。 以下python代码使用该算法来获取输出。
message = 'This is program to explain reverse cipher.'
translated = '' #cipher text is stored in this variable
i = len(message) - 1
while i >= 0:
   translated = translated + message[i]
   i = i - 1
print(“The cipher text is : “, translated)
输出 (Output)
您可以看到反转的文本,即输出,如下图所示 -
说明 (Explanation)
纯文本存储在变量消息中,翻译后的变量用于存储创建的密文。
使用for循环并在index number帮助下计算纯文本的长度。 字符存储在translated密文translated ,并在最后一行打印。
Cryptography with Python - Caesar Cipher
在最后一章中,我们讨论了反向密码。 本章详细讨论了凯撒密码。
凯撒密码算法
凯撒密码算法具有以下特点 -
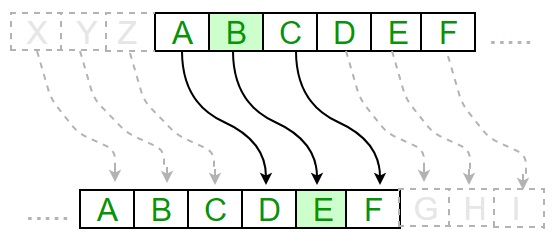
Caesar Cipher技术是一种简单易用的加密技术。
它是简单类型的替换密码。
每个纯文本字母都被一个字母替换,该字母具有一些固定数量的位置和字母。
下图描绘了Caesar密码算法实现的工作原理 -
Caesar密码算法的程序实现如下 -
def encrypt(text,s):
result = ""
# transverse the plain text
for i in range(len(text)):
char = text[i]
# Encrypt uppercase characters in plain text
if (char.isupper()):
result += chr((ord(char) + s-65) % 26 + 65)
# Encrypt lowercase characters in plain text
else:
result += chr((ord(char) + s - 97) % 26 + 97)
return result
#check the above function
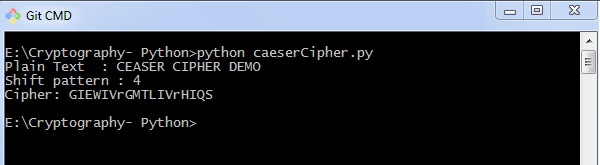
text = "CEASER CIPHER DEMO"
s = 4
print "Plain Text : " + text
print "Shift pattern : " + str(s)
print "Cipher: " + encrypt(text,s)
输出 (Output)
您可以看到Caesar密码,即输出,如下图所示 -
说明 (Explanation)
纯文本字符一次遍历一个。
对于给定纯文本中的每个字符,根据规则转换给定字符,具体取决于加密和解密文本的过程。
在执行这些步骤之后,将生成一个新字符串,称为密文。
黑客凯撒密码算法
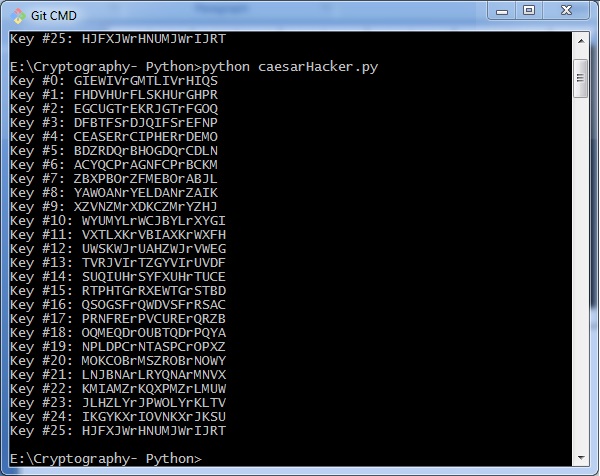
密文可以被各种可能性破解。 其中一种可能性是Brute Force Technique,它涉及尝试每个可能的解密密钥。 这种技术不需要太多努力,对于黑客来说相对简单。
黑客凯撒密码算法的程序实现如下 -
message = 'GIEWIVrGMTLIVrHIQS' #encrypted message
LETTERS = 'ABCDEFGHIJKLMNOPQRSTUVWXYZ'
for key in range(len(LETTERS)):
   translated = ''
   for symbol in message:
      if symbol in LETTERS:
         num = LETTERS.find(symbol)
         num = num - key
         if num < 0:
            num = num + len(LETTERS)
         translated = translated + LETTERS[num]
      else:
         translated = translated + symbol
print('Hacking key #%s: %s' % (key, translated))
考虑前面示例中加密的密文。 然后,使用密钥和使用强力攻击技术的可能的黑客攻击方法的输出如下 -
Cryptography with Python - ROT13 Algorithm
到目前为止,您已经了解了反向密码和凯撒密码算法。 现在,让我们讨论ROT13算法及其实现。
ROT13算法的解释
ROT13密码是指缩写形式Rotate by 13 places 。 这是Caesar Cipher的特例,其中shift始终为13.每个字母移位13个位置以加密或解密消息。
例子 (Example)
下图以图形方式说明了ROT13算法流程 -

程序代码
ROT13算法的程序实现如下 -
from string import maketrans
rot13trans = maketrans('ABCDEFGHIJKLMNOPQRSTUVWXYZabcdefghijklmnopqrstuvwxyz',
   'NOPQRSTUVWXYZABCDEFGHIJKLMnopqrstuvwxyzabcdefghijklm')
# Function to translate plain text
def rot13(text):
   return text.translate(rot13trans)
def main():
   txt = "ROT13 Algorithm"
   print rot13(txt)
if __name__ == "__main__":
   main()
您可以看到ROT13输出,如下图所示 -

缺点 (Drawback)
ROT13算法使用13个班次。 因此,以相反的方式移动字符以解密密文非常容易。
ROT13算法分析
ROT13密码算法被认为是Caesar Cipher的特例。 它不是一个非常安全的算法,可以通过频率分析或仅尝试可能的25个键轻松破解,而ROT13可以通过移动13个位置来打破。 因此,它不包括任何实际用途。
Transposition Cipher
Transposition Cipher是一种加密算法,其中明文中的字母顺序被重新排列以形成密文。 在此过程中,不包括实际的纯文本字母表。
例子 (Example)
转置密码的一个简单示例是columnar transposition cipher ,其中纯文本中的每个字符都是水平写入的,具有指定的字母宽度。 密码垂直写入,创建完全不同的密文。
考虑纯文本hello world ,让我们应用简单的柱状转置技术,如下所示
纯文本字符水平放置,密文以垂直格式创建: holewdlo lr. 现在,接收方必须使用相同的表将密文解密为纯文本。
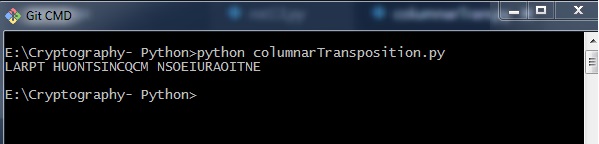
Code
以下程序代码演示了柱状转置技术的基本实现 -
def split_len(seq, length):
   return [seq[i:i + length] for i in range(0, len(seq), length)]
def encode(key, plaintext):
   order = {
      int(val): num for num, val in enumerate(key)
   }
ciphertext = ''
for index in sorted(order.keys()):
   for part in split_len(plaintext, len(key)):
      try:ciphertext += part[order[index]]
         except IndexError:
            continue
   return ciphertext
print(encode('3214', 'HELLO'))
说明 (Explanation)
使用split_len(),函数split_len(),我们可以拆分纯文本字符,这些字符可以以列式或行格式放置。
encode方法有助于使用指定列数的键创建密文,并通过读取每列中的字符来打印密文。
输出 (Output)
用于柱状换位技术基本实现的程序代码给出以下输出 -
Note - Cryptanalysts观察到转换技术执行时加密安全性的显着改善。 他们还指出,使用相同的转置密码重新加密密文可以提高安全性。
Encryption of Transposition Cipher
在上一章中,我们学习了Transposition Cipher。 在本章中,我们将讨论其加密。
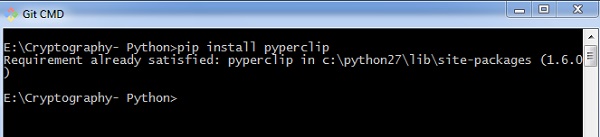
Pyperclip (Pyperclip)
Python编程语言中pyperclip插件的主要用途是执行跨平台模块,用于将文本复制并粘贴到剪贴板。 您可以使用如图所示的命令安装python pyperclip模块
pip install pyperclip
如果系统中已存在该要求,则可以看到以下输出 -
Code
用于加密转置密码的python代码,其中pyperclip是主要模块,如下所示 -
import pyperclip
def main():
   myMessage = 'Transposition Cipher'
   myKey = 10
   ciphertext = encryptMessage(myKey, myMessage)
   print("Cipher Text is")
   print(ciphertext + '|')
   pyperclip.copy(ciphertext)
def encryptMessage(key, message):
   ciphertext = [''] * key
   for col in range(key):
      position = col
      while position < len(message):
         ciphertext[col] += message[position]
			position += key
      return ''.join(ciphertext) #Cipher text
if __name__ == '__main__':
   main()
输出 (Output)
用于加密转置密码的程序代码,其中pyperclip是主模块,给出以下输出 -
说明 (Explanation)
函数main()调用encryptMessage() ,其中包括使用len函数拆分字符并以列式格式迭代它们的过程。
主函数在最后初始化以获得适当的输出。
Decryption of Transposition Cipher
在本章中,您将学习解密转置密码的过程。
Code
请查看以下代码,以便更好地理解解密转置密码。 将密钥为6消息Transposition Cipher的密文提取为Toners raiCntisippoh.
import math, pyperclip
def main():
   myMessage= 'Toners raiCntisippoh'
   myKey = 6
   plaintext = decryptMessage(myKey, myMessage)
   print("The plain text is")
   print('Transposition Cipher')
def decryptMessage(key, message):
   numOfColumns = math.ceil(len(message)/key)
   numOfRows = key
   numOfShadedBoxes = (numOfColumns * numOfRows) - len(message)
   plaintext = float('') * numOfColumns
   col = 0
   row = 0
   for symbol in message:
      plaintext[col] += symbol
      col += 1
      if (col == numOfColumns) or (col == numOfColumns - 1 and row >= numOfRows - numOfShadedBoxes):
         col = 0 row += 1 return ''.join(plaintext)
if __name__ == '__main__':
   main()
说明 (Explanation)
密文和所提到的密钥是作为输入参数的两个值,用于通过以列格式放置字符并以水平方式读取它们来以反向技术解密或解密密文。
您可以以列格式放置字母,然后使用以下代码将它们组合或连接在一起 -
for symbol in message:
   plaintext[col] += symbol
   col += 1
   if (col == numOfColumns) or (col == numOfColumns - 1 and row >= numOfRows - numOfShadedBoxes):
   col = 0
   row += 1
return ''.join(plaintext)
输出 (Output)
用于解密转置密码的程序代码给出以下输出 -
Encryption of files
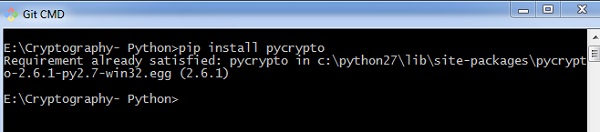
在Python中,可以在传输到通信通道之前加密和解密文件。 为此,您必须使用插件PyCrypto 。 您可以使用下面给出的命令安装此插件。
pip install pycrypto
Code
使用密码保护器加密文件的程序代码如下 -
# =================Other Configuration================
# Usages :
usage = "usage: %prog [options] "
# Version
Version="%prog 0.0.1"
# ====================================================
# Import Modules
import optparse, sys,os
from toolkit import processor as ps
def main():
   parser = optparse.OptionParser(usage = usage,version = Version)
   parser.add_option(
      '-i','--input',type = 'string',dest = 'inputfile',
      help = "File Input Path For Encryption", default = None)
   parser.add_option(
      '-o','--output',type = "string",dest = 'outputfile',
      help = "File Output Path For Saving Encrypter Cipher",default = ".")
   parser.add_option(
      '-p','--password',type = "string",dest = 'password',
      help = "Provide Password For Encrypting File",default = None)
   parser.add_option(
      '-p','--password',type = "string",dest = 'password',
      help = "Provide Password For Encrypting File",default = None)
   (options, args)= parser.parse_args()
   # Input Conditions Checkings
   if not options.inputfile or not os.path.isfile(options.inputfile):
      print " [Error] Please Specify Input File Path"
      exit(0)
   if not options.outputfile or not os.path.isdir(options.outputfile):
      print " [Error] Please Specify Output Path"
      exit(0)
   if not options.password:
      print " [Error] No Password Input"
      exit(0)
   inputfile = options.inputfile
   outputfile = os.path.join(
      options.outputfile,os.path.basename(options.inputfile).split('.')[0]+'.ssb')
   password = options.password
   base = os.path.basename(inputfile).split('.')[1]
   work = "E"
   ps.FileCipher(inputfile,outputfile,password,work)
   return
   if __name__ == '__main__':
   main()
您可以使用以下命令与密码一起执行加密过程 -
python pyfilecipher-encrypt.py -i file_path_for_encryption -o output_path -p password
输出 (Output)
执行上面给出的代码时,您可以观察到以下输出 -

说明 (Explanation)
密码是使用MD5哈希算法生成的,值存储在Windows系统中的简单安全备份文件中,其中包含如下所示的值 -

Decryption of files
在本章中,让我们讨论使用Python解密加密文件。 请注意,对于解密过程,我们将遵循相同的过程,但不是指定输出路径,而是关注输入路径或加密的必要文件。
Code
以下是使用Python解密加密文件的示例代码 -
#!/usr/bin/python
# ---------------- READ ME ---------------------------------------------
# This Script is Created Only For Practise And Educational Purpose Only
# This Script Is Created For http://bitforestinfo.blogspot.in
# This Script is Written By
#
#
##################################################
######## Please Don't Remove Author Name #########
############### Thanks ###########################
##################################################
#
#
# =================Other Configuration================
# Usages :
usage = "usage: %prog [options] "
# Version
Version="%prog 0.0.1"
# ====================================================
# Import Modules
import optparse, sys,os
from toolkit import processor as ps
def main():
   parser = optparse.OptionParser(usage = usage,version = Version)
   parser.add_option(
      '-i','--input',type = 'string',dest = 'inputfile',
      help = "File Input Path For Encryption", default = None)
   parser.add_option(
      '-o','--output',type = "string",dest = 'outputfile',
      help = "File Output Path For Saving Encrypter Cipher",default = ".")
   parser.add_option(
      '-p','--password',type = "string",dest = 'password',
      help = "Provide Password For Encrypting File",default = None)
      (options, args) =  parser.parse_args()
      # Input Conditions Checkings
      if not options.inputfile or not os.path.isfile(options.inputfile):
         print " [Error] Please Specify Input File Path"
         exit(0)
      if not options.outputfile or not os.path.isdir(options.outputfile):
         print " [Error] Please Specify Output Path"
         exit(0)
      if not options.password:
         print " [Error] No
         exit(0)
      inputfile = options.inputfile
      outputfile = options.outputfile
      password = options.password
      work = "D"
      ps.FileCipher(inputfile,outputfile,password,work)
      return
if __name__ == '__main__':
   main()
您可以使用以下命令执行上述代码 -
python pyfilecipher-decrypt.py -i encrypted_file_path -p password
输出 (Output)
执行上面显示的命令时,您可以观察以下代码 -

Note - 输出指定加密前和解密后的哈希值,这会记录同一文件已加密且进程成功。
Base64 Encoding and Decoding
Base64编码将二进制数据转换为文本格式,通过通信通道传递,用户可以安全地处理文本。 Base64也称为Privacy enhanced Electronic mail (PEM) ,主要用于电子邮件加密过程。
Python包含一个名为BASE64的模块,它包括两个主要功能,如下所示 -
base64.decode(input, output) - 它解码指定的输入值参数,并将解码的输出存储为对象。
Base64.encode(input, output) - 它对指定的输入值参数进行编码,并将解码后的输出存储为对象。
编码程序
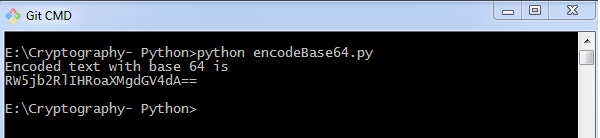
您可以使用以下代码执行base64编码 -
import base64
encoded_data = base64.b64encode("Encode this text")
print("Encoded text with base 64 is")
print(encoded_data)
输出 (Output)
base64编码的代码为您提供以下输出 -
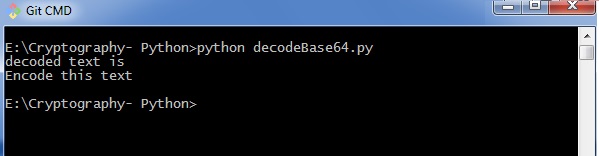
解码程序
您可以使用以下代码执行base64解码 -
import base64
decoded_data = base64.b64decode("RW5jb2RlIHRoaXMgdGV4dA==")
print("decoded text is ")
print(decoded_data)
输出 (Output)
base64解码的代码为您提供以下输出 -
ASCII和base64之间的区别
使用ASCII和base64编码数据时,您可以观察到以下差异 -
使用ASCII编码文本时,首先要使用文本字符串并将其转换为字节序列。
在Base64中编码数据时,从一系列字节开始并将其转换为文本字符串。
缺点 (Drawback)
Base64算法通常用于在数据库中存储密码。 主要缺点是每个解码的单词都可以通过任何在线工具轻松编码,入侵者可以轻松获取信息。
Cryptography with Python - XOR Process
在本章中,让我们了解XOR过程及其在Python中的编码。
算法 (Algorithm)
加密和解密的XOR算法转换ASCII字节格式的纯文本,并使用XOR过程将其转换为指定的字节。 它为用户提供以下优势 -
- 快速计算
- 左侧和右侧没有区别
- 易于理解和分析
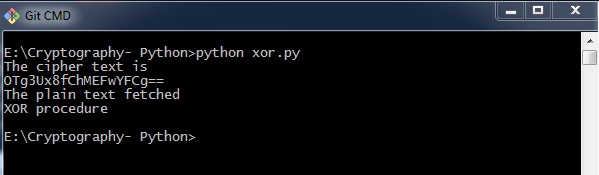
Code
您可以使用以下代码执行XOR过程 -
def xor_crypt_string(data, key = 'awesomepassword', encode = False, decode = False):
   from itertools import izip, cycle
   import base64
   if decode:
      data = base64.decodestring(data)
   xored = ''.join(chr(ord(x) ^ ord(y)) for (x,y) in izip(data, cycle(key)))
   if encode:
      return base64.encodestring(xored).strip()
   return xored
secret_data = "XOR procedure"
print("The cipher text is")
print xor_crypt_string(secret_data, encode = True)
print("The plain text fetched")
print xor_crypt_string(xor_crypt_string(secret_data, encode = True), decode = True)
输出 (Output)
XOR流程的代码为您提供以下输出 -
说明 (Explanation)
函数xor_crypt_string()包括用于指定编码和解码模式的参数以及字符串值。
基本功能是使用base64模块进行的,这些模块遵循XOR过程/操作来加密或解密纯文本/密文。
Note - XOR加密用于加密数据,并且难以通过强力方法破解,即通过生成随机加密密钥以匹配正确的密文。
Multiplicative Cipher
在使用凯撒密码技术时,加密和解密符号涉及使用简单的加法或减法基本过程将值转换为数字。
如果乘法用于转换为密文,则称为wrap-around情形。 考虑使用的字母和相关数字,如下所示 -

这些数字将用于乘法过程,相关密钥为7.在这种场景中用于生成乘法密码的基本公式如下 -
(Alphabet Number * key)mod(total number of alphabets)
通过输出获取的数字映射在上面提到的表中,相应的字母作为加密字母。
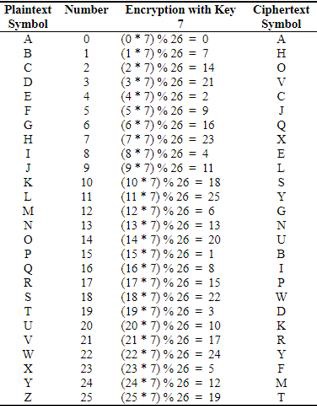
Python中乘法密码的基本调制函数如下 -
def unshift(key, ch):
   offset = ord(ch) - ASC_A
   return chr(((key[0] * (offset + key[1])) % WIDTH) + ASC_A)
Note - 乘法密码的优点是它可以使用非常大的密钥,如8,953,851。 计算机需要相当长的时间才能通过大多数九百万个键来暴力破解。
Cryptography with Python - Affine Cipher
仿射密码是乘法密码和凯撒密码算法的组合。 仿射密码的基本实现如下图所示 -
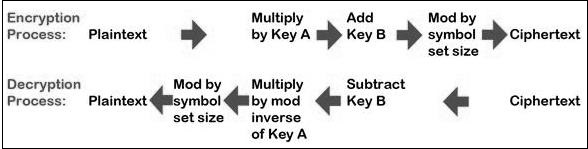
在本章中,我们将通过创建包含两个加密和解密基本函数的相应类来实现仿射密码。
Code
您可以使用以下代码实现仿射密码 -
class Affine(object):
   DIE = 128
   KEY = (7, 3, 55)
   def __init__(self):
      pass
   def encryptChar(self, char):
      K1, K2, kI = self.KEY
      return chr((K1 * ord(char) + K2) % self.DIE)
   def encrypt(self, string):
      return "".join(map(self.encryptChar, string))
   def decryptChar(self, char):
      K1, K2, KI = self.KEY
      return chr(KI * (ord(char) - K2) % self.DIE)
   def decrypt(self, string):
      return "".join(map(self.decryptChar, string))
		affine = Affine()
print affine.encrypt('Affine Cipher')
print affine.decrypt('*18?FMT')
输出 (Output)
实现仿射密码时,您可以观察到以下输出 -

输出显示纯文本消息Affine Cipher的加密消息和作为输入abcdefg.发送的消息的解密消息abcdefg.
Hacking Monoalphabetic Cipher
在本章中,您将学习使用Python的单字母密码及其黑客攻击。
单字母密码
单字母密码使用固定替换来加密整个消息。 这里显示了使用带有JSON对象的Python字典的单字母密码 -
monoalpha_cipher = {
   'a': 'm',
   'b': 'n',
   'c': 'b',
   'd': 'v',
   'e': 'c',
   'f': 'x',
   'g': 'z',
   'h': 'a',
   'i': 's',
   'j': 'd',
   'k': 'f',
   'l': 'g',
   'm': 'h',
   'n': 'j',
   'o': 'k',
   'p': 'l',
   'q': 'p',
   'r': 'o',
   's': 'i',
   't': 'u',
   'u': 'y',
   'v': 't',
   'w': 'r',
   'x': 'e',
   'y': 'w',
   'z': 'q',
	' ': ' ',
}
借助此字典,我们可以使用相关字母加密字母作为JSON对象中的值。 以下程序创建一个单字母程序作为类表示,其中包括加密和解密的所有功能。
from string import letters, digits
from random import shuffle
def random_monoalpha_cipher(pool = None):
   if pool is None:
      pool = letters + digits
   original_pool = list(pool)
   shuffled_pool = list(pool)
   shuffle(shuffled_pool)
   return dict(zip(original_pool, shuffled_pool))
def inverse_monoalpha_cipher(monoalpha_cipher):
   inverse_monoalpha = {}
   for key, value in monoalpha_cipher.iteritems():
      inverse_monoalpha[value] = key
   return inverse_monoalpha
def encrypt_with_monoalpha(message, monoalpha_cipher):
   encrypted_message = []
   for letter in message:
      encrypted_message.append(monoalpha_cipher.get(letter, letter))
   return ''.join(encrypted_message)
def decrypt_with_monoalpha(encrypted_message, monoalpha_cipher):
   return encrypt_with_monoalpha(
      encrypted_message,
      inverse_monoalpha_cipher(monoalpha_cipher)
   )
稍后调用此文件以实现Monoalphabetic密码的加密和解密过程,如下所述 -
import monoalphabeticCipher as mc
cipher = mc.random_monoalpha_cipher()
print(cipher)
encrypted = mc.encrypt_with_monoalpha('Hello all you hackers out there!', cipher)
decrypted = mc.decrypt_with_monoalpha('sXGGt SGG Nt0 HSrLXFC t0U UHXFX!', cipher)
print(encrypted)
print(decrypted)
输出 (Output)
实现上面给出的代码时,您可以观察到以下输出 -
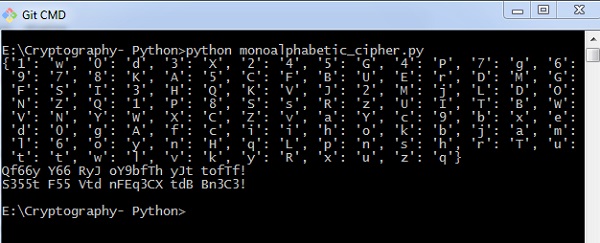
因此,您可以使用指定的键值对破解单字母密码,这会将密文破解为实际的纯文本。
Simple Substitution Cipher
简单替换密码是最常用的密码,包括为每个密文文本字符替换每个纯文本字符的算法。 在这个过程中,与凯撒密码算法相比,字母表是混乱的。
例子 (Example)
简单替换密码的密钥通常由26个字母组成。 一个示例关键是 -
plain alphabet : abcdefghijklmnopqrstuvwxyz
cipher alphabet: phqgiumeaylnofdxjkrcvstzwb
使用上述密钥的示例加密是 -
plaintext : defend the east wall of the castle
ciphertext: giuifg cei iprc tpnn du cei qprcni
以下代码显示了一个实现简单替换密码的程序 -
import random, sys
LETTERS = 'ABCDEFGHIJKLMNOPQRSTUVWXYZ'
def main():
   message = ''
   if len(sys.argv) > 1:
      with open(sys.argv[1], 'r') as f:
         message = f.read()
   else:
      message = raw_input("Enter your message: ")
   mode = raw_input("E for Encrypt, D for Decrypt: ")
   key = ''
   while checkKey(key) is False:
      key = raw_input("Enter 26 ALPHA key (leave blank for random key): ")
      if key == '':
         key = getRandomKey()
      if checkKey(key) is False:
		print('There is an error in the key or symbol set.')
   translated = translateMessage(message, key, mode)
   print('Using key: %s' % (key))
   if len(sys.argv) > 1:
      fileOut = 'enc.' + sys.argv[1]
      with open(fileOut, 'w') as f:
         f.write(translated)
      print('Success! File written to: %s' % (fileOut))
   else: print('Result: ' + translated)
# Store the key into list, sort it, convert back, compare to alphabet.
def checkKey(key):
   keyString = ''.join(sorted(list(key)))
   return keyString == LETTERS
def translateMessage(message, key, mode):
   translated = ''
   charsA = LETTERS
   charsB = key
   # If decrypt mode is detected, swap A and B
   if mode == 'D':
      charsA, charsB = charsB, charsA
   for symbol in message:
      if symbol.upper() in charsA:
         symIndex = charsA.find(symbol.upper())
         if symbol.isupper():
            translated += charsB[symIndex].upper()
         else:
            translated += charsB[symIndex].lower()
				else:
               translated += symbol
         return translated
def getRandomKey():
   randomList = list(LETTERS)
   random.shuffle(randomList)
   return ''.join(randomList)
if __name__ == '__main__':
   main()
输出 (Output)
实现上面给出的代码时,您可以观察到以下输出 -

Testing of Simple Substitution Cipher
在本章中,我们将重点介绍使用各种方法测试替换密码,这有助于生成随机字符串,如下所示 -
import random, string, substitution
def main():
   for i in range(1000):
      key = substitution.getRandomKey()
      message = random_string()
      print('Test %s: String: "%s.."' % (i + 1, message[:50]))
      print("Key: " + key)
      encrypted = substitution.translateMessage(message, key, 'E')
      decrypted = substitution.translateMessage(encrypted, key, 'D')
      if decrypted != message:
         print('ERROR: Decrypted: "%s" Key: %s' % (decrypted, key))
         sys.exit()
      print('Substutition test passed!')
def random_string(size = 5000, chars = string.ascii_letters + string.digits):
   return ''.join(random.choice(chars) for _ in range(size))
if __name__ == '__main__':
   main()
输出 (Output)
您可以将输出视为随机生成的字符串,这有助于生成随机纯文本消息,如下所示 -

测试成功完成后,我们可以观察输出消息Substitution test passed!.
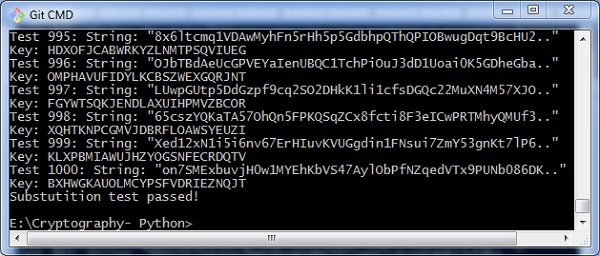
因此,您可以系统地破解替换密码。
Decryption of Simple Substitution Cipher
在本章中,您可以了解替换密码的简单实现,它根据简单替换密码技术中使用的逻辑显示加密和解密的消息。 这可以被视为编码的替代方法。
Code
您可以使用以下代码使用简单替换密码执行解密 -
import random
chars = 'ABCDEFGHIJKLMNOPQRSTUVWXYZ' + \
   'abcdefghijklmnopqrstuvwxyz' + \
   '0123456789' + \
   ':.;,?!@#$%&()+=-*/_<> []{}`~^"\'\\'
def generate_key():
   """Generate an key for our cipher"""
   shuffled = sorted(chars, key=lambda k: random.random())
   return dict(zip(chars, shuffled))
def encrypt(key, plaintext):
   """Encrypt the string and return the ciphertext"""
   return ''.join(key[l] for l in plaintext)
def decrypt(key, ciphertext):
   """Decrypt the string and return the plaintext"""
   flipped = {v: k for k, v in key.items()}
   return ''.join(flipped[l] for l in ciphertext)
def show_result(plaintext):
   """Generate a resulting cipher with elements shown"""
   key = generate_key()
   encrypted = encrypt(key, plaintext)
   decrypted = decrypt(key, encrypted)
   print 'Key: %s' % key
	print 'Plaintext: %s' % plaintext
   print 'Encrypted: %s' % encrypted
   print 'Decrypted: %s' % decrypted
show_result('Hello World. This is demo of substitution cipher')
输出 (Output)
上面的代码为您提供了如下所示的输出 -

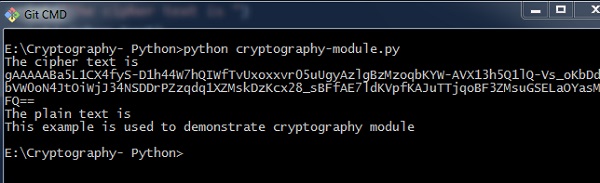
Python Modules of Cryptography
在本章中,您将详细了解Python中各种加密模块。
密码学模块
它包含所有配方和原语,并在Python中提供高级编码接口。 您可以使用以下命令安装加密模块 -
pip install cryptography
Code
您可以使用以下代码来实现加密模块 -
from cryptography.fernet import Fernet
key = Fernet.generate_key()
cipher_suite = Fernet(key)
cipher_text = cipher_suite.encrypt("This example is used to demonstrate cryptography module")
plain_text = cipher_suite.decrypt(cipher_text)
输出 (Output)
上面给出的代码产生以下输出 -
此处给出的代码用于验证密码并创建其哈希值。 它还包括用于验证密码以进行身份验证的逻辑。
import uuid
import hashlib
def hash_password(password):
   # uuid is used to generate a random number of the specified password
   salt = uuid.uuid4().hex
   return hashlib.sha256(salt.encode() + password.encode()).hexdigest() + ':' + salt
def check_password(hashed_password, user_password):
   password, salt = hashed_password.split(':')
   return password == hashlib.sha256(salt.encode() + user_password.encode()).hexdigest()
new_pass = input('Please enter a password: ')
hashed_password = hash_password(new_pass)
print('The string to store in the db is: ' + hashed_password)
old_pass = input('Now please enter the password again to check: ')
if check_password(hashed_password, old_pass):
   print('You entered the right password')
else:
   print('Passwords do not match')
输出 (Output)
Scenario 1 - 如果您输入了正确的密码,您可以找到以下输出 -
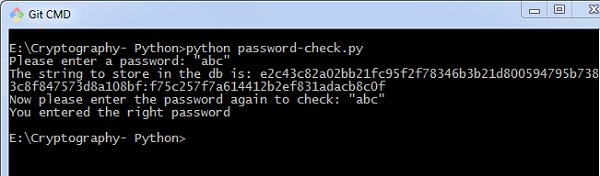
Scenario 2 - 如果我们输入错误的密码,您可以找到以下输出 -

说明 (Explanation)
Hashlib包用于在数据库中存储密码。 在此程序中,使用salt ,在实现散列函数之前将随机序列添加到密码字符串。
Understanding Vignere Cipher
Vignere Cipher包含用于加密和解密的Caesar Cipher算法。 Vignere Cipher与Caesar Cipher算法类似,只有一个主要区别:Caesar Cipher包含一个字符移位的算法,而Vignere Cipher包含多个字母移位的键。
数学方程
对于加密,数学方程式如下 -
$$E_{k}\left ( M{_{i{}}} \right ) = \left ( M_{i}+K_{i} \right )\;\;\; mod \;\; 26$$
对于解密,数学方程式如下 -
$$D_{k}\left ( C{_{i{}}} \right ) = \left ( C_{i}-K_{i} \right )\;\;\; mod \;\; 26$$
Vignere密码使用一组以上的替换,因此它也被称为polyalphabetic cipher 。 Vignere Cipher将使用字母键而不是数字键表示:字母A将用于键0,字母B将用于键1,依此类推。 加密过程之前和之后的字母数量如下所示 -
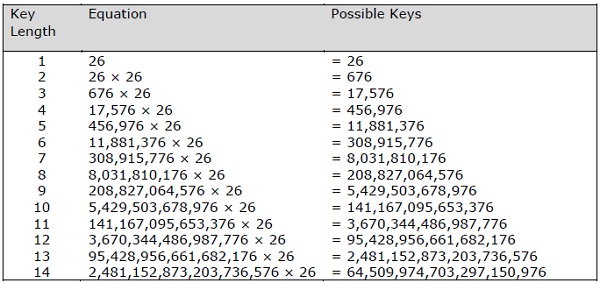
基于Vignere密钥长度的可能密钥数量的可能组合如下给出,其给出了Vignere密码算法的安全性的结果 -
Vignere Tableau
用于Vignere密码的画面如下所示 -

Implementing Vignere Cipher
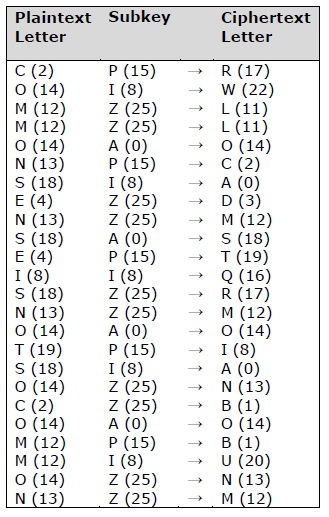
在本章中,让我们了解如何实现Vignere密码。 考虑文本This is basic implementation of Vignere Cipher进行编码,使用的密钥是PIZZA.
Code
您可以使用以下代码在Python中实现Vignere密码 -
import pyperclip
LETTERS = 'ABCDEFGHIJKLMNOPQRSTUVWXYZ'
def main():
   myMessage = "This is basic implementation of Vignere Cipher"
   myKey = 'PIZZA'
   myMode = 'encrypt'
   if myMode == 'encrypt':
      translated = encryptMessage(myKey, myMessage)
   elif myMode == 'decrypt':
      translated = decryptMessage(myKey, myMessage)
   print('%sed message:' % (myMode.title()))
   print(translated)
   print()
def encryptMessage(key, message):
   return translateMessage(key, message, 'encrypt')
def decryptMessage(key, message):
   return translateMessage(key, message, 'decrypt')
def translateMessage(key, message, mode):
   translated = [] # stores the encrypted/decrypted message string
   keyIndex = 0
   key = key.upper()
   for symbol in message:
      num = LETTERS.find(symbol.upper())
      if num != -1:
         if mode == 'encrypt':
            num += LETTERS.find(key[keyIndex])
				elif mode == 'decrypt':
               num -= LETTERS.find(key[keyIndex])
            num %= len(LETTERS)
            if symbol.isupper():
               translated.append(LETTERS[num])
            elif symbol.islower():
               translated.append(LETTERS[num].lower())
            keyIndex += 1
            if keyIndex == len(key):
               keyIndex = 0
         else:
            translated.append(symbol)
      return ''.join(translated)
if __name__ == '__main__':
   main()
输出 (Output)
实现上面给出的代码时,您可以观察到以下输出 -

攻击Vignere密码的可能组合几乎是不可能的。 因此,它被认为是安全加密模式。
One Time Pad Cipher
一次性密码密码是一种Vignere密码,包括以下功能 -
这是一个牢不可破的密码。
密钥与加密的消息长度完全相同。
密钥由随机符号组成。
顾名思义,密钥仅使用一次,并且从不再用于任何其他要加密的消息。
因此,加密消息将容易受到密码分析者的攻击。 用于一次性密码密码的密钥称为pad ,因为它印在纸垫上。
为什么它坚不可摧?
由于以下特点,关键是牢不可破的 -
关键是与给定的消息一样长。
密钥是真正随机的,特别是自动生成的。
密钥和纯文本以模10/26/2计算。
每个密钥应使用一次并由发送方和接收方销毁。
密钥应该有两个副本:一个带有发送者,另一个带有接收者。
加密 Encryption
要加密字母,用户需要在明文下面写一个密钥。 明文字母位于顶部,密钥字母位于左侧。 两个字母之间的横截面是纯文本。 它在下面的例子中描述 -
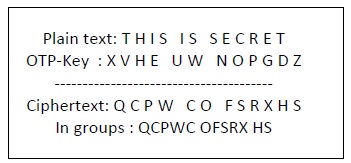
解密(Decryption)
要解密一封信,用户将获取左侧的关键字母,并在该行中找到密文字母。 纯文本字母位于列的顶部,用户可以在其中找到密文字母。
Implementation of One Time Pad Cipher
Python包含一个用于one-time-pad密码密码实现的hacky实现模块。 包名称称为One-Time-Pad,其中包括一个命令行加密工具,该工具使用类似于一次性密码密码算法的加密机制。
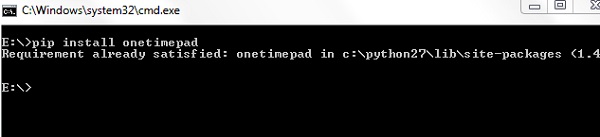
安装 (Installation)
您可以使用以下命令安装此模块 -
pip install onetimepad
如果要从命令行使用它,请运行以下命令 -
onetimepad
Code
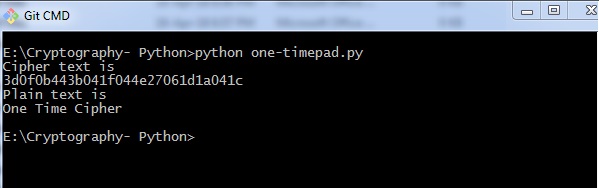
以下代码有助于生成一次性密码密码 -
import onetimepad
cipher = onetimepad.encrypt('One Time Cipher', 'random')
print("Cipher text is ")
print(cipher)
print("Plain text is ")
msg = onetimepad.decrypt(cipher, 'random')
print(msg)
输出 (Output)
运行上面给出的代码时,您可以观察到以下输出 -
Note - 如果密钥长度小于消息长度(纯文本),则加密消息很容易破解。
在任何情况下,密钥不一定是随机的,这使得一次性密码密码成为一种有价值的工具。
Symmetric and Asymmetric Cryptography
在本章中,我们将详细讨论对称和非对称密码术。
对称密码学
在这种类型中,加密和解密过程使用相同的密钥。 它也被称为secret key cryptography 。 对称密码术的主要特征如下 -
- 它更简单,更快捷。
- 双方以安全的方式交换钥匙。
缺点 (Drawback)
对称加密的主要缺点是,如果密钥泄漏给入侵者,则可以轻松更改消息,这被视为风险因素。
Data Encryption Standard (DES)
最流行的对称密钥算法是数据加密标准(DES),Python包括一个包含DES算法背后的逻辑的包。
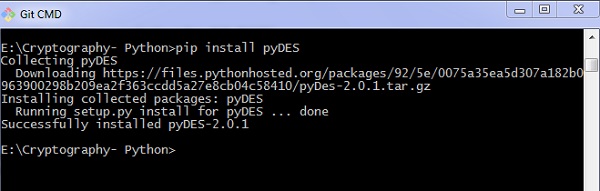
安装 (Installation)
在Python中安装DES包pyDES的命令是 -
pip install pyDES
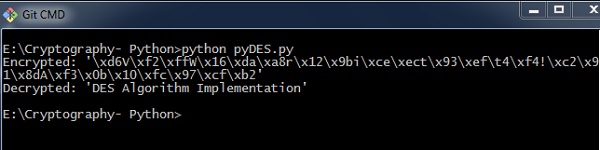
DES算法的简单程序实现如下 -
import pyDes
data = "DES Algorithm Implementation"
k = pyDes.des("DESCRYPT", pyDes.CBC, "\0\0\0\0\0\0\0\0", pad=None, padmode=pyDes.PAD_PKCS5)
d = k.encrypt(data)
print "Encrypted: %r" % d
print "Decrypted: %r" % k.decrypt(d)
assert k.decrypt(d) == data
它要求变量padmode按照DES算法实现获取所有包,并以指定方式遵循加密和解密。
输出 (Output)
作为上面给出的代码的结果,您可以看到以下输出 -
不对称密码学
它也被称为public key cryptography. 它以对称密码学的相反方式工作。 这意味着它需要两个密钥:一个用于加密,另一个用于解密。 公钥用于加密,私钥用于解密。
缺点 (Drawback)
- 由于其密钥长度,它提供较低的加密速度。
- 密钥管理至关重要。
Python中的以下程序代码说明了使用RSA算法及其实现的非对称加密的工作 -
from Crypto import Random
from Crypto.PublicKey import RSA
import base64
def generate_keys():
   # key length must be a multiple of 256 and >= 1024
   modulus_length = 256*4
   privatekey = RSA.generate(modulus_length, Random.new().read)
   publickey = privatekey.publickey()
   return privatekey, publickey
def encrypt_message(a_message , publickey):
   encrypted_msg = publickey.encrypt(a_message, 32)[0]
   encoded_encrypted_msg = base64.b64encode(encrypted_msg)
   return encoded_encrypted_msg
def decrypt_message(encoded_encrypted_msg, privatekey):
   decoded_encrypted_msg = base64.b64decode(encoded_encrypted_msg)
   decoded_decrypted_msg = privatekey.decrypt(decoded_encrypted_msg)
   return decoded_decrypted_msg
a_message = "This is the illustration of RSA algorithm of asymmetric cryptography"
privatekey , publickey = generate_keys()
encrypted_msg = encrypt_message(a_message , publickey)
decrypted_msg = decrypt_message(encrypted_msg, privatekey)
print "%s - (%d)" % (privatekey.exportKey() , len(privatekey.exportKey()))
print "%s - (%d)" % (publickey.exportKey() , len(publickey.exportKey()))
print " Original content: %s - (%d)" % (a_message, len(a_message))
print "Encrypted message: %s - (%d)" % (encrypted_msg, len(encrypted_msg))
print "Decrypted message: %s - (%d)" % (decrypted_msg, len(decrypted_msg))
输出 (Output)
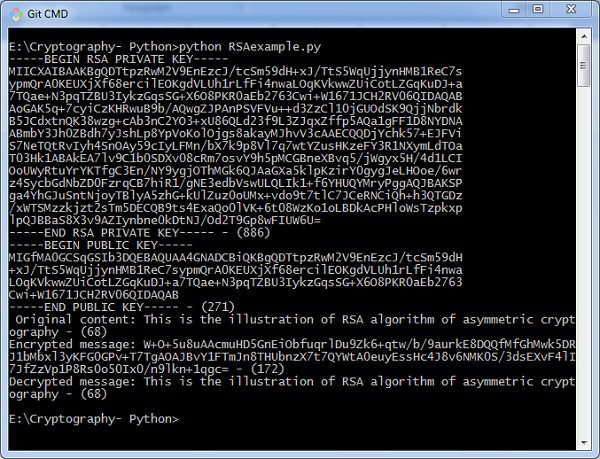
执行上面给出的代码时,您可以找到以下输出 -
Understanding RSA Algorithm
RSA算法是一种公钥加密技术,被认为是最安全的加密方式。 它是由Rivest,Shamir和Adleman于1978年发明的,因此命名为RSA算法。
算法 (Algorithm)
RSA算法具有以下功能 -
RSA算法是包含素数的整数在有限域中的流行取幂。
该方法使用的整数足够大,难以求解。
该算法有两组密钥:私钥和公钥。
您将不得不通过以下步骤来处理RSA算法 -
步骤1:生成RSA模数
初始程序首先选择两个素数,即p和q,然后计算它们的乘积N,如图所示 -
N=p*q
在这里,让N为指定的大数。
第2步:派生数字(e)
将数字e视为派生数,该数字应大于1且小于(p-1)和(q-1)。 主要条件是除了1之外,不应存在(p-1)和(q-1)的共同因子
第3步:公钥
指定的数字对n和e形成RSA公钥,并将其公开。
第4步:私钥
私钥d由数字p,q和e计算。 数字之间的数学关系如下 -
ed = 1 mod (p-1) (q-1)
上述公式是扩展欧几里得算法的基本公式,它以p和q为输入参数。
加密公式
考虑将纯文本消息发送给公钥为(n,e).人的发件人(n,e). 要在给定方案中加密纯文本消息,请使用以下语法 -
C = Pe mod n
解密公式
解密过程非常简单,包括用于系统方法计算的分析。 考虑到接收器C具有私钥d ,结果模数将被计算为 -
Plaintext = Cd mod n
Creating RSA Keys
在本章中,我们将重点介绍使用Python逐步实现RSA算法。
生成RSA密钥
生成RSA密钥涉及以下步骤 -
创建两个大素数,即p和q 。 这些数字的乘积称为n ,其中n= p*q
生成与(p-1)和(q-1).相对素数的随机数(q-1). 将数字称为e 。
计算e的模逆。 计算的倒数将被称为d 。
生成RSA密钥的算法
我们需要两个使用Python生成RSA密钥的主要算法 - Cryptomath module和Rabin Miller module 。
Cryptomath模块
遵循RSA算法的所有基本实现的cryptomath模块的源代码如下 -
def gcd(a, b):
   while a != 0:
      a, b = b % a, a
   return b
def findModInverse(a, m):
   if gcd(a, m) != 1:
      return None
   u1, u2, u3 = 1, 0, a
   v1, v2, v3 = 0, 1, m
   while v3 != 0:
      q = u3 // v3
         v1, v2, v3, u1, u2, u3 = (u1 - q * v1), (u2 - q * v2), (u3 - q * v3), v1, v2, v3
   return u1 % m
RabinMiller模块
遵循RSA算法所有基本实现的RabinMiller模块的源代码如下 -
import random
def rabinMiller(num):
   s = num - 1
   t = 0
   while s % 2 == 0:
      s = s // 2
      t += 1
   for trials in range(5):
      a = random.randrange(2, num - 1)
      v = pow(a, s, num)
      if v != 1:
         i = 0
         while v != (num - 1):
            if i == t - 1:
               return False
            else:
               i = i + 1
               v = (v ** 2) % num
      return True
def isPrime(num):
   if (num 7< 2):
      return False
   lowPrimes = [2, 3, 5, 7, 11, 13, 17, 19, 23, 29, 31, 37, 41, 43, 47, 53, 59, 61,
   67, 71, 73, 79, 83, 89, 97, 101, 103, 107, 109, 113, 127, 131, 137, 139, 149, 151,
   157, 163, 167, 173, 179, 181, 191, 193, 197, 199, 211, 223, 227, 229, 233, 239, 241,
   251, 257, 263, 269, 271, 277, 281, 283, 293, 307, 311, 313,317, 331, 337, 347, 349,
   353, 359, 367, 373, 379, 383, 389, 397, 401, 409, 419, 421, 431, 433, 439, 443, 449,
   457, 461, 463, 467, 479, 487, 491, 499, 503, 509, 521, 523, 541, 547, 557, 563, 569,
   571, 577, 587, 593, 599, 601, 607, 613, 617, 619, 631, 641, 643, 647, 653, 659, 661,
   673, 677, 683, 691, 701, 709, 719, 727, 733, 739, 743, 751, 757, 761, 769, 773, 787,
   797, 809, 811, 821, 823, 827, 829, 839, 853, 857, 859, 863, 877, 881, 883, 887, 907,
   911, 919, 929, 937, 941, 947, 953, 967, 971, 977, 983, 991, 997]
   if num in lowPrimes:
      return True
   for prime in lowPrimes:
      if (num % prime == 0):
         return False
   return rabinMiller(num)
def generateLargePrime(keysize = 1024):
   while True:
      num = random.randrange(2**(keysize-1), 2**(keysize))
      if isPrime(num):
         return num
生成RSA密钥的完整代码如下 -
import random, sys, os, rabinMiller, cryptomath
def main():
   makeKeyFiles('RSA_demo', 1024)
def generateKey(keySize):
   # Step 1: Create two prime numbers, p and q. Calculate n = p * q.
   print('Generating p prime...')
   p = rabinMiller.generateLargePrime(keySize)
   print('Generating q prime...')
   q = rabinMiller.generateLargePrime(keySize)
   n = p * q
   # Step 2: Create a number e that is relatively prime to (p-1)*(q-1).
   print('Generating e that is relatively prime to (p-1)*(q-1)...')
   while True:
      e = random.randrange(2 ** (keySize - 1), 2 ** (keySize))
      if cryptomath.gcd(e, (p - 1) * (q - 1)) == 1:
         break
   # Step 3: Calculate d, the mod inverse of e.
   print('Calculating d that is mod inverse of e...')
   d = cryptomath.findModInverse(e, (p - 1) * (q - 1))
   publicKey = (n, e)
   privateKey = (n, d)
   print('Public key:', publicKey)
   print('Private key:', privateKey)
   return (publicKey, privateKey)
def makeKeyFiles(name, keySize):
   # Creates two files 'x_pubkey.txt' and 'x_privkey.txt'
      (where x is the value in name) with the the n,e and d,e integers written in them,
   # delimited by a comma.
   if os.path.exists('%s_pubkey.txt' % (name)) or os.path.exists('%s_privkey.txt' % (name)):
      sys.exit('WARNING: The file %s_pubkey.txt or %s_privkey.txt already exists! Use a different name or delete these files and re-run this program.' % (name, name))
   publicKey, privateKey = generateKey(keySize)
   print()
   print('The public key is a %s and a %s digit number.' % (len(str(publicKey[0])), len(str(publicKey[1]))))
   print('Writing public key to file %s_pubkey.txt...' % (name))
   fo = open('%s_pubkey.txt' % (name), 'w')
	fo.write('%s,%s,%s' % (keySize, publicKey[0], publicKey[1]))
   fo.close()
   print()
   print('The private key is a %s and a %s digit number.' % (len(str(publicKey[0])), len(str(publicKey[1]))))
   print('Writing private key to file %s_privkey.txt...' % (name))
   fo = open('%s_privkey.txt' % (name), 'w')
   fo.write('%s,%s,%s' % (keySize, privateKey[0], privateKey[1]))
   fo.close()
# If makeRsaKeys.py is run (instead of imported as a module) call
# the main() function.
if __name__ == '__main__':
   main()
输出 (Output)
生成公钥和私钥并将其保存在各自的文件中,如以下输出所示。

RSA Cipher Encryption
在本章中,我们将重点介绍RSA密码加密的不同实现及其所涉及的功能。 您可以引用或包含此python文件以实现RSA密码算法实现。
加密算法包含的模块如下 -
from Crypto.PublicKey import RSA
from Crypto.Cipher import PKCS1_OAEP
from Crypto.Signature import PKCS1_v1_5
from Crypto.Hash import SHA512, SHA384, SHA256, SHA, MD5
from Crypto import Random
from base64 import b64encode, b64decode
hash = "SHA-256"
为了更好的安全性,我们将哈希值初始化为SHA-256。 我们将使用函数使用以下代码生成新密钥或一对公钥和私钥。
def newkeys(keysize):
   random_generator = Random.new().read
   key = RSA.generate(keysize, random_generator)
   private, public = key, key.publickey()
   return public, private
def importKey(externKey):
   return RSA.importKey(externKey)
对于加密,使用以下函数,该函数遵循RSA算法 -
def encrypt(message, pub_key):
   cipher = PKCS1_OAEP.new(pub_key)
   return cipher.encrypt(message)
两个参数是必需的: message和pub_key引用公钥。 公钥用于加密,私钥用于解密。
加密程序的完整程序如下所述 -
from Crypto.PublicKey import RSA
from Crypto.Cipher import PKCS1_OAEP
from Crypto.Signature import PKCS1_v1_5
from Crypto.Hash import SHA512, SHA384, SHA256, SHA, MD5
from Crypto import Random
from base64 import b64encode, b64decode
hash = "SHA-256"
def newkeys(keysize):
   random_generator = Random.new().read
   key = RSA.generate(keysize, random_generator)
   private, public = key, key.publickey()
   return public, private
def importKey(externKey):
   return RSA.importKey(externKey)
def getpublickey(priv_key):
   return priv_key.publickey()
def encrypt(message, pub_key):
   cipher = PKCS1_OAEP.new(pub_key)
   return cipher.encrypt(message)
RSA Cipher Decryption
本章是前一章的延续,我们使用RSA算法逐步实现加密,并详细讨论它。
用于解密密文的函数如下 -
def decrypt(ciphertext, priv_key):
   cipher = PKCS1_OAEP.new(priv_key)
   return cipher.decrypt(ciphertext)
对于公钥加密或非对称密钥加密,重要的是保持两个重要的功能,即Authentication和Authorization 。
授权 (Authorization)
授权是确认发件人是唯一传送邮件的人的过程。 以下代码解释了这一点 -
def sign(message, priv_key, hashAlg="SHA-256"):
   global hash
   hash = hashAlg
   signer = PKCS1_v1_5.new(priv_key)
   if (hash == "SHA-512"):
      digest = SHA512.new()
   elif (hash == "SHA-384"):
      digest = SHA384.new()
   elif (hash == "SHA-256"):
      digest = SHA256.new()
   elif (hash == "SHA-1"):
      digest = SHA.new()
   else:
      digest = MD5.new()
   digest.update(message)
   return signer.sign(digest)
身份验证 (Authentication)
验证方法可以通过验证方法进行验证,如下所述 -
def verify(message, signature, pub_key):
   signer = PKCS1_v1_5.new(pub_key)
   if (hash == "SHA-512"):
      digest = SHA512.new()
   elif (hash == "SHA-384"):
      digest = SHA384.new()
   elif (hash == "SHA-256"):
      digest = SHA256.new()
   elif (hash == "SHA-1"):
      digest = SHA.new()
   else:
      digest = MD5.new()
   digest.update(message)
   return signer.verify(digest, signature)
验证数字签名以及发件人和收件人的详细信息。 为安全起见,这增加了更多的重量年龄。
RSA密码解密
您可以使用以下代码进行RSA密码解密 -
from Crypto.PublicKey import RSA
from Crypto.Cipher import PKCS1_OAEP
from Crypto.Signature import PKCS1_v1_5
from Crypto.Hash import SHA512, SHA384, SHA256, SHA, MD5
from Crypto import Random
from base64 import b64encode, b64decode
hash = "SHA-256"
def newkeys(keysize):
   random_generator = Random.new().read
   key = RSA.generate(keysize, random_generator)
   private, public = key, key.publickey()
   return public, private
def importKey(externKey):
   return RSA.importKey(externKey)
def getpublickey(priv_key):
   return priv_key.publickey()
def encrypt(message, pub_key):
   cipher = PKCS1_OAEP.new(pub_key)
   return cipher.encrypt(message)
def decrypt(ciphertext, priv_key):
   cipher = PKCS1_OAEP.new(priv_key)
   return cipher.decrypt(ciphertext)
def sign(message, priv_key, hashAlg = "SHA-256"):
   global hash
   hash = hashAlg
   signer = PKCS1_v1_5.new(priv_key)
   if (hash == "SHA-512"):
      digest = SHA512.new()
   elif (hash == "SHA-384"):
      digest = SHA384.new()
   elif (hash == "SHA-256"):
      digest = SHA256.new()
   elif (hash == "SHA-1"):
      digest = SHA.new()
   else:
      digest = MD5.new()
   digest.update(message)
   return signer.sign(digest)
def verify(message, signature, pub_key):
   signer = PKCS1_v1_5.new(pub_key)
   if (hash == "SHA-512"):
      digest = SHA512.new()
   elif (hash == "SHA-384"):
      digest = SHA384.new()
   elif (hash == "SHA-256"):
      digest = SHA256.new()
   elif (hash == "SHA-1"):
      digest = SHA.new()
   else:
      digest = MD5.new()
   digest.update(message)
   return signer.verify(digest, signature)
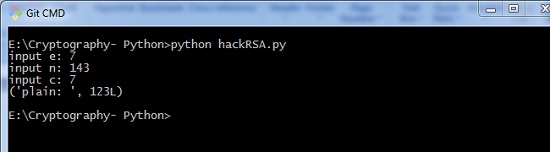
Hacking RSA Cipher
使用小素数可能会破坏RSA密码,但如果使用大数字则认为是不可能的。 说明为何难以入侵RSA密码的原因如下 -
蛮力攻击不会起作用,因为有太多可能的钥匙要通过。 而且,这会消耗大量时间。
字典攻击在RSA算法中不起作用,因为键是数字的,并且不包含任何字符。
由于单个加密块表示各种字符,因此很难遵循字符的频率分析。
破解RSA密码没有具体的数学技巧。
RSA解密方程是 -
M = C^d mod n
在小素数的帮助下,我们可以尝试破解RSA密码,下面提到了相同的示例代码 -
def p_and_q(n):
   data = []
   for i in range(2, n):
      if n % i == 0:
         data.append(i)
   return tuple(data)
def euler(p, q):
   return (p - 1) * (q - 1)
def private_index(e, euler_v):
   for i in range(2, euler_v):
      if i * e % euler_v == 1:
         return i
def decipher(d, n, c):
   return c ** d % n
	def main():
      e = int(input("input e: "))
      n = int(input("input n: "))
      c = int(input("input c: "))
      # t = 123
      # private key = (103, 143)
      p_and_q_v = p_and_q(n)
      # print("[p_and_q]: ", p_and_q_v)
      euler_v = euler(p_and_q_v[0], p_and_q_v[1])
      # print("[euler]: ", euler_v)
      d = private_index(e, euler_v)
      plain = decipher(d, n, c)
      print("plain: ", plain)
if __name__ == "__main__":
   main()
输出 (Output)
上面的代码产生以下输出 -