JavaFX - 快速指南
JavaFX - Overview
Rich Internet Applications是那些提供与桌面应用程序类似的功能和体验的Web应用程序。 与用户的普通Web应用程序相比,它们提供了更好的视觉体验。 这些应用程序作为浏览器插件或虚拟机提供,用于将传统静态应用程序转换为更加增强,流畅,动画和引人入胜的应用程序。
与传统桌面应用程序不同,RIA不需要运行任何其他软件。 作为替代方案,您应该安装ActiveX,Java,Flash等软件,具体取决于应用程序。
在RIA中,图形表示在客户端处理,因为它有一个插件,可以提供对丰富图形的支持。 简而言之,RIA中的数据操作是在服务器端执行的,而相关的对象操作是在客户端执行的。
我们有三种主要技术可用于开发RIA。 这些包括以下内容 -
- Adobe Flash
- Microsoft Silverlight
- JavaFX
Adobe Flash
该软件平台由Adobe Systems开发,用于创建富Internet应用程序。 除此之外,您还可以构建其他应用程序,如矢量,动画,浏览器游戏,桌面应用程序,移动应用程序和游戏等。
这是开发和执行RIA的最常用平台,桌面浏览器的渗透率为96%。
Microsoft Silverlight
就像Adobe Flash一样,Microsoft Silverlight也是一个用于开发和执行富Internet应用程序的软件应用程序框架。 最初,此框架用于流媒体。 目前的版本也支持多媒体,图形和动画。
这个平台很少使用桌面浏览器的渗透率为66%。
JavaFX
JavaFX是一个Java库,您可以使用它来开发富Internet应用程序。 通过使用Java技术,这些应用程序的浏览器渗透率为76%。
什么是JavaFX?
JavaFX是用于构建富Internet应用程序的Java库。 使用此库编写的应用程序可以跨多个平台一致地运行。 使用JavaFX开发的应用程序可以在各种设备上运行,例如台式计算机,移动电话,电视,平板电脑等。
要使用Java编程语言开发GUI Applications程序,程序员依赖于诸如Advanced Windowing Toolkit和Swing 。 在JavaFX出现之后,这些Java程序员现在可以使用丰富的内容有效地开发GUI应用程序。
需要JavaFX
为了开发具有丰富功能的Client Side Applications ,程序员过去依赖于各种库来添加诸如媒体,UI控件,Web,2D和3D等功能.JavaFX在单个库中包含所有这些功能。 除此之外,开发人员还可以访问Java库的现有功能,例如Swing 。
JavaFX提供了丰富的图形和媒体API,并通过硬件加速图形利用现代Graphical Processing Unit 。 JavaFX还提供了接口,开发人员可以使用这些接口组合图形动画和UI控件。
可以将JavaFX与基于JVM的技术一起使用,例如Java,Groovy和JRuby。 如果开发人员选择JavaFX,则无需学习其他技术,因为任何上述技术的先验知识都足以使用JavaFX开发RIA。
JavaFX的功能
以下是JavaFX的一些重要功能 -
Written in Java - JavaFX库是用Java编写的,可用于可在JVM上执行的语言,包括Java, Groovy and JRuby 。 这些JavaFX应用程序也与平台无关。
FXML - JavaFX使用称为FXML的语言,它是一种类似于声明性标记语言的HTML。 此语言的唯一目的是定义用户界面。
Scene Builder - JavaFX提供名为Scene Builder的应用程序。 在将此应用程序集成到IDE(例如Eclipse和NetBeans)中时,用户可以访问拖放设计界面,该界面用于开发FXML应用程序(就像Swing Drag&Drop和DreamWeaver应用程序一样)。
Swing Interoperability - 在JavaFX应用程序中,您可以使用Swing Node类嵌入Swing内容。 同样,您可以使用嵌入式Web内容和丰富的图形媒体等JavaFX功能更新现有的Swing应用程序。
Built-in UI controls - JavaFX库提供UI控件,使用它可以开发功能齐全的应用程序。
CSS like Styling这样的CSS - JavaFX提供了类似样式的CSS。 通过使用它,您可以通过简单的CSS知识改进应用程序的设计。
Canvas and Printing API - JavaFX提供了Canvas,一种即时模式的渲染API。 在包javafx.scene.canvas它包含一组canvas类,我们可以使用它直接在JavaFX场景的区域内绘制。 JavaFX还在包javafx.print提供用于打印目的的类。
Rich set of API’s - JavaFX库提供了丰富的API来开发GUI应用程序,2D和3D图形等。这套API还包括Java平台的功能。 因此,使用此API,您可以访问Java语言的功能,如泛型,注释,多线程和Lambda表达式。 传统的Java Collections库得到了增强,其中包含了可观察List and Map等概念。 使用这些,用户可以观察数据模型中的变化。
Integrated Graphics library - JavaFX提供2d和3d图形的类。
Graphics pipeline - JavaFX支持基于硬件加速图形管道(称为Prism)的图形。 与支持的图形卡或GPU一起使用时,它可提供流畅的图形。 如果系统不支持图形卡,则棱镜默认为软件渲染堆栈。
JavaFX的历史
JavaFX最初是由Chris Oliver开发的,当时他在一家名为See Beyond Technology Corporation的公司工作,该公司后来在2005年被Sun Microsystems收购。
以下几点为我们提供了有关该项目的更多信息 -
最初这个项目被命名为F3 (Form Follows Functions) ,它的开发旨在为开发GUI应用程序提供更丰富的界面。
Sun Microsystems于2005年6月收购了See Beyond公司,它将F3项目改编为JavaFX 。
在2007年,JavaFX在Java One正式宣布,这是一个每年举行的万维网会议。
在2008年,可以使用与JavaFX集成的Net Beans 。 同年,JavaFX 1.0 Java Standard Development Kit发布。
在2009年,甲骨文公司收购了Sun Microsystems,并在同一年发布了下一版JavaFX(1.2)。
在2010年,JavaFX 1.3问世,2011年JavaFX 2.0发布。
最新版本JavaFX8于2014年3月18日作为Java的一个组成部分发布。
JavaFX - Environment
从Java8开始,JDK (Java Development Kit)包含JavaFX库。 因此,要运行JavaFX应用程序,只需在系统中安装Java8或更高版本即可。
除此之外,像Eclipse和NetBeans这样的IDE提供了对JavaFX的支持。 本章将教您如何设置环境以各种方式运行JavaFX应用程序。
安装Java8
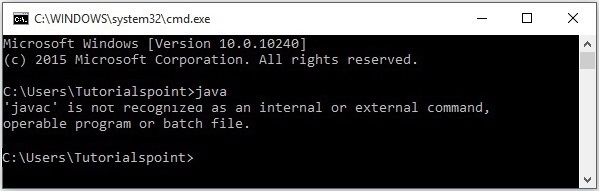
首先,您必须通过打开命令提示符并在其中键入命令“Java”来验证系统中是否存在Java Installed。
如果尚未在系统中安装Java,则命令提示符将显示以下屏幕截图中显示的消息。
然后按照下面给出的步骤安装Java。
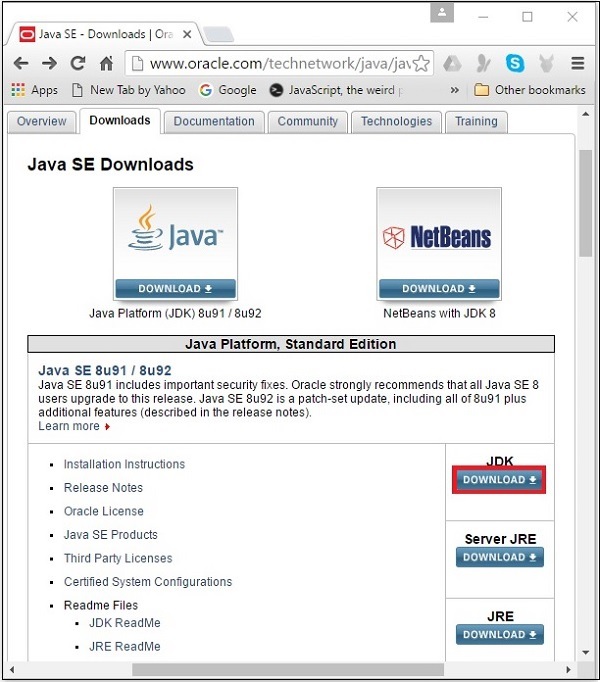
Step 1 - 访问JavaSE下载页面,单击下面屏幕截图中突出显示的JDK Download按钮
Step 2 - 单击“下载”按钮,您将被重定向到Java SE Development Kit 8 Downloads页面。 此页面提供了各种平台的JDK链接。
接受许可协议,然后单击其相应链接下载所需的软件。
例如,如果您正在使用Windows 64位操作系统,则需要下载以下屏幕截图中突出显示的JDK版本。
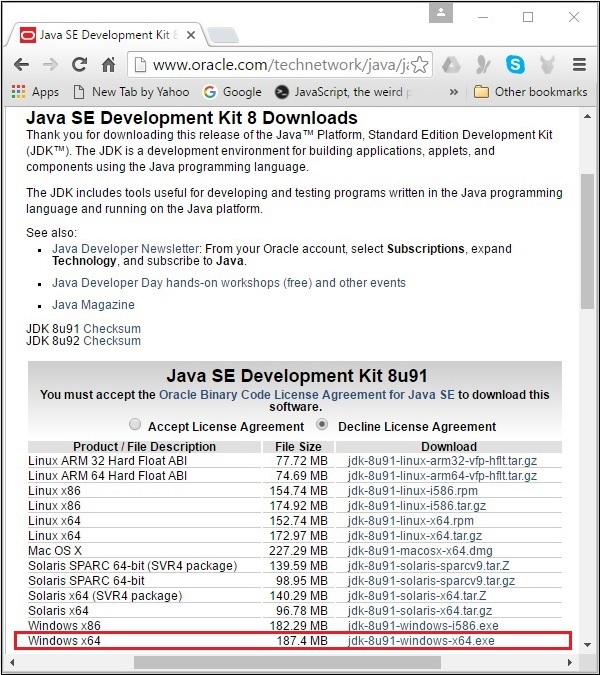
单击突出显示的链接后,适用于Windows 64位操作系统的Java8开发工具包将下载到您的系统中。
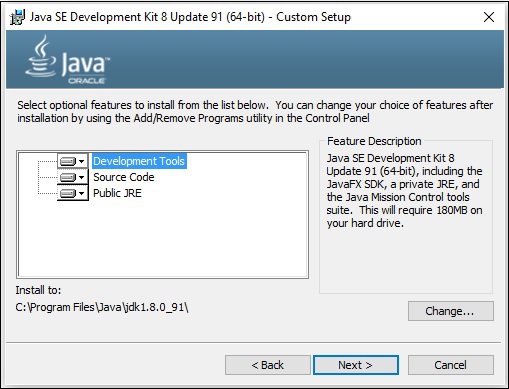
Step 3 - 运行下载的二进制可执行文件以开始安装JDK8。

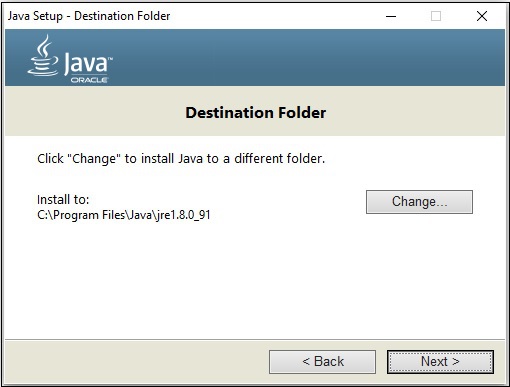
Step 4 - 选择安装目录。
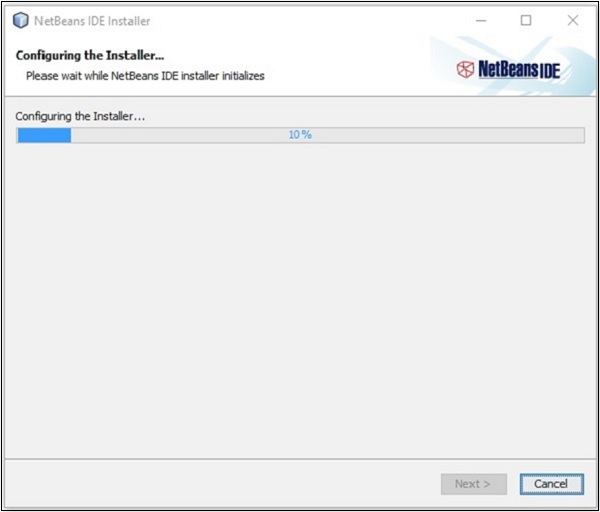
Step 5 - 在选择目标文件夹并单击下一步时,JavaFX安装过程开始显示进度条,如以下屏幕截图所示。

Step 6 - 如果需要,更改安装目录,否则保留默认目录并继续。
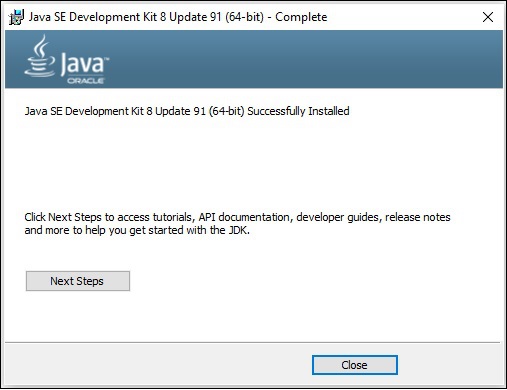
Step 7 - 单击关闭按钮完成安装过程,如以下屏幕截图所示。
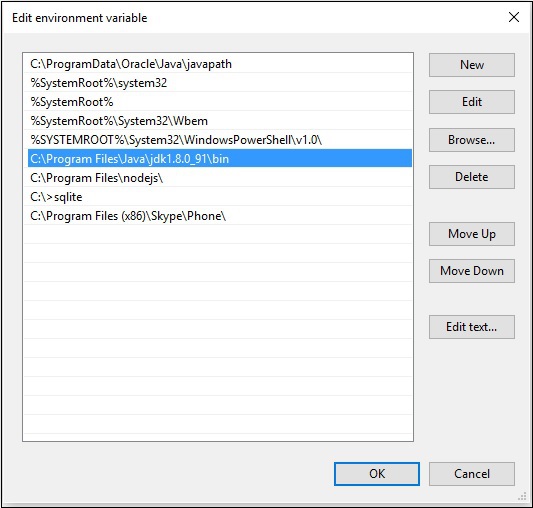
设置Windows路径
安装Java后,需要设置路径变量。 假设您已在C:\Program Files\java\jdk1.8.0_91目录中安装了Java。
现在,您可以按照以下步骤进行操作 -
右键单击“我的电脑”,然后选择“属性”。
单击“高级”选项卡下的“环境变量”按钮。
现在,更改'Path'变量,使其也包含Java可执行文件的路径。 例如,如果路径当前设置为“C:\WINDOWS\SYSTEM32”,则将路径更改为“C:\WINDOWS\SYSTEM32; C:\Program Files\java\jdk1.8.0_91\bin'。
设置JavaFX的NetBeans环境
NetBeans8为JavaFX提供内置支持。 安装它时,您可以创建一个JavaFX应用程序,而无需任何其他插件或JAR文件。 要设置NetBeans环境,您需要按照下面给出的步骤进行操作。
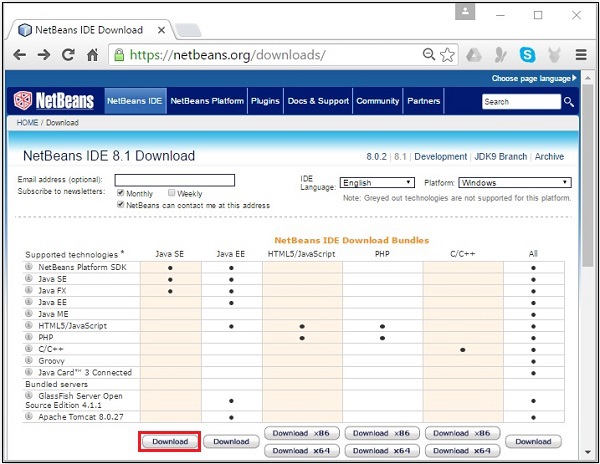
Step 1 - 访问NetBeans网站 NetBeans网站,然后单击“下载”按钮以下载NetBeans软件。

Step 2 - 单击“ Download ,您将进入NetBeans软件的“下载”页面,该软件为各种Java应用程序提供NetBeans软件包。 下载适用于JavaSE的NetBeans软件,如以下屏幕截图所示。
Step 3 - 单击此按钮,将在您的系统上下载名为netbeans-8.0-windows.exe的文件。 运行此文件以进行安装。 运行此文件时,将启动NetBeans安装程序,如以下屏幕截图所示。
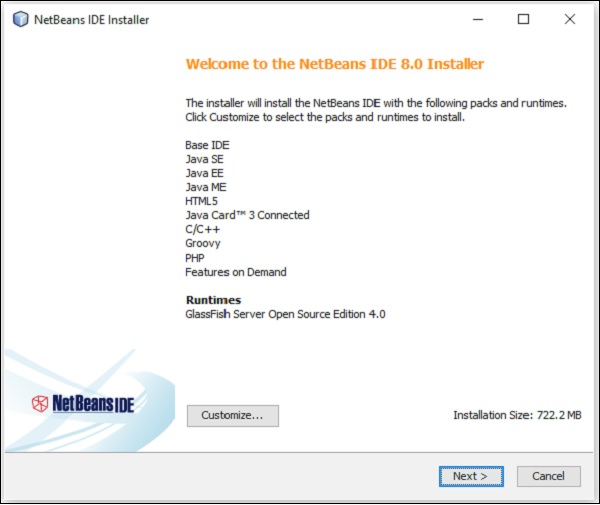
完成配置后,您将看到Welcome Page of the installer的Welcome Page of the installer 。
Step 4 - 单击“下一步”按钮继续安装。
Step 5 - 下一个窗口包含NETBEANS IDE 8.0 license agreement 。 仔细阅读并通过选中“我接受许可协议中的条款”复选框接受协议,然后单击“ Next按钮。

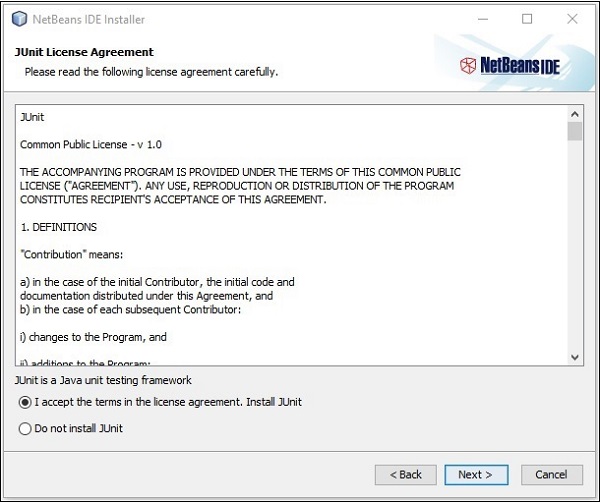
Step 6 - 在下一个窗口中,您将看到Junit的许可协议,通过选择“我接受许可协议中的条款,安装JUnit”中的单选按钮接受它,然后单击Next 。
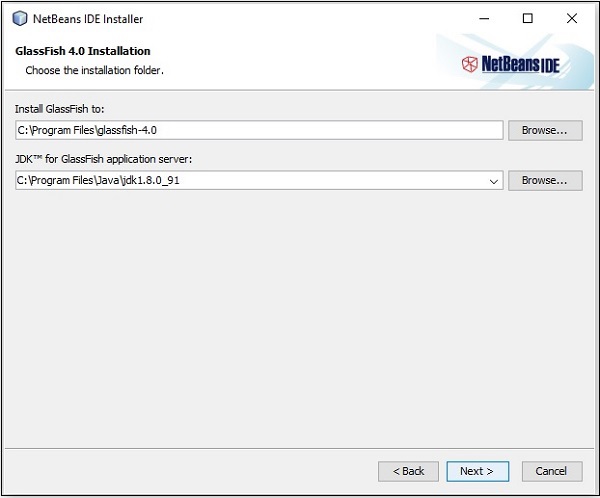
Step 7 - 选择您需要安装Netbeans 8.0的目标目录。 此外,您还可以浏览系统中安装Java Development Kit的目录,然后单击Next按钮。
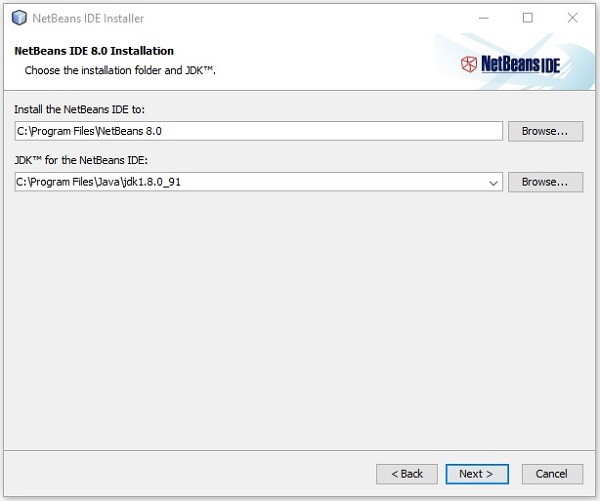
Step 8 - 同样,选择Glassfish Server安装的目标目录。 浏览Java Development Kit目录(现在是Glassfish Reference),然后单击Next 。
Step 9 - 选中Check for Updates框以获取自动更新,然后单击Install按钮开始安装。

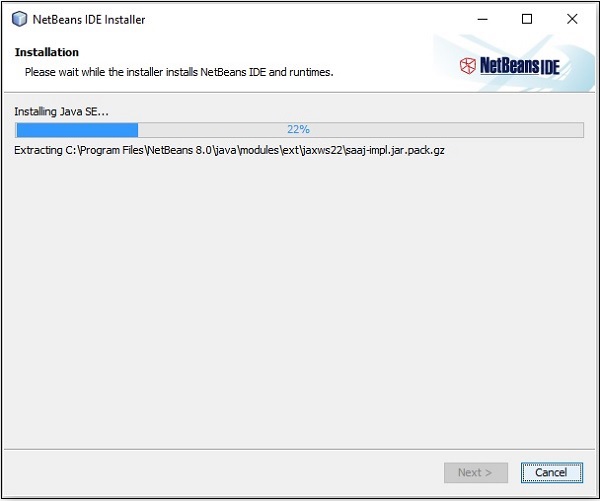
Step 10 - 此步骤开始安装NetBeans IDE 8.0,可能需要一段时间。
Step 11 - 完成该过程后,单击“ Finish按钮完成安装。
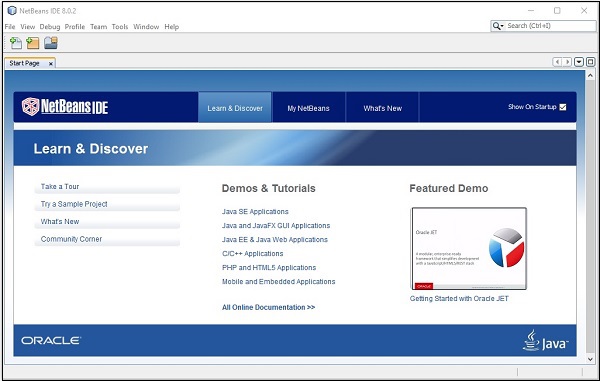
Step 12 - 启动NetBeans IDE后,您将看到如以下屏幕截图所示的起始页面。
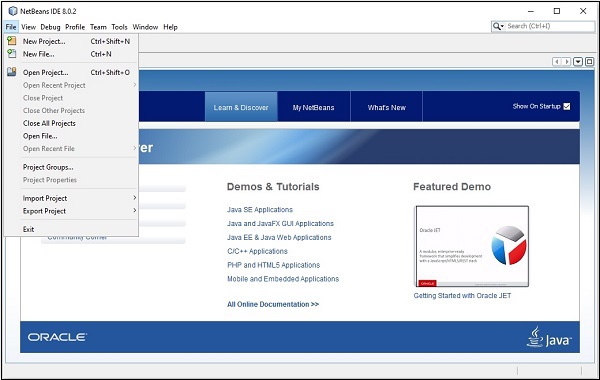
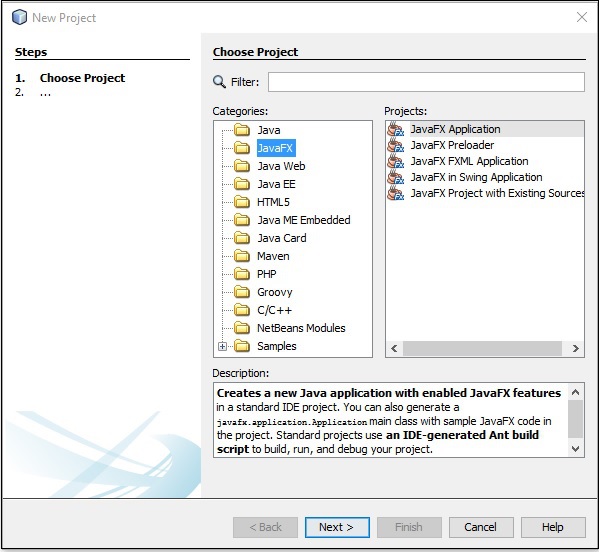
Step 13 - 在文件菜单中,选择New Project ...以打开New project向导,如以下屏幕截图所示。
Step 14 - 在New Project向导中,选择JavaFX并单击Next 。 它开始为您创建一个新的JavaFX应用程序。
Step 15 - 在NewJavaFX Application窗口中选择项目名称和项目位置,然后单击Finish 。 它创建一个具有给定名称的示例应用程序。
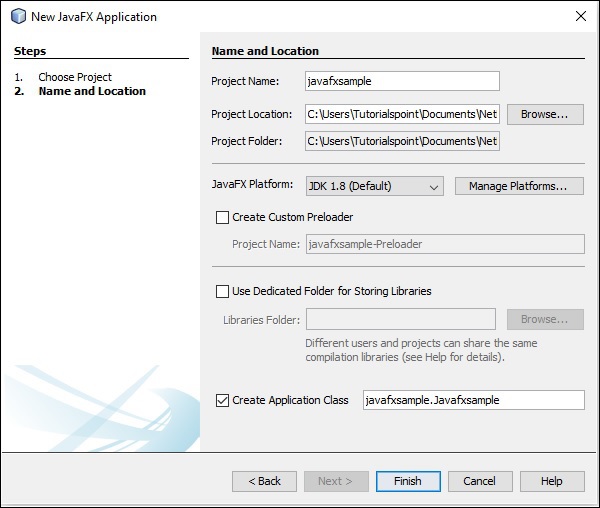
在此实例中,将创建名为javafxsample的应用程序。 在此应用程序中,NetBeans IDE将生成名为Javafxsample.java的Java程序。 如以下屏幕截图所示,此程序将在NetBeans源包→ javafxsample 。

Step 16 - 右键单击该文件,然后选择Run File以运行此代码,如以下屏幕截图所示。
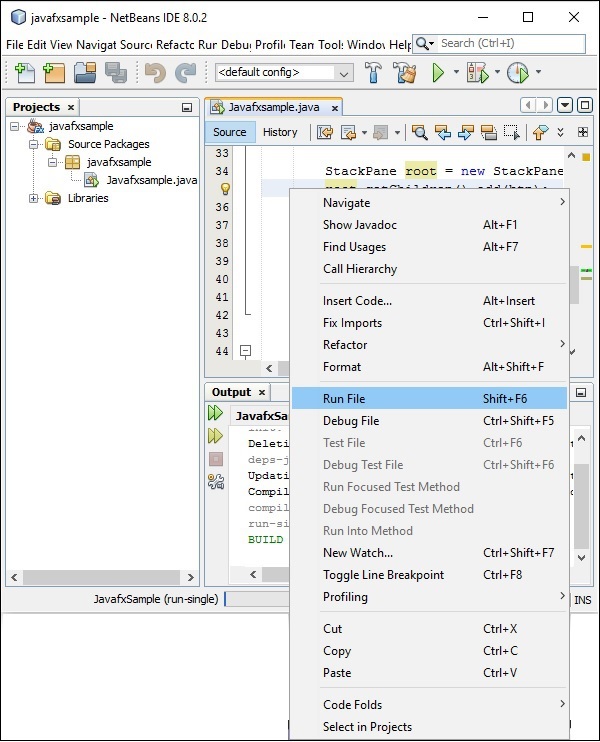
这个自动创建的程序包含生成一个简单的JavaFX窗口的代码,该窗口中有一个标签为Say 'Hello World'的按钮。 每次单击此按钮时,字符串Hello World都将显示在控制台上,如下所示。
在Eclipse中安装JavaFX
JavaFX中也提供了名为e(fx) clipse的插件。 您可以使用以下步骤在Eclipse中设置JavaFX。 首先,确保您的系统中有Eclipse。 如果没有,请在系统中下载并安装Eclipse。
安装Eclipse后,请按照以下步骤在系统中安装e(fx)clipse 。
Step 1 - 在“ Help菜单中打开Eclipse,然后选择“ Install New Software ...”选项,如下所示。
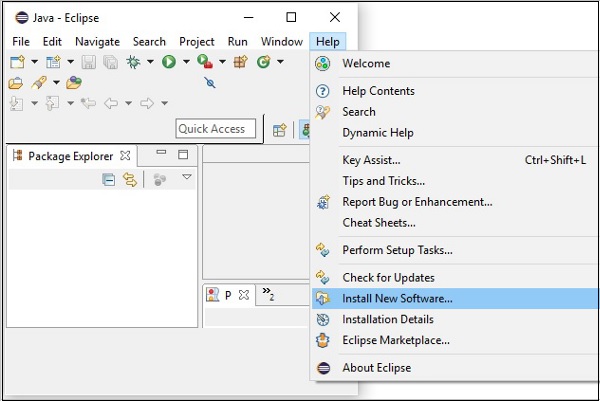
单击后,将显示“ Available Software窗口,如以下屏幕截图所示。
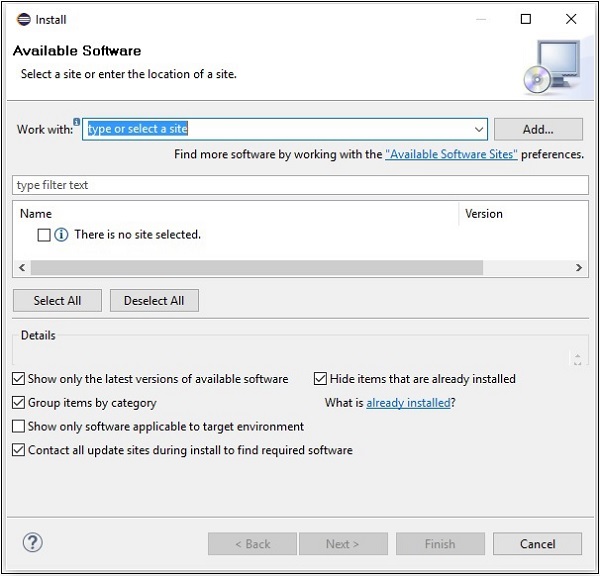
在“ Work with此窗口”文本框中,您需要提供所需软件插件的链接。
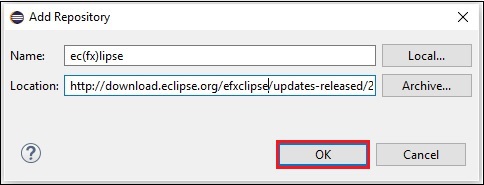
Step 2 - 单击“ Add ...”按钮。 提供插件的名称为e(fx)clipse 。 接下来,提供以下链接作为位置。 http://download.eclipse.org/efxclipse/updates-released/2.3.0/site/
Step 3 - 指定插件的名称和位置后,单击“确定”按钮,如以下屏幕截图中所示。
Step 4 - 添加插件后不久,您会发现e(fx)clipse – install两个复选框e(fx)clipse – install和e(fx)clipse – single components 。 选中这两个复选框,然后单击Add ...按钮,如以下屏幕截图所示。
clipse_single_components.jpg)
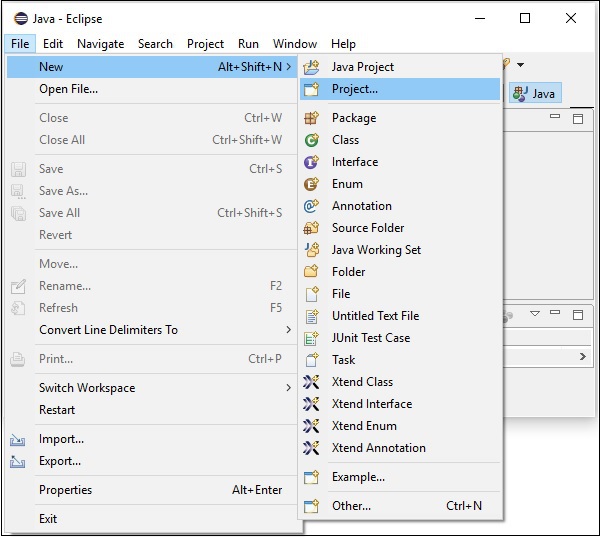
Step 5 - 接下来,打开Eclipse IDE。 单击“文件”菜单,然后选择“项目”,如以下屏幕截图所示。
Step 6 - 然后,您将看到一个窗口,您可以在其中查看Eclipse提供的向导列表以创建项目。 展开JavaFX向导,选择JavaFX Project并单击Next按钮,如以下屏幕截图所示。
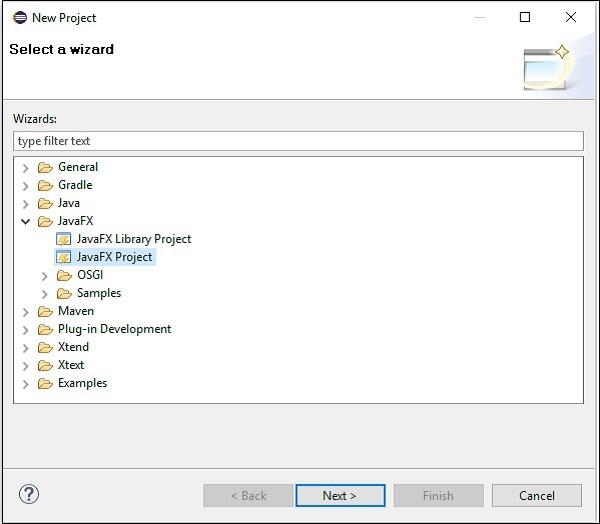
Step 7 - 单击“ Next ,将打开“新建项目向导”。 在这里,您可以键入所需的项目名称,然后单击“ Finish 。
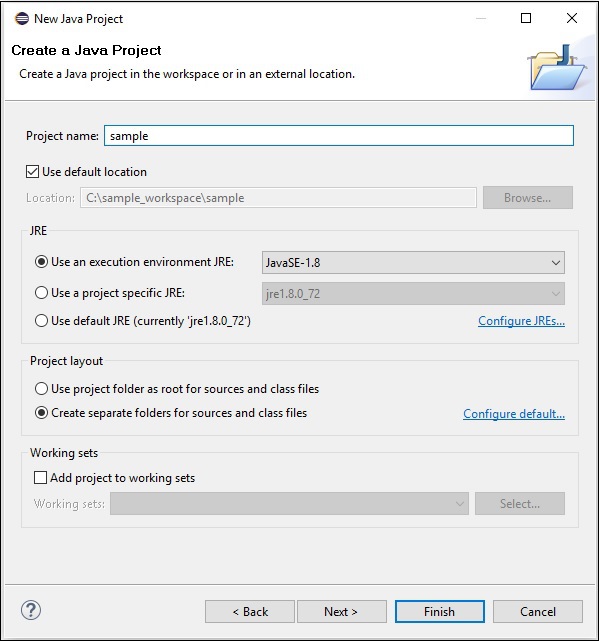
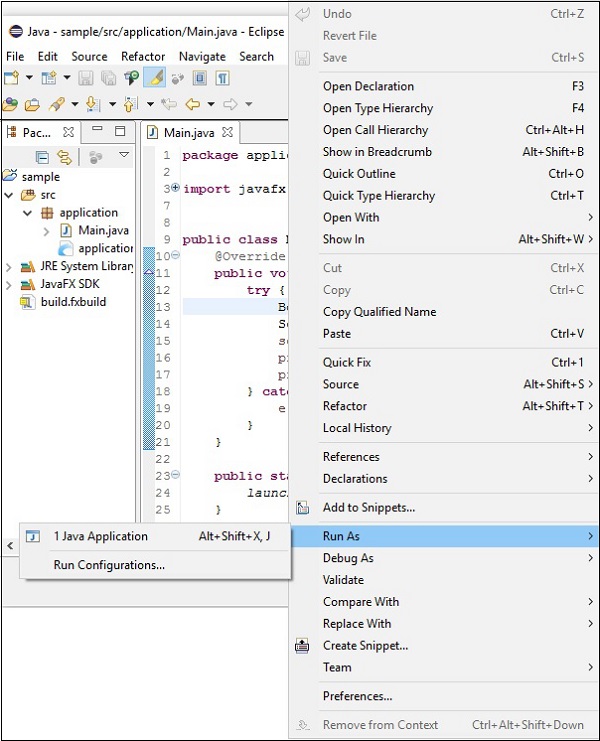
Step 8 - 单击“完成”后,将使用给定名称(样本)创建应用程序。 在名为application的子包中,生成名为Main.java的程序,如下所示。

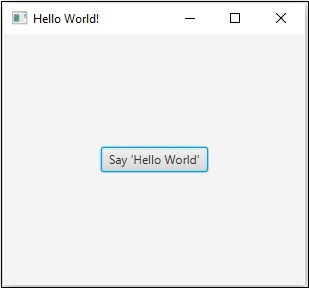
Step 9 - 这个自动生成的程序包含生成空JavaFX窗口的代码。 右键单击此文件,选择Run As → Java Application ,如以下屏幕截图所示。
在执行此应用程序时,它会为您提供一个空的JavaFX窗口,如下所示。
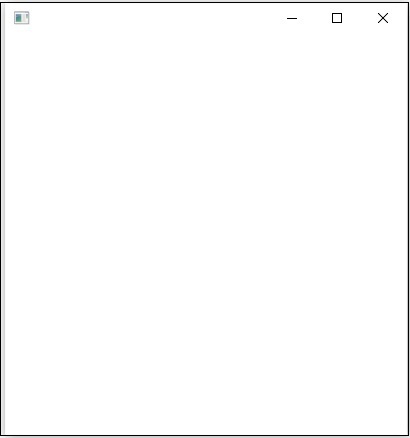
Note - 我们将在后面的章节中讨论有关代码的更多信息。
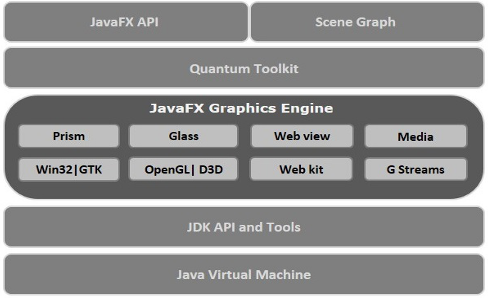
JavaFX - Architecture
JavaFX提供了一个完整的API,其中包含一组丰富的类和接口,用于构建具有丰富图形的GUI应用程序。 这个API的重要包是 -
javafx.animation - 包含用于向JavaFX节点添加基于过渡的动画(如填充,淡入淡出,旋转,缩放和平移)的类。
javafx.application - 包含一组负责JavaFX应用程序生命周期的类。
javafx.css - 包含用于向JavaFX GUI应用程序添加类似CSS样式的类。
javafx.event - 包含用于传递和处理JavaFX事件的类和接口。
javafx.geometry - 包含用于定义2D对象并对其执行操作的类。
javafx.stage - 此包包含JavaFX应用程序的顶级容器类。
javafx.scene - 此包提供了支持场景图的类和接口。 此外,它还提供了子包,如画布,图表,控件,效果,图像,输入,布局,媒体,绘画,形状,文本,转换,Web等。有几个组件支持JavaFX丰富的API 。
下图显示了JavaFX API的体系结构。 在这里,您可以看到支持JavaFX API的组件。
场景图
在JavaFX中,GUI应用程序使用场景图编码。 场景图是构建GUI应用程序的起点。 它包含称为节点的(GUI)应用程序基元。
节点是可视/图形对象,它可能包括 -
Geometrical (Graphical) objects - (2D和3D),如圆形,矩形,多边形等。
UI controls - 例如Button,Checkbox,Choice box,Text Area等。
Containers - (布局窗格),例如Border Pane,Grid Pane,Flow Pane等。
Media elements - 例如音频,视频和图像对象。
通常,节点集合形成场景图。 所有这些节点按层次顺序排列,如下所示。

场景图中的每个节点都有一个父节点,而不包含任何父root node称为root node 。
同样,每个节点都有一个或多个子节点,没有子节点的节点称为leaf node ; 具有子节点的节点被称为branch node 。
节点实例只能添加到场景图一次。 场景图的节点可以具有效果,不透明度,变换,事件处理程序,事件处理程序,应用程序特定状态。
Prism
Prism是一种high performance hardware–accelerated graphical pipeline ,用于在JavaFX中渲染图形。 它可以渲染2-D和3-D图形。
为了渲染图形,Prism使用 -
- Windows XP和Vista上的DirectX 9。
- Windows 7上的DirectX 11。
- Mac和Linux上的OpenGL,嵌入式系统。
如果系统上的图形硬件支持不足,则Prism使用软件渲染路径处理图形。
与支持的图形卡或GPU一起使用时,它可以提供更流畅的图形。 如果系统不支持图形卡,则Prism默认为软件渲染堆栈(以上两者之一)。
GWT (Glass Windowing Toolkit)
顾名思义,GWT提供管理Windows,定时器,曲面和事件队列的服务。 GWT将JavaFX平台连接到本机操作系统。
量子工具包
它是对Prism,Glass,Media Engine和Web Engine的低级组件的抽象。 它将Prism和GWT结合在一起,并将它们提供给JavaFX。
WebView
使用JavaFX,您还可以将HTML内容嵌入到场景图中。 WebView是JavaFX的组件,用于处理此内容。 它使用一种名为Web Kit的技术,这是一种内部开源Web浏览器引擎。 该组件支持不同的Web技术,如HTML5,CSS,JavaScript,DOM和SVG。
使用WebView,您可以 -
- 从本地或远程URL呈现HTML内容。
- 支持历史记录并提供后退和前进导航。
- 重新加载内容。
- 将效果应用于Web组件。
- 编辑HTML内容。
- 执行JavaScript命令。
- 处理事件。
通常,使用WebView,您可以从Java控制Web内容。
媒体引擎
JavaFX media engine基于称为Streamer的开源引擎。 该媒体引擎支持视频和音频内容的回放。
JavaFX媒体引擎为以下文件格式的音频提供支持 -
| Audio |
|
|---|---|
| Video |
|
包javafx.scene.media包含用于在JavaFX中提供媒体功能的类和接口。 它以三个组成部分的形式提供,它们是 -
Media Object - 这表示媒体文件
Media Player - 播放媒体内容。
Media View - 显示媒体。
JavaFX - Application
在本章中,我们将详细讨论JavaFX应用程序的结构,并学习如何使用示例创建JavaFX应用程序。
JavaFX应用程序结构
通常,JavaFX应用程序将具有三个主要组件,即Stage, Scene和Nodes ,如下图所示。
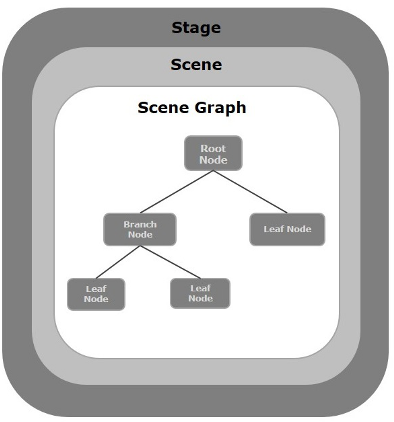
Stage
阶段(窗口)包含JavaFX应用程序的所有对象。 它由包javafx.stage的Stage类表示。 主要阶段由平台本身创建。 创建的stage对象作为参数传递给Application类的start()方法(在下一节中解释)。
阶段有两个参数确定其位置,即Width和Height 。 它分为内容区域和装饰(标题栏和边框)。
有五种类型的阶段 -
- Decorated
- Undecorated
- Transparent
- Unified
- Utility
您必须调用show()方法来显示舞台的内容。
Scene
场景表示JavaFX应用程序的物理内容。 它包含场景图的所有内容。 包javafx.scene的类Scene表示场景对象。 在一个实例中,场景对象仅添加到一个阶段。
您可以通过实例化Scene类来创建场景。 您可以通过将其尺寸(高度和宽度)以及root node给其构造函数来选择场景的大小。
场景图和节点
scene graph是表示场景内容的树状数据结构(分层)。 相反, node是场景图的视觉/图形对象。
节点可能包括 -
几何(图形)对象(2D和3D),例如 - 圆形,矩形,多边形等。
UI控件,如 - 按钮,复选框,选择框,文本区域等。
容器(布局窗格),例如边框窗格,网格窗格,流窗格等。
媒体元素,如音频,视频和图像对象。
包javafx.scene的Node Class表示JavaFX中的一个节点,该类是所有节点的超类。
如前所述,节点有三种类型 -
Root Node - 第一个场景图称为根节点。
Branch Node/Parent Node - 具有子节点的节点称为分支/父节点。 包名为javafx.scene包的Parent类的抽象类是所有父节点的基类,这些父节点将具有以下类型 -
Group - 组节点是包含子节点列表的集合节点。 每当渲染组节点时,其所有子节点都按顺序呈现。 应用于组的任何转换,效果状态都将应用于所有子节点。
Region - 它是所有基于JavaFX节点的UI控件的基类,例如Chart,Pane和Control。
WebView - 此节点管理Web引擎并显示其内容。
Leaf Node - 没有子节点的节点称为叶节点。 例如,Rectangle,Ellipse,Box,ImageView,MediaView是叶节点的示例。
必须将根节点传递给场景图。 如果以root身份传递组,则所有节点将被剪切到场景,并且场景大小的任何更改都不会影响场景的布局。
创建JavaFX应用程序
要创建JavaFX应用程序,您需要实例化Application类并实现其抽象方法start() 。 在这个方法中,我们将编写JavaFX应用程序的代码。
应用类
包javafx.application的Application类是JavaFX中应用程序的入口点。 要创建JavaFX应用程序,您需要继承此类并实现其抽象方法start() 。 在此方法中,您需要编写JavaFX图形的完整代码
在main方法中,您必须使用launch()方法启动应用程序。 此方法在内部调用Application类的start()方法,如以下程序所示。
public class JavafxSample extends Application {
   @Override
   public void start(Stage primaryStage) throws Exception {
      /*
      Code for JavaFX application.
      (Stage, scene, scene graph)
      */
   }
   public static void main(String args[]){
      launch(args);
   }
}
在start()方法中,为了创建典型的JavaFX应用程序,您需要按照下面给出的步骤 -
准备具有所需节点的场景图。
准备具有所需尺寸的场景,并将场景图(场景图的根节点)添加到场景中。
准备舞台并将场景添加到舞台并显示舞台的内容。
准备场景图
根据您的应用程序,您需要准备一个包含所需节点的场景图。 由于根节点是第一个节点,因此您需要创建根节点。 作为根节点,您可以从“ Group, Region or WebView 。
Group - 组节点由名为Group的类表示,该类属于包javafx.scene ,您可以通过实例化此类来创建组节点,如下所示。
Group root = new Group();
Group类的getChildren()方法为您提供了包含节点的ObservableList类的对象。 我们可以检索此对象并向其添加节点,如下所示。
//Retrieving the observable list object
ObservableList list = root.getChildren();
//Setting the text object as a node
list.add(NodeObject);
我们还可以将Node对象添加到组中,只需将它们传递给Group类以及实例化时的构造函数,如下所示。
Group root = new Group(NodeObject);
Region - 它是所有基于JavaFX节点的UI控件的Base类,例如 -
Chart - 此类是所有图表的基类,它属于包javafx.scene.chart 。
这个类有两个子类,分别是PieChart和XYChart 。 这两个又具有子类,如AreaChart, BarChart, BubbleChart等,用于在JavaFX中绘制不同类型的XY平面图。
您可以使用这些类在应用程序中嵌入图表。
Pane - 窗格是所有布局窗格的基类,例如AnchorPane, BorderPane, DialogPane等。此类属于一个名为AnchorPane, BorderPane, DialogPane的包。
您可以使用这些类在应用程序中插入预定义的布局。
Control - 它是用户界面控件的基类,如Accordion, ButtonBar, ChoiceBox, ComboBoxBase, HTMLEditor, etc. This class belongs to the package javafx.scene.control 。
您可以使用这些类在应用程序中插入各种UI元素。
在组中,您可以实例化上述任何类并将它们用作根节点,如以下程序所示。
//Creating a Stack Pane
StackPane pane = new StackPane();
//Adding text area to the pane
ObservableList list = pane.getChildren();
list.add(NodeObject);
WebView - 此节点管理Web引擎并显示其内容。
以下是表示JavaFX的节点类层次结构的图。

准备场景
JavaFX场景由包javafx.scene的Scene类表示。 您可以通过实例化此类来创建一个Scene,如下面的cod块所示。
在实例化时,必须将根对象传递给场景类的构造函数。
Scene scene = new Scene(root);
您还可以传递两个表示场景高度和宽度的double类型参数,如下所示。
Scene scene = new Scene(root, 600, 300);
准备舞台
这是任何JavaFX应用程序的容器,它为应用程序提供了一个窗口。 它由包javafx.stage的Stage类表示。 此类的对象作为Application类的start()方法的参数传递。
使用此对象,您可以在舞台上执行各种操作。 主要是你可以执行以下操作 -
使用setTitle()方法设置舞台的标题。
使用setScene()方法将场景对象附加到舞台。
使用show()方法show()场景的内容,如下所示。
//Setting the title to Stage.
primaryStage.setTitle("Sample application");
//Setting the scene to Stage
primaryStage.setScene(scene);
//Displaying the stage
primaryStage.show();
JavaFX应用程序的生命周期
JavaFX Application类有三种生命周期方法,它们是 -
start() - 要写入JavaFX图形代码的入口点方法。
stop() - 一个可以被覆盖的空方法,在这里你可以编写停止应用程序的逻辑。
init() - 一个可以被覆盖的空方法,但是你不能在这个方法中创建阶段或场景。
除此之外,它还提供了一个名为launch()的静态方法来启动JavaFX应用程序。
由于launch()方法是静态的,因此需要从静态上下文(通常是main)调用它。 每当启动JavaFX应用程序时,将执行以下操作(按相同顺序)。
创建应用程序类的实例。
调用Init()方法。
调用start()方法。
启动程序等待应用程序完成并调用stop()方法。
终止JavaFX应用程序
关闭应用程序的最后一个窗口时,将隐式终止JavaFX应用程序。 您可以通过将布尔值“False”传递给静态方法setImplicitExit() (应该从静态上下文中调用setImplicitExit()来关闭此行为。
您可以使用Platform.exit()或System.exit (int)方法显式终止JavaFX应用程序。
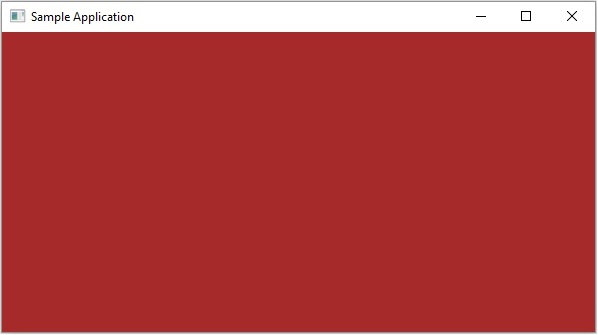
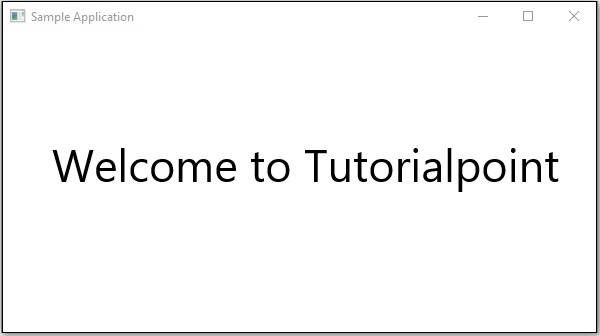
示例1 - 创建空窗口
本节将教您如何创建一个显示空窗口的JavaFX示例应用程序。 以下是步骤 -
第1步:创建一个类
创建一个Java类并继承包javafx.application的Application类,并按如下方式实现此类的start()方法。
public class JavafxSample extends Application {
   @Override
   public void start(Stage primaryStage) throws Exception {
   }
}
第2步:创建组对象
在start()方法中,通过实例javafx.scene为Group的类来创建组对象,该类属于包javafx.scene ,如下所示。
Group root = new Group();
第3步:创建场景对象
通过实例化属于包javafx.scene名为Scene的类来创建一个场景。 在此类中,传递在上一步中创建的Group对象(root) 。
除了根对象之外,您还可以传递两个表示屏幕高度和宽度的双参数以及Group类的对象,如下所示。
Scene scene = new Scene(root,600, 300);
第4步:设置舞台的标题
您可以使用Stage类的setTitle()方法将标题设置为Stage 。 primaryStage是一个Stage对象,它作为参数传递给场景类的start方法。
使用primaryStage对象,将场景标题设置为Sample Application ,如下所示。
primaryStage.setTitle("Sample Application");
第5步:将场景添加到舞台
您可以使用名为Stage的类的方法setScene()将Scene对象添加到Stage 。 使用此方法添加在前面步骤中准备的Scene对象,如下所示。
primaryStage.setScene(scene);
第6步:显示舞台的内容
使用Stage类的名为show()的方法show()场景的内容,如下所示。
primaryStage.show();
第7步:启动应用程序
通过从main方法调用Application类的静态方法launch()来启动JavaFX应用程序,如下所示。
public static void main(String args[]){
   launch(args);
}
例子 (Example)
以下程序生成一个空的JavaFX窗口。 将此代码保存在名为JavafxSample.java的文件中
import javafx.application.Application;
import javafx.scene.Group;
import javafx.scene.Scene;
import javafx.scene.paint.Color;
import javafx.stage.Stage;
public class JavafxSample extends Application {
   @Override
   public void start(Stage primaryStage) throws Exception {
      //creating a Group object
      Group group = new Group();
      //Creating a Scene by passing the group object, height and width
      Scene scene = new Scene(group ,600, 300);
      //setting color to the scene
      scene.setFill(Color.BROWN);
      //Setting the title to Stage.
      primaryStage.setTitle("Sample Application");
      //Adding the scene to Stage
      primaryStage.setScene(scene);
      //Displaying the contents of the stage
      primaryStage.show();
   }
   public static void main(String args[]){
      launch(args);
   }
}
使用以下命令从命令提示符编译并执行保存的java文件。
javac JavafxSample.java
java JavafxSample
执行时,上面的程序生成一个JavaFX窗口,如下所示。
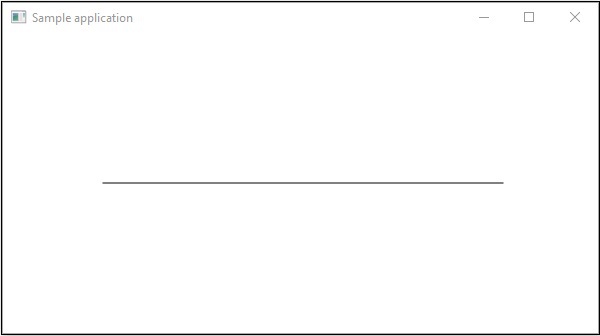
示例2 - 绘制直线
在前面的例子中,我们已经看到了如何创建一个空阶段,现在在这个例子中让我们尝试使用JavaFX库绘制一条直线。
以下是步骤 -
第1步:创建一个类
创建一个Java类并继承包javafx.application的Application类,并按如下方式实现此类的start()方法。
public class DrawingLine extends Application {
   @Override
   public void start(Stage primaryStage) throws Exception {
   }
}
第2步:创建一条线
您可以通过实例化属于包javafx.scene.shape名为Line的类在JavaFX中创建一行,按如下方式实例化此类。
//Creating a line object
Line line = new Line();
第3步:将属性设置为行
通过使用各自的setter方法设置属性startX, startY, endX和endY ,指定在XY平面上绘制线条的坐标,如下面的代码块所示。
line.setStartX(100.0);
line.setStartY(150.0);
line.setEndX(500.0);
line.setEndY(150.0);
第4步:创建组对象
在start()方法中,通过实例化名为Group的类来创建组对象,该类属于包javafx.scene。
将在上一步中创建的Line(节点)对象作为参数传递给Group类的构造函数,以便将其添加到组中,如下所示 -
Group root = new Group(line);
第5步:创建场景对象
通过实例化属于包javafx.scene名为Scene的类来创建一个场景。 在此类中,传递在上一步中创建的Group对象(root) 。
除了根对象之外,您还可以传递两个表示屏幕高度和宽度的双参数以及Group类的对象,如下所示。
Scene scene = new Scene(group ,600, 300);
第6步:设置舞台的标题
您可以使用Stage类的setTitle()方法将标题设置为Stage 。 primaryStage是一个Stage对象,它作为参数传递给场景类的start方法。
使用primaryStage对象,将场景标题设置为Sample Application ,如下所示。
primaryStage.setTitle("Sample Application");
第7步:将场景添加到舞台
您可以使用名为Stage的类的方法setScene()将Scene对象添加到Stage 。 使用此方法添加前面步骤中准备的Scene对象,如下所示。
primaryStage.setScene(scene);
第8步:显示舞台的内容
使用Stage类的名为show()的方法show()场景的内容,如下所示。
primaryStage.show();
第9步:启动应用程序
通过从main方法调用Application类的静态方法launch()来启动JavaFX应用程序,如下所示。
public static void main(String args[]){
   launch(args);
}
例子 (Example)
以下程序显示了如何使用JavaFX生成直线。 将此代码保存在名为JavafxSample.java的文件中。
import javafx.application.Application;
import javafx.scene.Group;
import javafx.scene.Scene;
import javafx.scene.shape.Line;
import javafx.stage.Stage;
public class DrawingLine extends Application{
   @Override
   public void start(Stage stage) {
      //Creating a line object
      Line line = new Line();
      //Setting the properties to a line
      line.setStartX(100.0);
      line.setStartY(150.0);
      line.setEndX(500.0);
      line.setEndY(150.0);
      //Creating a Group
      Group root = new Group(line);
      //Creating a Scene
      Scene scene = new Scene(root, 600, 300);
      //Setting title to the scene
      stage.setTitle("Sample application");
      //Adding the scene to the stage
      stage.setScene(scene);
      //Displaying the contents of a scene
      stage.show();
   }
   public static void main(String args[]){
      launch(args);
   }
}
使用以下命令从命令提示符编译并执行保存的java文件。
javac DrawingLine.java
java DrawingLine
执行时,上述程序生成一个显示直线的JavaFX窗口,如下所示。
示例3 - 显示文本
我们还可以在JavaFX场景中嵌入文本。 此示例显示如何在JavaFX中嵌入文本。
以下是步骤 -
第1步:创建一个类
创建Java类并继承包javafx.application的Application类,并按如下方式实现此类的start()方法。
public class DrawingLine extends Application {
   @Override
   public void start(Stage primaryStage) throws Exception {
   }
}
第2步:嵌入文本
您可以通过实例化属于包javafx.scene.shape名为Text的类来将文本嵌入到JavaFX场景中,从而实例化此类。
您可以通过以String格式传递要嵌入的文本来实例化此类。或者,您可以使用默认构造函数创建文本对象,如下所示。
//Creating a Text object
Text text = new Text();
第3步:设置字体
您可以使用Text类的setFont()方法将字体设置为Text 。 此方法接受字体对象作为参数。 将给定文本的字体设置为45,如下所示。
//Setting font to the text
text.setFont(new Font(45));
第4步:设置文本的位置
您可以通过使用相应的setter方法setX()和setY()设置X,Y坐标,在XY平面上设置文本的位置,如下所示。
//setting the position of the text
text.setX(50);
text.setY(150);
第5步:设置要添加的文本
您可以使用Text类的setText()方法设置要添加的文本。 此方法接受表示要添加的文本的字符串参数。
text.setText("Welcome to IoWiki");
第6步:创建组对象
在start()方法中,通过实例javafx.scene为Group的类来创建组对象,该类属于包javafx.scene 。
将上一步中创建的Text(节点)对象作为参数传递给Group类的构造函数,以便将其添加到组中,如下所示 -
Group root = new Group(text)
第7步:创建场景对象
通过实例化属于包javafx.scene名为Scene的类来创建一个场景。 在此类中,传递在上一步中创建的Group对象(root) 。
除了根对象之外,您还可以传递两个表示屏幕高度和宽度的双参数以及Group类的对象,如下所示。
Scene scene = new Scene(group ,600, 300);
第8步:设置舞台的标题
您可以使用Stage类的setTitle()方法将标题设置为Stage 。 primaryStage是一个Stage对象,它作为参数传递给场景类的start方法。
使用primaryStage对象,将场景标题设置为Sample Application ,如下所示。
primaryStage.setTitle("Sample Application");
第9步:将场景添加到舞台
您可以使用名为Stage的类的方法setScene()将Scene对象添加到Stage 。 使用此方法添加前面步骤中准备的Scene对象,如下所示。
primaryStage.setScene(scene);
第10步:显示舞台的内容
使用Stage类的名为show()的方法show()场景的内容,如下所示。
primaryStage.show();
第11步:启动应用程序
通过从main方法调用Application类的静态方法launch()来启动JavaFX应用程序,如下所示。
public static void main(String args[]){
   launch(args);
}
例子 (Example)
以下是使用JavaFX显示文本的程序。 将此代码保存在名为DisplayingText.java的文件中。
import javafx.application.Application;
import javafx.collections.ObservableList;
import javafx.scene.Group;
import javafx.scene.Scene;
import javafx.stage.Stage;
import javafx.scene.text.Font;
import javafx.scene.text.Text;
public class DisplayingText extends Application {
   @Override
   public void start(Stage stage) {
      //Creating a Text object
      Text text = new Text();
      //Setting font to the text
      text.setFont(new Font(45));
      //setting the position of the text
      text.setX(50);
      text.setY(150);
      //Setting the text to be added.
      text.setText("Welcome to IoWiki");
      //Creating a Group object
      Group root = new Group();
      //Retrieving the observable list object
      ObservableList list = root.getChildren();
      //Setting the text object as a node to the group object
      list.add(text);
      //Creating a scene object
      Scene scene = new Scene(root, 600, 300);
      //Setting title to the Stage
      stage.setTitle("Sample Application");
      //Adding scene to the stage
      stage.setScene(scene);
      //Displaying the contents of the stage
      stage.show();
   }
   public static void main(String args[]){
      launch(args);
   }
}
使用以下命令从命令提示符编译并执行保存的java文件。
javac DisplayingText.java
java DisplayingText
执行时,上述程序生成一个显示文本的JavaFX窗口,如下所示。
JavaFX - 2D Shapes
在上一章中,我们已经看到了JavaFX的基本应用,我们学习了如何创建一个空窗口以及如何在JavaFX的XY平面上绘制一条线。 除了线,我们还可以绘制其他几个2D形状。
2D形状
通常,2D形状是可以在XY平面上绘制的几何图形,包括直线,矩形,圆形等。
使用JavaFX库,您可以绘制 -
预定义的形状,如直线,矩形,圆,椭圆,多边形,折线,立方曲线,四边形曲线,圆弧。
路径元素,如MoveTO路径元素,线,水平线,垂直线,立方曲线,二次曲线,弧。
除此之外,您还可以通过解析SVG路径来绘制2D形状。
上面提到的每个2D形状都由一个类表示,所有这些类都属于包javafx.scene.shape 。 名为Shape的类是JavaFX中所有二维形状的基类。
创建2D形状
要创建图表,您需要 -
- 实例化所需形状的相应类。
- 设置形状的属性。
- 将形状对象添加到组中。
实例化各个类
要创建二维形状,首先需要实例化其各自的类。
例如,如果要创建一行,则需要实例化名为Line的类,如下所示 -
Line line = new Line();
设置形状的属性
实例化类之后,需要使用setter方法设置形状的属性。
例如,要绘制线条,您需要传递线条起点和终点的x和y坐标。 您可以使用各自的setter方法指定这些值,如下所示 -
//Setting the Properties of the Line
line.setStartX(150.0f);
line.setStartY(140.0f);
line.setEndX(450.0f);
line.setEndY(140.0f);
将形状对象添加到组
最后,您需要将形状的对象添加到组中,方法是将其作为构造函数的参数传递,如下所示。
//Creating a Group object
Group root = new Group(line);
下表提供了JavaFX提供的各种形状(类)的列表。
| S.No | 形状和描述 |
|---|---|
| 1 | Line 线是连接两点的几何结构。 包javafx.scene.shape的Line类表示XY平面中的一条线。 |
| 2 | Rectangle 通常,矩形是四边形多边形,其具有两对平行边和并排边,所有内角都是直角。 在JavaFX中,Rectangle由名为Rectangle的类表示。 该类属于包javafx.scene.shape 。 |
| 3 | 圆角矩形 在JavaFX中,您可以绘制具有锐边或带有拱形边的矩形。带有拱形边的矩形称为圆角矩形。 |
| 4 | Circle 圆是形成闭环的线,每个点与中心点之间的距离是固定的。 在JavaFX中,圆圈由名为Circle的类表示。 该类属于包javafx.scene.shape 。 |
| 5 | Ellipse 椭圆由两个点定义,每个点称为焦点。 如果采用椭圆上的任何点,则到焦点的距离之和是恒定的。 椭圆的大小由这两个距离的总和决定。 在JavaFX中,椭圆由名为Ellipse的类表示。 该类属于包javafx.scene.shape 。 |
| 6 | Polygon 由多个共面线段形成的封闭形状,端对端连接。 在JavaFX中,多边形由名为Polygon的类表示。 该类属于包javafx.scene.shape 。 |
| 7 | Polyline 折线与多边形相同,只是折线最终不会关闭。 或者,由一个或多个线段组成的连续线。 在JavaFX中,Polyline由名为Polygon的类表示。 该类属于包javafx.scene.shape 。 |
| 8 | 立方曲线 三次曲线是XY平面中的Bezier参数曲线,是度为3的曲线。在JavaFX中,立方曲线由名为CubicCurve的类表示。 该类属于包javafx.scene.shape 。 |
| 9 | QuadCurve 二次曲线是XY平面中的Bezier参数曲线是2阶曲线。在JavaFX中,QuadCurve由名为QuadCurve的类表示。 该类属于包javafx.scene.shape 。 |
| 10 | Arc 弧是曲线的一部分。 在JavaFX中,弧由名为Arc的类表示。 该类属于包 - javafx.scene.shape 。 弧的类型除此之外,我们还可以绘制三种弧形的Open, Chord, Round 。 |
| 11 | SVGPath 在JavaFX中,我们可以通过解析SVG路径来构造图像。 这种形状由名为SVGPath的类SVGPath 。 该类属于包javafx.scene.shape 。 此类具有名为String数据类型的content的属性。 这表示SVG Path编码的字符串,应从中绘制图像。 |
通过路径类绘制更多形状
在上一节中,我们已经了解了如何通过实例化类和设置相应的参数来绘制一些简单的预定义形状。
但是,只有这些预定义的形状不足以构建除javafx.shape package提供的基元之外的更复杂的形状。
例如,如果要绘制如下图所示的图形元素,则不能依赖这些简单的形状。

路径类
为了绘制这样复杂的结构,JavaFX提供了一个名为Path的类。 此类表示形状的几何轮廓。
它附加到一个可观察的列表,其中包含各种Path Elements ,如moveTo,LineTo,HlineTo,VlineTo,ArcTo,QuadCurveTo,CubicCurveTo。
在实例化时,此类根据给定的路径元素构造路径。
您可以将路径元素传递给此类,同时将其实例化为如下 -
Path myshape = new Path(pathElement1, pathElement2, pathElement3);
或者,您可以使用addAll()方法获取可观察列表并添加所有路径元素,如下所示 -
Path myshape = new Path();
myshape.getElements().addAll(pathElement1, pathElement2, pathElement3);
您还可以使用add()方法单独添加元素 -
Path myshape = new Path();
myshape.getElements().add(pathElement1);
移动到路径元素
Path Element MoveTo用于将路径的当前位置移动到指定点。 它通常用于设置使用路径元素绘制的形状的起点。
它由包javafx.scene.shape名为LineTo的类表示。 它有两个数据类型的属性,即 -
X - 从当前位置绘制直线的点的x坐标。
Y - 从当前位置绘制直线的点的y坐标。
您可以通过实例化MoveTo类并传递新点的x,y坐标来创建到path元素的移动,如下所示 -
MoveTo moveTo = new MoveTo(x, y);
如果未将任何值传递给构造函数,则新点将设置为(0,0)。
您还可以使用各自的setter方法将值设置为x,y坐标,如下所示 -
setX(value);
setY(value);
示例 - 绘制复杂路径
在本例中,我们将展示如何使用Path, MoveTo和Line类绘制以下形状。
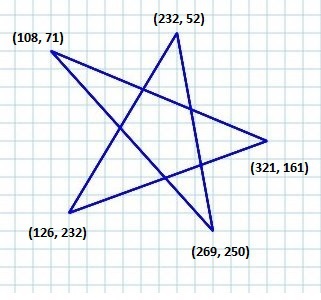
将此代码保存在名为ComplexShape.java的文件中。
import javafx.application.Application;
import javafx.scene.Group;
import javafx.scene.Scene;
import javafx.stage.Stage;
import javafx.scene.shape.LineTo;
import javafx.scene.shape.MoveTo;
import javafx.scene.shape.Path;
public class ComplexShape extends Application {
   @Override
   public void start(Stage stage) {
      //Creating a Path
      Path path = new Path();
      //Moving to the starting point
      MoveTo moveTo = new MoveTo(108, 71);
      //Creating 1st line
      LineTo line1 = new LineTo(321, 161);
      //Creating 2nd line
      LineTo line2 = new LineTo(126,232);
      //Creating 3rd line
      LineTo line3 = new LineTo(232,52);
      //Creating 4th line
      LineTo line4 = new LineTo(269, 250);
      //Creating 4th line
      LineTo line5 = new LineTo(108, 71);
      //Adding all the elements to the path
      path.getElements().add(moveTo);
      path.getElements().addAll(line1, line2, line3, line4, line5);
      //Creating a Group object
      Group root = new Group(path);
      //Creating a scene object
      Scene scene = new Scene(root, 600, 300);
      //Setting title to the Stage
      stage.setTitle("Drawing an arc through a path");
      //Adding scene to the stage
      stage.setScene(scene);
      //Displaying the contents of the stage
      stage.show();
   }
   public static void main(String args[]){
      launch(args);
   }
}
使用以下命令从命令提示符编译并执行保存的java文件。
javac ComplexShape.java
java ComplexShape
在执行时,上述程序生成一个显示弧的JavaFX窗口,该窗口从当前位置绘制到指定点,如下所示。

以下是JavaFX提供的各种路径元素(类)。 这些类存在于javafx.shape包中。 所有这些类都继承了PathElement类。
| S.No | 形状和描述 |
|---|---|
| 1 | LineTo 路径元素line用于从当前位置绘制指定坐标中的点的直线。 它由名为LineTo的类表示。 该类属于包javafx.scene.shape 。 |
| 2 | HlineTo 路径元素HLineTo用于将水平线绘制到当前位置的指定坐标中的点。 它由名为HLineTo的类HLineTo 。 该类属于包javafx.scene.shape 。 |
| 3 | VLineTo 路径元素vertical line用于从当前位置绘制指定坐标中的点的垂直线。 它由名为VLineTo的类VLineTo 。 该类属于包javafx.scene.shape 。 |
| 4 | QuadCurveTo 路径元素二次曲线用于将quadratic curve绘制到当前位置的指定坐标中的点。 它由名为QuadraticCurveTo的类表示。 该类属于包javafx.scene.shape 。 |
| 5 | CubicCurveTo 路径元素cubic curve用于将三次曲线绘制到当前位置的指定坐标中的点。 它由名为CubicCurveTo的类表示。 该类属于包javafx.scene.shape 。 |
| 6 | ArcTo 路径元素Arc用于将弧绘制到当前位置指定坐标中的点。 它由名为ArcTo的类ArcTo 。 该类属于包javafx.scene.shape 。 |
2D对象的属性
对于所有二维对象,您可以设置各种属性,如填充,描边,StrokeType等。以下部分讨论2D对象的各种属性。
2D对象的操作
如果我们向一个组添加多个形状,则第一个形状与第二个形状重叠,如下所示。
除了转换(旋转,缩放,平移等),转换(动画)之外,您还可以对2D对象执行三个操作,即Union, Subtraction和Intersection 。
| S.No | 操作和说明 |
|---|---|
| 1 | 联盟运作 此操作将两个或多个形状作为输入并返回它们占用的区域。 |
| 2 | 交叉口作业 此操作将两个或多个形状作为输入,并返回它们之间的交叉区域。 |
| 3 | 减法操作 该操作采用两种或更多种形状作为输入。 然后,它返回第一形状的区域,不包括与第二形状重叠的区域。 |
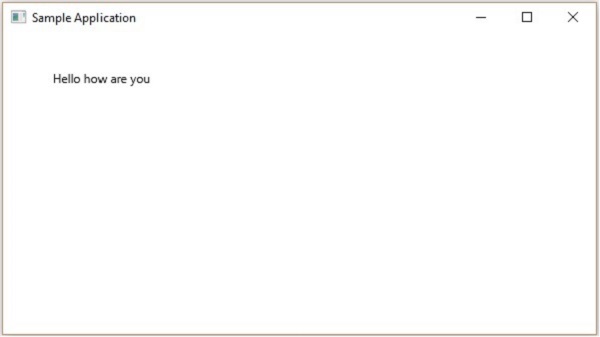
JavaFX - Text
就像各种形状一样,您也可以在JavaFX中创建文本节点。 文本节点由名为Text的类表示,该类属于包javafx.scene.text 。
此类包含几个在JavaFX中创建文本并修改其外观的属性。 该类还继承了属于包javafx.scene.shape的Shape类。
因此,除了文本的属性,如字体,对齐,行间距,文本等。它还继承了基本的形状节点属性,如strokeFill, stroke, strokeWidth, strokeType,等。
创建文本节点
由于包javafx.scene.text的类Text表示JavaFX中的文本节点,因此可以通过实例化此类来创建文本,如下所示 -
Text text = new Text();
Text类包含一个名为text of string type的属性,它表示要创建的文本。
实例化Text类之后,需要使用setText()方法为此属性设置值,如下所示。
String text = "Hello how are you"
Text.setText(text);
您还可以通过使用各自的setter方法(即setX()和setY()指定属性x和y的值来设置文本的位置(原点),如以下代码块所示 -
text.setX(50);
text.setY(50);
例子 (Example)
以下程序是演示如何在JavaFX中创建文本节点的示例。 将此代码保存在名为TextExample.java的文件中。
import javafx.application.Application;
import javafx.scene.Group;
import javafx.scene.Scene;
import javafx.stage.Stage;
import javafx.scene.text.Text;
public class TextExample extends Application {
   @Override
   public void start(Stage stage) {
      //Creating a Text object
      Text text = new Text();
      //Setting the text to be added.
      text.setText("Hello how are you");
      //setting the position of the text
      text.setX(50);
      text.setY(50);
      //Creating a Group object
      Group root = new Group(text);
      //Creating a scene object
      Scene scene = new Scene(root, 600, 300);
      //Setting title to the Stage
      stage.setTitle("Sample Application");
      //Adding scene to the stage
      stage.setScene(scene);
      //Displaying the contents of the stage
      stage.show();
   }
   public static void main(String args[]){
      launch(args);
   }
}
使用以下命令从命令提示符编译并执行保存的java文件。
javac TextExample.java
java TextExample
执行时,上述程序生成一个显示指定文本的JavaFX窗口,如下所示 -
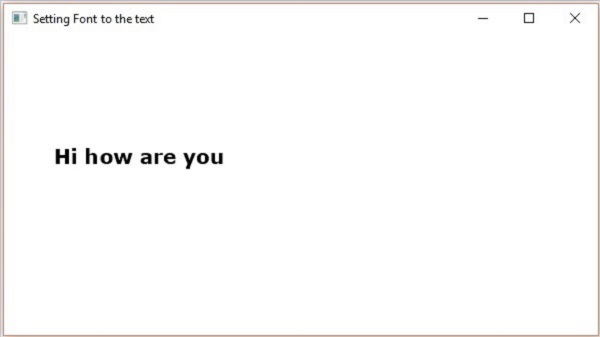
文本的位置和字体
默认情况下,文本类创建的文本具有字体...,大小...和黑色。
您可以使用setFont()方法更改文本的字体大小和颜色。 此方法接受Font类的对象。
包javafx.scene.text名为Font的类用于定义文本的字体。 该类包含一个名为font()的静态方法。
该方法接受四个参数,即 -
family - 这是String类型,表示我们要应用于文本的字体系列。
weight - 此属性表示字体的权重。 它接受9个值,分别是 - FontWeight.BLACK, FontWeight.BOLD, FontWeight.EXTRA_BOLD, FontWeight.EXTRA_LIGHT, LIGHT, MEDIUM, NORMAL, SEMI_BOLD, THIN 。
posture - 此属性表示字体状态(常规或斜体)。 它接受两个值FontPosture.REGULAR和FontPosture.ITALIC 。
size - 此属性的类型为double,它表示字体的大小。
您可以使用以下方法将字体设置为文本 -
text.setFont(Font.font("verdana", FontWeight.BOLD, FontPosture.REGULAR, 20));
例子 (Example)
以下程序是演示如何在JavaFX中设置文本节点字体的示例。 在这里,我们将字体设置为Verdana,将粗体设置为粗体,将姿势设置为常规,将大小设置为20。
将此代码保存在名为TextFontExample.java的文件中。
import javafx.application.Application;
import javafx.scene.Group;
import javafx.scene.Scene;
import javafx.stage.Stage;
import javafx.scene.text.Font;
import javafx.scene.text.FontPosture;
import javafx.scene.text.FontWeight;
import javafx.scene.text.Text;
public class TextFontExample extends Application {
   @Override
   public void start(Stage stage) {
      //Creating a Text object
      Text text = new Text();
      //Setting font to the text
      text.setFont(Font.font("verdana", FontWeight.BOLD, FontPosture.REGULAR, 20));
      //setting the position of the text
      text.setX(50);
      text.setY(130);
      //Setting the text to be added.
      text.setText("Hi how are you");
      //Creating a Group object
      Group root = new Group(text);
      //Creating a scene object
      Scene scene = new Scene(root, 600, 300);
      //Setting title to the Stage
      stage.setTitle("Setting Font to the text");
      //Adding scene to the stage
      stage.setScene(scene);
      //Displaying the contents of the stage
      stage.show();
   }
   public static void main(String args[]){
      launch(args);
   }
}
使用以下命令从命令提示符编译并执行保存的java文件。
javac TextFontExample.java
java TextFontExample
执行时,上述程序生成一个JavaFX窗口,显示具有指定字体的文本,如下所示 -
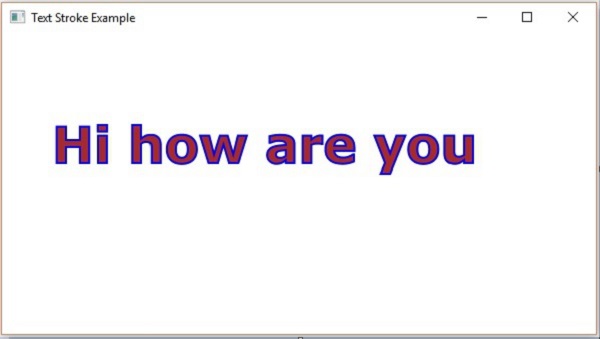
中风和颜色
Text类还继承了包的类Shape。 因此,您可以使用javafx.scene.shape ,您也可以使用它设置笔触和颜色到文本节点。
您可以使用shape(inherited)类的setFill()方法将颜色设置为文本,如下所示 -
text.setFill(Color.BEIGE);
同样,您可以使用setStroke()方法设置文本的笔触颜色。 虽然可以使用方法setStrokeWidth()设置笔划的宽度,如下所示 -
//Setting the color
text.setFill(Color.BROWN);
//Setting the Stroke
text.setStrokeWidth(2);
//Setting the stroke color
text.setStroke(Color.BLUE);
例子 (Example)
以下程序是演示如何设置文本节点的颜色,strokeWidth和strokeColor的示例。 在此代码中,我们将笔触颜色设置为 - 蓝色,文本颜色设置为 - 棕色,笔触宽度设置为-2。
将此代码保存在名为StrokeExample.java的文件中。
import javafx.application.Application;
import javafx.scene.Group;
import javafx.scene.Scene;
import javafx.scene.paint.Color;
import javafx.stage.Stage;
import javafx.scene.text.Font;
import javafx.scene.text.FontPosture;
import javafx.scene.text.FontWeight;
import javafx.scene.text.Text;
public class StrokeExample extends Application {
   @Override
   public void start(Stage stage) {
      //Creating a Text object
      Text text = new Text();
      //Setting font to the text
      text.setFont(Font.font("verdana", FontWeight.BOLD, FontPosture.REGULAR, 50));
      //setting the position of the text
      text.setX(50);
      text.setY(130);
      //Setting the color
      text.setFill(Color.BROWN);
      //Setting the Stroke
      text.setStrokeWidth(2);
      // Setting the stroke color
      text.setStroke(Color.BLUE);
      //Setting the text to be added.
      text.setText("Hi how are you");
      //Creating a Group object
      Group root = new Group(text);
      //Creating a scene object
      Scene scene = new Scene(root, 600, 300);
      //Setting title to the Stage
      stage.setTitle("Setting font to the text");
      //Adding scene to the stage
      stage.setScene(scene);
      //Displaying the contents of the stage
      stage.show();
   }
   public static void main(String args[]){
      launch(args);
   }
}
使用以下命令从命令提示符编译并执行保存的java文件。
javac StrokeExample.java
java StrokeExample
执行时,上述程序生成一个JavaFX窗口,显示具有指定笔划和颜色属性的文本,如下所示 -
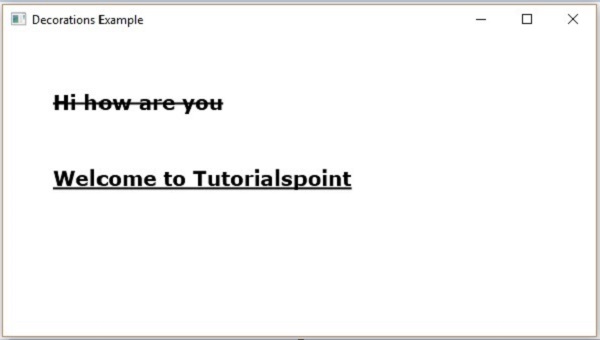
将装饰应用于文本
你也可以应用穿透等装饰; 在这种情况下,一行将通过文本传递。 您可以使用Text类的方法为Text加下划线。
您可以使用方法setStrikethrough()来浏览文本。 这接受一个布尔值,将值true传递给此方法以触发文本,如下面的代码框所示 -
//Striking through the text
text1.setStrikethrough(true);
以同样的方式,您可以通过将值true传递给方法setUnderLine()为文本加下划线,如下所示 -
//underlining the text
text2.setUnderline(true);
例子 (Example)
以下程序是演示如何在文本中应用underline或strike through等装饰的示例。 将此代码保存在名为DecorationsExample.java的文件中。
import javafx.application.Application;
import javafx.scene.Group;
import javafx.scene.Scene;
import javafx.stage.Stage;
import javafx.scene.text.Font;
import javafx.scene.text.FontPosture;
import javafx.scene.text.FontWeight;
import javafx.scene.text.Text;
public class DecorationsExample extends Application {
   @Override
   public void start(Stage stage) {
      //Creating a Text_Example object
      Text text1 = new Text("Hi how are you");
      //Setting font to the text
      text1.setFont(Font.font("verdana", FontWeight.BOLD, FontPosture.REGULAR, 20));
      //setting the position of the text
      text1.setX(50);
      text1.setY(75);
      //Striking through the text
      text1.setStrikethrough(true);
      //Creating a Text_Example object
      Text text2 = new Text("Welcome to IoWiki");
      //Setting font to the text
      text2.setFont(Font.font("verdana", FontWeight.BOLD, FontPosture.REGULAR, 20));
      //setting the position of the text
      text2.setX(50);
      text2.setY(150);
      //underlining the text
      text2.setUnderline(true);
      //Creating a Group object
      Group root = new Group(text1, text2);
      //Creating a scene object
      Scene scene = new Scene(root, 600, 300);
      //Setting title to the Stage
      stage.setTitle("Decorations Example");
      //Adding scene to the stage
      stage.setScene(scene);
      //Displaying the contents of the stage
      stage.show();
   }
   public static void main(String args[]){
      launch(args);
   }
}
使用以下命令从命令提示符编译并执行保存的Java文件。
javac DecorationsExample.java
java DecorationsExample
执行时,上面的程序生成一个JavaFX窗口,如下所示 -
JavaFX - Effects
效果是增强图形外观的任何操作。 在JavaFX中,效果是一种应用于节点以在视觉上增强其外观的算法。 Node类的effect属性用于指定效果。
在JavaFX中,您可以为节点设置各种效果,例如bloom, blur和glow 。 这些效果中的每一个都由一个类表示,所有这些类都可以在名为javafx.scene.effect的包中找到。
将效果应用于节点
您可以使用setEffect()方法将效果应用于节点。 对于此方法,您需要传递效果的对象。
要将效果应用于节点,您需要 -
创建节点。
实例化需要应用的效果的相应类。
设置效果的属性。
使用setEffect()方法将效果应用于节点。
创建节点
首先,通过实例化各自的类来创建JavaFX应用程序中的节点。
例如,如果要将发光效果应用于应用程序中的图像。 首先,您需要通过实例化Image类并设置其视图来创建图像节点,如下所示。
//Creating an image
Image image = new Image("https://www.iowiki.com/green/images/logo.png");
//Setting the image view
ImageView imageView = new ImageView(image);
//Setting the position of the image
imageView.setX(100);
imageView.setY(70);
//setting the fit height and width of the image view
imageView.setFitHeight(200);
imageView.setFitWidth(400);
//Setting the preserve ratio of the image view
imageView.setPreserveRatio(true);
实例化各个类
实例化表示需要应用于创建节点的效果的类。
例如 - 要应用发光效果,您需要实例化Glow类,如下面的代码框所示 -
Glow glow = new Glow();
设置效果的属性
在实例化类之后,您需要使用其setter方法设置效果的属性。
例如 - 要绘制三维框,您需要传递其宽度,高度和深度。 您可以使用各自的setter方法指定这些值,如下所示 -
//setting the level property
glow.setLevel(0.9);
添加效果到节点
最后,您可以使用setEffect()方法将所需效果应用于节点。 例如:要将光晕效果设置为图像节点,您需要将Glow类的对象传递给此方法,如下所示 -
imageView.setEffect(glow);
JavaFX Effects - 下表提供了JavaFX提供的各种效果(类)的列表。 这些类存在于名为javafx.scene.effect的包中。
| S.No | 形状和描述 |
|---|---|
| 1 | 颜色调整 您可以通过对图像应用颜色调整效果来调整图像的颜色。 这包括调整每个像素的hue, saturation, brightness和contrast 包javafx.scene.effect名为ColorAdjust的类表示颜色调整效果。 |
| 2 | 颜色输入 颜色输入效果提供与绘制矩形并用颜色填充相同的输出。 与其他效果不同,如果此效果应用于任何节点,则它仅显示矩形框(而不是节点)。 此效果主要用于传递其他效果的输入。 包javafx.scene.effect名为ColorInput的类表示颜色输入效果。 |
| 3 | 图像输入 JavaFX中的图像输入效果只是将图像嵌入到JavaFX屏幕中。 就像颜色输入效果(它用于将指定的彩色矩形区域作为输入传递给其他效果)一样,图像输入效果用于将指定的图像作为输入传递给另一个效果。 包javafx.scene.effect名为ImageInput的类表示图像输入效果。 |
| 4 | Blend 通常,混合物是指两种或更多种不同物质或物质的混合物。 如果我们应用此混合效果,它会在同一位置获取两个不同输入的像素,并根据blend mode生成组合输出。 包javafx.scene.effect名为Blend的类表示混合效果。 |
| 5 | Bloom 在应用布隆效果时,使节点的某些部分中的像素发光。 包javafx.scene.effect名为Bloom的类表示bloom效果。 |
| 6 | Glow 就像bloom一样,Glow效果使给定的输入图像发光,这种效果使输入的亮像素更亮。 包javafx.scene.effect名为Glow的类表示发光效果。 |
| 7 | 盒子模糊 在将此模糊效果应用于节点时,使其不清楚。 Box blur是JavaFX提供的一种模糊效果。 在此效果中,当我们将模糊应用于节点时,使用简单的盒式过滤器。 包javafx.scene.effect名为BoxBlur的类表示boxblur效果。 |
| 8 | GaussianBlur 就像Box Blur Gaussian一样,它可以模糊JavaFX中的节点。 Gaussian Blur effect的唯一区别是高斯卷积核用于产生模糊效果。 包javafx.scene.effect名为GaussianBlur的类表示高斯模糊效果。 |
| 9 | MotionBlur 就像高斯效果一样,运动模糊是一种模糊JavaFX节点的效果。 它还使用高斯卷积核来产生模糊效果,但不同之处在于高斯卷积核以指定角度使用。 包javafx.scene.effect名为MotionBlur的类表示Motion Blur效果。 |
| 10 | Reflection 在将反射效果应用于JavaFX中的节点时,会在节点的底部添加对它的反射。 名为Reflection的包javafx.scene.effect表示反射效果。 |
| 11 | SepiaTone 在将Sepia色调效果应用于JavaFX中的节点(一般图像)时,它会被调整为红棕色。 包javafx.scene.effect名为SepiaTone的类表示棕褐色调效果。 |
| 12 | Shadow 此效果会创建具有模糊边缘的指定节点的副本。 包javafx.scene.effect名为Shadow的类表示棕褐色调效果。 |
| 13 | DropShadow 将此效果应用于节点时,将在指定节点后面创建阴影。 包javafx.scene.effect名为DropShadow的类表示投影效果。 |
| 14 | InnerShadow 将此效果应用于节点时,将在节点边缘内创建阴影。 包javafx.scene.effect名为InnerShadow的类表示内部阴影效果。 |
| 15 | Lighting 照明效果用于模拟来自光源的光。 有不同种类的光源,即point , distant和spot 。 包javafx.scene.effect名为Lighting的类表示照明效果。 |
| 16 | Light.Distant 在将该效果应用于节点时,在其上模拟光,就好像它是由远距离光源生成的。 Distant Light Source - 离节点很远的光源。 在这里,光从光源的一个方向衰减。 包javafx.scene.effect名为Light.Distant的类表示远处的光源。 |
| 17 | Light.Spot 将此效果应用于节点时,会在其上模拟灯光,就好像它是由聚光灯生成的一样。 Spot light Source - 来自此光源的光线在所有方向上衰减。 光的强度取决于物体与光源的距离。 包javafx.scene.effect名为Light.Spot的类表示远程光源。 |
| 18 | Point.Spot 将此效果应用于节点时,会在其上模拟光,就好像它是由点光源生成的一样。 Point Light Source - 来自此光源的光从单个点向所有方向衰减。 光的强度取决于物体与光源的距离。 包javafx.scene.effect的名为Point.Spot的类表示点光源。 |
JavaFX - Transformations
转换意味着通过应用规则将一些图形更改为其他图形。 我们可以进行各种类型的转换,例如Translation, Scaling Up or Down, Rotation, Shearing,等。
使用JavaFX,您可以在节点上应用转换,例如旋转,缩放和转换。 所有这些转换都由各种类表示,它们属于包javafx.scene.transform 。
| S.No | 转型与描述 |
|---|---|
| 1 | Rotation 在旋转中,我们将物体从其原点以特定角度θ (theta)旋转。 |
| 2 | Scaling 要更改对象的大小,请使用缩放转换。 |
| 3 | Translation 将对象移动到屏幕上的其他位置。 |
| 4 | Shearing 倾斜对象形状的变换称为剪切变换。 |
多重转换
您还可以在JavaFX中的节点上应用多个转换。 以下程序是同时对矩形执行Rotation, Scaling和Translation变换的示例。
将此代码保存在名称为的文件中 -
MultipleTransformationsExample.java 。
import javafx.application.Application;
import javafx.scene.Group;
import javafx.scene.Scene;
import javafx.scene.paint.Color;
import javafx.scene.shape.Rectangle;
import javafx.scene.transform.Rotate;
import javafx.scene.transform.Scale;
import javafx.scene.transform.Translate;
import javafx.stage.Stage;
public class MultipleTransformationsExample extends Application {
   @Override
   public void start(Stage stage) {
      //Drawing a Rectangle
      Rectangle rectangle = new Rectangle(50, 50, 100, 75);
      //Setting the color of the rectangle
      rectangle.setFill(Color.BURLYWOOD);
      //Setting the stroke color of the rectangle
      rectangle.setStroke(Color.BLACK);
      //creating the rotation transformation
      Rotate rotate = new Rotate();
      //Setting the angle for the rotation
      rotate.setAngle(20);
      //Setting pivot points for the rotation
      rotate.setPivotX(150);
      rotate.setPivotY(225);
      //Creating the scale transformation
      Scale scale = new Scale();
      //Setting the dimensions for the transformation
      scale.setX(1.5);
      scale.setY(1.5);
      //Setting the pivot point for the transformation
      scale.setPivotX(300);
      scale.setPivotY(135);
      //Creating the translation transformation
      Translate translate = new Translate();
      //Setting the X,Y,Z coordinates to apply the translation
      translate.setX(250);
      translate.setY(0);
      translate.setZ(0);
      //Adding all the transformations to the rectangle
      rectangle.getTransforms().addAll(rotate, scale, translate);
      //Creating a Group object
      Group root = new Group(rectangle);
      //Creating a scene object
      Scene scene = new Scene(root, 600, 300);
      //Setting title to the Stage
      stage.setTitle("Multiple transformations");
      //Adding scene to the stage
      stage.setScene(scene);
      //Displaying the contents of the stage
      stage.show();
   }
   public static void main(String args[]){
      launch(args);
   }
}
使用以下命令从命令提示符编译并执行保存的java文件。
javac MultipleTransformationsExample.java
java MultipleTransformationsExample
执行时,上面的程序生成一个JavaFX窗口,如下所示。
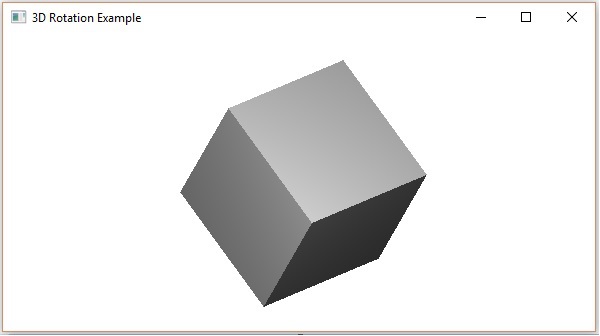
3D对象的转换
您还可以在3D对象上应用变换。 以下是旋转和平移三维框的示例。
将此代码保存在名为RotationExample3D.java的文件中。
import javafx.application.Application;
import javafx.scene.Group;
import javafx.scene.Scene;
import javafx.scene.shape.Box;
import javafx.scene.transform.Rotate;
import javafx.scene.transform.Translate;
import javafx.stage.Stage;
public class RotationExample3D extends Application {
   @Override
   public void start(Stage stage) {
      //Drawing a Box
      Box box = new Box();
      //Setting the properties of the Box
      box.setWidth(150.0);
      box.setHeight(150.0);
      box.setDepth(150.0);
      //Creating the translation transformation
      Translate translate = new Translate();
      translate.setX(400);
      translate.setY(150);
      translate.setZ(25);
      Rotate rxBox = new Rotate(0, 0, 0, 0, Rotate.X_AXIS);
      Rotate ryBox = new Rotate(0, 0, 0, 0, Rotate.Y_AXIS);
      Rotate rzBox = new Rotate(0, 0, 0, 0, Rotate.Z_AXIS);
      rxBox.setAngle(30);
      ryBox.setAngle(50);
      rzBox.setAngle(30);
      box.getTransforms().addAll(translate,rxBox, ryBox, rzBox);
      //Creating a Group object
      Group root = new Group(box);
      //Creating a scene object
      Scene scene = new Scene(root, 600, 300);
      //Setting title to the Stage
      stage.setTitle("Drawing a cylinder");
      //Adding scene to the stage
      stage.setScene(scene);
      //Displaying the contents of the stage
      stage.show();
   }
   public static void main(String args[]){
      launch(args);
   }
}
使用以下命令从命令提示符编译并执行保存的java文件。
javac RotationExample3D.java
java RotationExample3D
执行时,上面的程序生成一个JavaFX窗口,如下所示。
JavaFX - Animations
通常,动画对象意味着通过快速显示来创建其运动的错觉。 在JavaFX中,可以通过随时间更改其属性来为节点设置动画。 JavaFX提供了一个名为javafx.animation的包。 此程序包包含用于为节点设置动画的类。 动画是所有这些类的基类。
使用JavaFX,您可以应用动画(过渡),如Fade Transition , Fill Transition , Rotate Transition , Scale Transition , Stroke Transition , Translate Transition , Path Transition , Sequential Transition , Pause Transition , Parallel Transition等。
所有这些转换都由包javafx.animation中的各个类表示。
要将特定动画应用于节点,您必须按照以下步骤操作 -
使用相应的类创建require节点。
实例化要应用的相应转换(动画)类
设置过渡的属性和
最后使用Animation类的play()方法进行转换。
在本章中,我们将讨论基本过渡(旋转,缩放,翻译)的示例。
旋转过渡
以下是演示JavaFX中的Rotate Transition的程序。 将此代码保存在名为RotateTransitionExample.java的文件中。
import javafx.animation.RotateTransition;
import javafx.application.Application;
import static javafx.application.Application.launch;
import javafx.scene.Group;
import javafx.scene.Scene;
import javafx.scene.paint.Color;
import javafx.scene.shape.Polygon;
import javafx.stage.Stage;
import javafx.util.Duration;
public class RotateTransitionExample extends Application {
   @Override
   public void start(Stage stage) {
      //Creating a hexagon
      Polygon hexagon = new Polygon();
      //Adding coordinates to the hexagon
      hexagon.getPoints().addAll(new Double[]{
         200.0, 50.0,
         400.0, 50.0,
         450.0, 150.0,
         400.0, 250.0,
         200.0, 250.0,
         150.0, 150.0,
      });
      //Setting the fill color for the hexagon
      hexagon.setFill(Color.BLUE);
      //Creating a rotate transition
      RotateTransition rotateTransition = new RotateTransition();
      //Setting the duration for the transition
      rotateTransition.setDuration(Duration.millis(1000));
      //Setting the node for the transition
      rotateTransition.setNode(hexagon);
      //Setting the angle of the rotation
      rotateTransition.setByAngle(360);
      //Setting the cycle count for the transition
      rotateTransition.setCycleCount(50);
      //Setting auto reverse value to false
      rotateTransition.setAutoReverse(false);
      //Playing the animation
      rotateTransition.play();
      //Creating a Group object
      Group root = new Group(hexagon);
      //Creating a scene object
      Scene scene = new Scene(root, 600, 300);
      //Setting title to the Stage
      stage.setTitle("Rotate transition example ");
      //Adding scene to the stage
      stage.setScene(scene);
      //Displaying the contents of the stage
      stage.show();
   }
   public static void main(String args[]){
      launch(args);
   }
}
使用以下命令从命令提示符编译并执行保存的java文件。
javac RotateTransitionExample.java
java RotateTransitionExample
执行时,上面的程序生成一个JavaFX窗口,如下所示。
规模转换
以下是在JavaFX中演示Scale Transition的程序。 将此代码保存在名为ScaleTransitionExample.java的文件中。
import javafx.animation.ScaleTransition;
import javafx.application.Application;
import static javafx.application.Application.launch;
import javafx.scene.Group;
import javafx.scene.Scene;
import javafx.scene.paint.Color;
import javafx.scene.shape.Circle;
import javafx.stage.Stage;
import javafx.util.Duration;
public class ScaleTransitionExample extends Application {
   @Override
   public void start(Stage stage) {
      //Drawing a Circle
      Circle circle = new Circle();
      //Setting the position of the circle
      circle.setCenterX(300.0f);
      circle.setCenterY(135.0f);
      //Setting the radius of the circle
      circle.setRadius(50.0f);
      //Setting the color of the circle
      circle.setFill(Color.BROWN);
      //Setting the stroke width of the circle
      circle.setStrokeWidth(20);
      //Creating scale Transition
      ScaleTransition scaleTransition = new ScaleTransition();
      //Setting the duration for the transition
      scaleTransition.setDuration(Duration.millis(1000));
      //Setting the node for the transition
      scaleTransition.setNode(circle);
      //Setting the dimensions for scaling
      scaleTransition.setByY(1.5);
      scaleTransition.setByX(1.5);
      //Setting the cycle count for the translation
      scaleTransition.setCycleCount(50);
      //Setting auto reverse value to true
      scaleTransition.setAutoReverse(false);
      //Playing the animation
      scaleTransition.play();
      //Creating a Group object
      Group root = new Group(circle);
      //Creating a scene object
      Scene scene = new Scene(root, 600, 300);
      //Setting title to the Stage
      stage.setTitle("Scale transition example");
      //Adding scene to the stage
      stage.setScene(scene);
      //Displaying the contents of the stage
      stage.show();
   }
   public static void main(String args[]){
      launch(args);
   }
}
使用以下命令从命令提示符编译并执行保存的java文件。
javac ScaleTransitionExample.java
java ScaleTransitionExample
执行时,上面的程序生成一个JavaFX窗口,如下所示。
翻译过渡
以下是演示JavaFX中的Translate Transition的程序。 将此代码保存在名为TranslateTransitionExample.java的文件中。
import javafx.animation.TranslateTransition;
import javafx.application.Application;
import javafx.scene.Group;
import javafx.scene.Scene;
import javafx.scene.paint.Color;
import javafx.scene.shape.Circle;
import javafx.stage.Stage;
import javafx.util.Duration;
public class TranslateTransitionExample extends Application {
   @Override
   public void start(Stage stage) {
      //Drawing a Circle
      Circle circle = new Circle();
      //Setting the position of the circle
      circle.setCenterX(150.0f);
      circle.setCenterY(135.0f);
      //Setting the radius of the circle
      circle.setRadius(100.0f);
      //Setting the color of the circle
      circle.setFill(Color.BROWN);
      //Setting the stroke width of the circle
      circle.setStrokeWidth(20);
      //Creating Translate Transition
      TranslateTransition translateTransition = new TranslateTransition();
      //Setting the duration of the transition
      translateTransition.setDuration(Duration.millis(1000));
      //Setting the node for the transition
      translateTransition.setNode(circle);
      //Setting the value of the transition along the x axis.
      translateTransition.setByX(300);
      //Setting the cycle count for the transition
      translateTransition.setCycleCount(50);
      //Setting auto reverse value to false
      translateTransition.setAutoReverse(false);
      //Playing the animation
      translateTransition.play();
      //Creating a Group object
      Group root = new Group(circle);
      //Creating a scene object
      Scene scene = new Scene(root, 600, 300);
      //Setting title to the Stage
      stage.setTitle("Translate transition example");
      //Adding scene to the stage
      stage.setScene(scene);
      //Displaying the contents of the stage
      stage.show();
   }
   public static void main(String args[]){
      launch(args);
   }
}
使用以下命令从命令提示符编译并执行保存的java文件。
javac TranslateTransitionExample.java
java TranslateTransitionExample
执行时,上面的程序生成一个JavaFX窗口,如下所示。
除此之外,JavaFX还提供了在节点上应用更多转换的类。 以下是JavaFX支持的其他类型的转换。
影响节点Fade, Fill, Stroke属性的转换
涉及多个基本转换的转换Sequential, Parallel, Pause
JavaFX - Colors
要将颜色应用于应用程序,JavaFX在包javafx.scene.paint包中提供了各种类。 这个包包含一个名为Paint的抽象类,它是用于应用颜色的所有类的基类。
使用这些类,您可以使用以下模式应用颜色 -
Uniform - 在此模式中,颜色在整个节点中均匀应用。
Image Pattern - 这使您可以使用图像模式填充节点的区域。
Gradient - 在此模式中,应用于节点的颜色从一个点到另一个点不同。 它有两种梯度,即Linear Gradient和Radial Gradient 。
您可以应用颜色的所有节点类(如Shape, Text (包括Scene))都具有名为setFill()和setStroke() 。 这些将有助于分别设置节点的颜色值及其笔划。
这些方法接受Paint类型的对象。 因此,要创建这些类型的图像中的任何一种,您需要实例化这些类并将对象作为参数传递给这些方法。
将颜色应用于节点
要为节点设置统一的颜色模式,需要将类颜色的对象传递给setFill() , setStroke()方法,如下所示 -
//Setting color to the text
Color color = new Color.BEIGE
text.setFill(color);
//Setting color to the stroke
Color color = new Color.DARKSLATEBLUE
circle.setStroke(color);
在上面的代码块中,我们使用颜色类的静态变量来创建颜色对象。
同样,您也可以使用RGB值或HSB标准的着色或Web哈希码的颜色,如下所示 -
//creating color object by passing RGB values
Color c = Color.rgb(0,0,255);
//creating color object by passing HSB values
Color c = Color.hsb(270,1.0,1.0);
//creating color object by passing the hash code for web
Color c = Color.web("0x0000FF",1.0);
例子 (Example)
下面是一个演示如何将颜色应用于JavaFX中的节点的示例。 在这里,我们创建一个圆形和文本节点并为它们应用颜色。
将此代码保存在名为ColorExample.java的文件中。
import javafx.application.Application;
import javafx.scene.Group;
import javafx.scene.Scene;
import javafx.scene.paint.Color;
import javafx.stage.Stage;
import javafx.scene.shape.Circle;
import javafx.scene.text.Font;
import javafx.scene.text.Text;
public class ColorExample extends Application {
   @Override
   public void start(Stage stage) {
      //Drawing a Circle
      Circle circle = new Circle();
      //Setting the properties of the circle
      circle.setCenterX(300.0f);
      circle.setCenterY(180.0f);
      circle.setRadius(90.0f);
      //Setting color to the circle
      circle.setFill(Color.DARKRED);
      //Setting the stroke width
      circle.setStrokeWidth(3);
      //Setting color to the stroke
      circle.setStroke(Color.DARKSLATEBLUE);
      //Drawing a text
      Text text = new Text("This is a colored circle");
      //Setting the font of the text
      text.setFont(Font.font("Edwardian Script ITC", 50));
      //Setting the position of the text
      text.setX(155);
      text.setY(50);
      //Setting color to the text
      text.setFill(Color.BEIGE);
      text.setStrokeWidth(2);
      text.setStroke(Color.DARKSLATEBLUE);
      //Creating a Group object
      Group root = new Group(circle, text);
      //Creating a scene object
      Scene scene = new Scene(root, 600, 300);
      //Setting title to the Stage
      stage.setTitle("Color Example");
      //Adding scene to the stage
      stage.setScene(scene);
      //Displaying the contents of the stage
      stage.show();
   }
   public static void main(String args[]){
      launch(args);
   }
}
使用以下命令从命令提示符编译并执行保存的java文件。
Javac ColorExample.java
java ColorExample
执行时,上面的程序生成一个JavaFX窗口,如下所示 -

将图像模式应用于节点
要将图像模式应用于节点,请实例化ImagePattern类并将其对象传递给setFill() , setStroke()方法。
该类的构造函数接受六个参数,即 -
Image - 要用于创建图案的图像的对象。
x and y - 表示锚矩形原点(x,y)坐标的双变量。
height and width - 表示用于创建图案的图像的高度和宽度的双变量。
isProportional - 这是一个布尔变量; 如果将此属性设置为true,则将起始位置和结束位置设置为成比例。
ImagePattern radialGradient = new ImagePattern(dots, 20, 20, 40, 40, false);
例子 (Example)
以下是演示如何将图像模式应用于JavaFX中的节点的示例。 在这里,我们创建一个圆圈和一个文本节点,并将图像模式应用于它们。
将此代码保存在名为ImagePatternExample.java的文件ImagePatternExample.java 。
import javafx.application.Application;
import javafx.scene.Group;
import javafx.scene.Scene;
import javafx.scene.image.Image;
import javafx.scene.paint.Color;
import javafx.scene.paint.ImagePattern;
import javafx.scene.paint.Stop;
import javafx.stage.Stage;
import javafx.scene.shape.Circle;
import javafx.scene.text.Font;
import javafx.scene.text.Text;
public class ImagePatternExample extends Application {
   @Override
   public void start(Stage stage) {
      //Drawing a Circle
      Circle circle = new Circle();
      //Setting the properties of the circle
      circle.setCenterX(300.0f);
      circle.setCenterY(180.0f);
      circle.setRadius(90.0f);
      //Drawing a text
      Text text = new Text("This is a colored circle");
      //Setting the font of the text
      text.setFont(Font.font("Edwardian Script ITC", 50));
      //Setting the position of the text
      text.setX(155);
      text.setY(50);
      //Setting the image pattern
      String link = "https://encrypted-tbn1.gstatic.com"
         + "/images?q=tbn:ANd9GcRQub4GvEezKMsiIf67U"
         + "rOxSzQuQ9zl5ysnjRn87VOC8tAdgmAJjcwZ2qM";
      Image image = new Image(link);
      ImagePattern radialGradient = new ImagePattern(image, 20, 20, 40, 40, false);
      //Setting the linear gradient to the circle and text
      circle.setFill(radialGradient);
      text.setFill(radialGradient);
      //Creating a Group object
      Group root = new Group(circle, text);
      //Creating a scene object
      Scene scene = new Scene(root, 600, 300);
      //Setting title to the Stage
      stage.setTitle("Image pattern Example");
      //Adding scene to the stage
      stage.setScene(scene);
      //Displaying the contents of the stage
      stage.show();
   }
   public static void main(String args[]){
      launch(args);
   }
}
使用以下命令从命令提示符编译并执行保存的java文件。
Javac ImagePatternExample.java
java ImagePatternExample
执行时,上面的程序生成一个JavaFX窗口,如下所示 -

应用线性梯度模式
要将线性渐变模式应用于节点,请实例化LinearGradient类并将其对象传递给setFill(), setStroke()方法。
该类的构造函数接受五个参数,即 -
startX, startY - 这些double属性表示渐变起点的x和y坐标。
endX, endY - 这些double属性表示渐变结束点的x和y坐标。
cycleMethod - 此参数定义应如何填充由起点和终点定义的颜色渐变边界之外的区域。
proportional - 这是一个布尔变量; 将此属性设置为true ,开始和结束位置将设置为一个比例。
Stops - 此参数定义沿渐变线的颜色停止点。
//Setting the linear gradient
Stop[] stops = new Stop[] {
   new Stop(0, Color.DARKSLATEBLUE),
   new Stop(1, Color.DARKRED)
};
LinearGradient linearGradient =
   new LinearGradient(0, 0, 1, 0, true, CycleMethod.NO_CYCLE, stops);
例子 (Example)
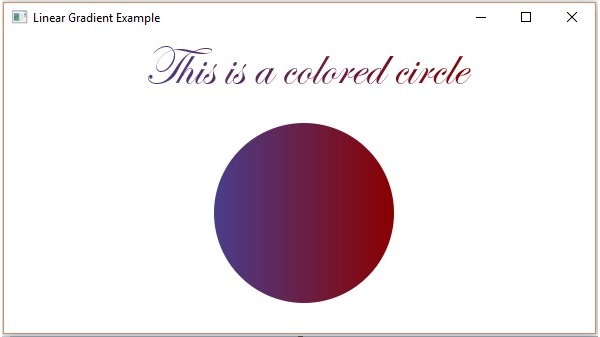
以下是演示如何将渐变模式应用于JavaFX中的节点的示例。 在这里,我们创建一个圆和一个文本节点,并将线性渐变模式应用于它们。
将此代码保存在名为LinearGradientExample.java的文件中。
import javafx.application.Application;
import javafx.scene.Group;
import javafx.scene.Scene;
import javafx.scene.paint.Color;
import javafx.scene.paint.CycleMethod;
import javafx.scene.paint.LinearGradient;
import javafx.scene.paint.Stop;
import javafx.stage.Stage;
import javafx.scene.shape.Circle;
import javafx.scene.text.Font;
import javafx.scene.text.Text;
public class LinearGradientExample extends Application {
   @Override
   public void start(Stage stage) {
      //Drawing a Circle
      Circle circle = new Circle();
      //Setting the properties of the circle
      circle.setCenterX(300.0f);
      circle.setCenterY(180.0f);
      circle.setRadius(90.0f);
      //Drawing a text
      Text text = new Text("This is a colored circle");
      //Setting the font of the text
      text.setFont(Font.font("Edwardian Script ITC", 55));
      //Setting the position of the text
      text.setX(140);
      text.setY(50);
      //Setting the linear gradient
      Stop[] stops = new Stop[] {
         new Stop(0, Color.DARKSLATEBLUE),
         new Stop(1, Color.DARKRED)
      };
      LinearGradient linearGradient =
         new LinearGradient(0, 0, 1, 0, true, CycleMethod.NO_CYCLE, stops);
      //Setting the linear gradient to the circle and text
      circle.setFill(linearGradient);
      text.setFill(linearGradient);
      //Creating a Group object
      Group root = new Group(circle, text);
      //Creating a scene object
      Scene scene = new Scene(root, 600, 300);
      //Setting title to the Stage
      stage.setTitle("Linear Gradient Example");
      //Adding scene to the stage
      stage.setScene(scene);
      //Displaying the contents of the stage
      stage.show();
   }
   public static void main(String args[]){
      launch(args);
   }
}
使用以下命令从命令提示符编译并执行保存的java文件。
Javac LinearGradientExample.java
java LinearGradientExample
执行时,上面的程序生成一个JavaFX窗口,如下所示 -
应用径向梯度模式
要将径向渐变图案应用于节点,请实例化GradientPattern类并将其对象传递给setFill(), setStroke()方法。
该类的构造函数接受一些参数,其中一些是 -
startX, startY - 这些double属性表示渐变起点的x和y坐标。
endX, endY - 这些double属性表示渐变结束点的x和y坐标。
cycleMethod - 此参数定义颜色渐变边界之外的区域如何由起点和终点定义以及如何填充它们。
proportional - 这是一个布尔变量; 将此属性设置为true ,开始和结束位置将设置为一个比例。
Stops - 此参数定义沿渐变线的颜色停止点。
//Setting the radial gradient
Stop[] stops = new Stop[] {
   new Stop(0.0, Color.WHITE),
   new Stop(0.3, Color.RED),
   new Stop(1.0, Color.DARKRED)
};
RadialGradient radialGradient =
   new RadialGradient(0, 0, 300, 178, 60, false, CycleMethod.NO_CYCLE, stops);
例子 (Example)
以下是演示如何将径向渐变模式应用于JavaFX中的节点的示例。 在这里,我们创建一个圆和一个文本节点,并为它们应用渐变模式。
将此代码保存在名为RadialGradientExample.java的文件中。
import javafx.application.Application;
import javafx.scene.Group;
import javafx.scene.Scene;
import javafx.scene.paint.Color;
import javafx.scene.paint.CycleMethod;
import javafx.scene.paint.RadialGradient;
import javafx.scene.paint.Stop;
import javafx.stage.Stage;
import javafx.scene.shape.Circle;
import javafx.scene.text.Font;
import javafx.scene.text.Text;
public class RadialGradientExample extends Application {
   @Override
   public void start(Stage stage) {
      //Drawing a Circle
      Circle circle = new Circle();
      //Setting the properties of the circle
      circle.setCenterX(300.0f);
      circle.setCenterY(180.0f);
      circle.setRadius(90.0f);
      //Drawing a text
      Text text = new Text("This is a colored circle");
      //Setting the font of the text
      text.setFont(Font.font("Edwardian Script ITC", 50));
      //Setting the position of the text
      text.setX(155);
      text.setY(50);
      //Setting the radial gradient
      Stop[] stops = new Stop[] {
         new Stop(0.0, Color.WHITE),
         new Stop(0.3, Color.RED),
         new Stop(1.0, Color.DARKRED)
      };
      RadialGradient radialGradient =
         new RadialGradient(0, 0, 300, 178, 60, false, CycleMethod.NO_CYCLE, stops);
      //Setting the radial gradient to the circle and text
      circle.setFill(radialGradient);
      text.setFill(radialGradient);
      //Creating a Group object
      Group root = new Group(circle, text);
      //Creating a scene object
      Scene scene = new Scene(root, 600, 300);
      //Setting title to the Stage
      stage.setTitle("Radial Gradient Example");
      //Adding scene to the stage
      stage.setScene(scene);
      //Displaying the contents of the stage
      stage.show();
   }
   public static void main(String args[]) {
      launch(args);
   }
}
使用以下命令从命令提示符编译并执行保存的java文件。
Javac RadialGradientExample.java
java RadialGradientExample
执行时,上面的程序生成一个JavaFX窗口,如下所示 -

JavaFX - Images
您可以使用JavaFX在javafx.scene.image包中提供的类来加载和修改图像。 JavaFX支持Bmp, Gif, Jpeg, Png等图像格式。
本章将教您如何将图像加载到JavaFX,如何在多个视图中投影图像以及如何更改图像的像素。
加载图片
您可以通过实例化包javafx.scene.image名为Image的类在JavaFX中加载图像。
对于类的构造函数,您必须通过以下任一方法 -
要加载的图像的InputStream对象,或
包含图像URL的字符串变量。
//Passing FileInputStream object as a parameter
FileInputStream inputstream = new FileInputStream("C:\\images\\image.jpg");
Image image = new Image(inputstream);
//Loading image from URL
//Image image = new Image(new FileInputStream("url for the image));
加载图像后,您可以通过实例化ImageView类并将图像传递给其构造函数来设置图像的视图,如下所示 -
ImageView imageView = new ImageView(image);
例子 (Example)
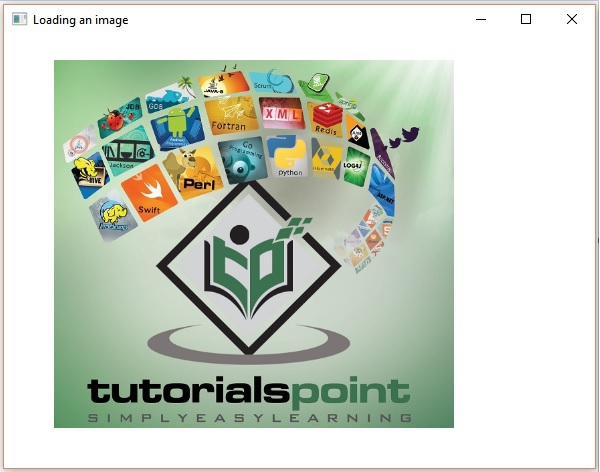
以下是演示如何在JavaFX中加载图像并设置视图的示例。
将此代码保存在名为ImageExample.java的文件中。
import java.io.FileInputStream;
import java.io.FileNotFoundException;
import javafx.application.Application;
import javafx.scene.Group;
import javafx.scene.Scene;
import javafx.scene.image.Image;
import javafx.scene.image.ImageView;
import javafx.stage.Stage;
public class ImageExample extends Application {
   @Override
   public void start(Stage stage) throws FileNotFoundException {
      //Creating an image
      Image image = new Image(new FileInputStream("path of the image"));
      //Setting the image view
      ImageView imageView = new ImageView(image);
      //Setting the position of the image
      imageView.setX(50);
      imageView.setY(25);
      //setting the fit height and width of the image view
      imageView.setFitHeight(455);
      imageView.setFitWidth(500);
      //Setting the preserve ratio of the image view
      imageView.setPreserveRatio(true);
      //Creating a Group object
      Group root = new Group(imageView);
      //Creating a scene object
      Scene scene = new Scene(root, 600, 500);
      //Setting title to the Stage
      stage.setTitle("Loading an image");
      //Adding scene to the stage
      stage.setScene(scene);
      //Displaying the contents of the stage
      stage.show();
   }
   public static void main(String args[]) {
      launch(args);
   }
}
使用以下命令从命令提示符编译并执行保存的java文件。
Javac ImageExample.java
java ImageExample
执行时,上面的程序生成一个JavaFX窗口,如下所示 -
图像的多个视图
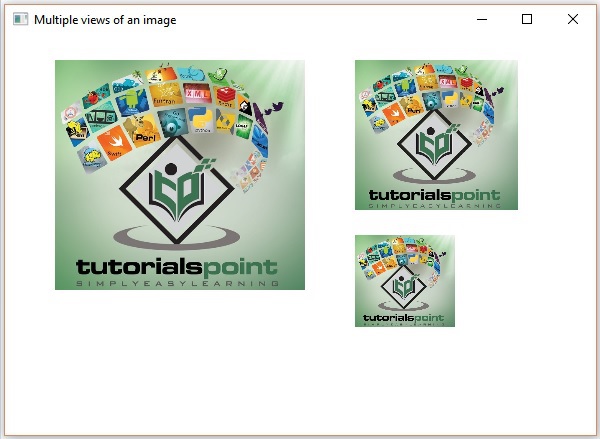
您还可以为同一场景中的图像设置多个视图。 以下程序是演示如何在JavaFX中为场景中的图像设置各种视图的示例。
将此代码保存在名为MultipleViews.java的文件中。
import java.io.FileInputStream;
import java.io.FileNotFoundException;
import javafx.application.Application;
import javafx.scene.Group;
import javafx.scene.Scene;
import javafx.scene.image.Image;
import javafx.scene.image.ImageView;
import javafx.stage.Stage;
public class MultipleViews extends Application {
   @Override
   public void start(Stage stage) throws FileNotFoundException {
      //Creating an image
      Image image = new Image(new FileInputStream("file path"));
      //Setting the image view 1
      ImageView imageView1 = new ImageView(image);
      //Setting the position of the image
      imageView1.setX(50);
      imageView1.setY(25);
      //setting the fit height and width of the image view
      imageView1.setFitHeight(300);
      imageView1.setFitWidth(250);
      //Setting the preserve ratio of the image view
      imageView1.setPreserveRatio(true);
      //Setting the image view 2
      ImageView imageView2 = new ImageView(image);
      //Setting the position of the image
      imageView2.setX(350);
      imageView2.setY(25);
      //setting the fit height and width of the image view
      imageView2.setFitHeight(150);
      imageView2.setFitWidth(250);
      //Setting the preserve ratio of the image view
      imageView2.setPreserveRatio(true);
      //Setting the image view 3
      ImageView imageView3 = new ImageView(image);
      //Setting the position of the image
      imageView3.setX(350);
      imageView3.setY(200);
      //setting the fit height and width of the image view
      imageView3.setFitHeight(100);
      imageView3.setFitWidth(100);
      //Setting the preserve ratio of the image view
      imageView3.setPreserveRatio(true);
      //Creating a Group object
      Group root = new Group(imageView1, imageView2, imageView3);
      //Creating a scene object
      Scene scene = new Scene(root, 600, 400);
      //Setting title to the Stage
      stage.setTitle("Multiple views of an image");
      //Adding scene to the stage
      stage.setScene(scene);
      //Displaying the contents of the stage
      stage.show();
   }
   public static void main(String args[]) {
      launch(args);
   }
}
使用以下命令从命令提示符编译并执行保存的java文件。
Javac MultipleViews.java
java MultipleViews
执行时,上面的程序生成一个JavaFX窗口,如下所示 -
写像素
JavaFX提供了名为PixelReader和PixelWriter类的类来读取和写入图像的像素。 WritableImage类用于创建可写图像。
以下是演示如何读取和写入图像像素的示例。 在这里,我们正在读取图像的颜色值并使其更暗。
将此代码保存在名为WritingPixelsExample.java的文件中。
import java.io.FileInputStream;
import java.io.FileNotFoundException;
import javafx.application.Application;
import javafx.scene.Group;
import javafx.scene.Scene;
import javafx.scene.image.Image;
import javafx.scene.image.ImageView;
import javafx.scene.image.PixelReader;
import javafx.scene.image.PixelWriter;
import javafx.scene.image.WritableImage;
import javafx.scene.paint.Color;
import javafx.stage.Stage;
public class WritingPixelsExample extends Application {
   @Override
   public void start(Stage stage) throws FileNotFoundException {
      //Creating an image
      Image image = new Image(new FileInputStream("C:\\images\\logo.jpg"));
      int width = (int)image.getWidth();
      int height = (int)image.getHeight();
      //Creating a writable image
      WritableImage wImage = new WritableImage(width, height);
      //Reading color from the loaded image
      PixelReader pixelReader = image.getPixelReader();
      //getting the pixel writer
      PixelWriter writer = wImage.getPixelWriter();
      //Reading the color of the image
      for(int y = 0; y < height; y++) {
         for(int x = 0; x < width; x++) {
            //Retrieving the color of the pixel of the loaded image
            Color color = pixelReader.getColor(x, y);
            //Setting the color to the writable image
            writer.setColor(x, y, color.darker());
         }
      }
      //Setting the view for the writable image
      ImageView imageView = new ImageView(wImage);
      //Creating a Group object
      Group root = new Group(imageView);
      //Creating a scene object
      Scene scene = new Scene(root, 600, 500);
      //Setting title to the Stage
      stage.setTitle("Writing pixels ");
      //Adding scene to the stage
      stage.setScene(scene);
      //Displaying the contents of the stage
      stage.show();
   }
   public static void main(String args[]) {
      launch(args);
   }
}
使用以下命令从命令提示符编译并执行保存的java文件。
Javac WritingPixelsExample.java
java WritingPixelsExample
执行时,上面的程序生成一个JavaFX窗口,如下所示 -
JavaFX - 3D Shapes
在前面的章节中,我们已经了解了如何在XY平面上绘制2D形状。 除了这些2D形状,我们还可以使用JavaFX绘制其他几种3D形状。
3D形状
通常,3D形状是可以在XYZ平面上绘制的几何图形。 这些包括Cylinder, Sphere和Box 。
上面提到的每个3D形状都由一个类表示,所有这些类都属于包javafx.scene.shape 。 名为Shape3D的类是JavaFX中所有三维形状的基类。
创建3D形状
要创建三维形状,您需要 -
实例化所需3D形状的相应类。
设置3D形状的属性。
将3D形状对象添加到组中。
实例化各个类
要创建三维形状,首先需要实例化其各自的类。 例如,如果要创建3D框,则需要实例化名为Box的类,如下所示 -
Box box = new Box();
设置形状的属性
实例化类之后,需要使用setter方法设置形状的属性。
例如,要绘制3D框,您需要传递其宽度,高度,深度。 您可以使用各自的setter方法指定这些值,如下所示 -
//Setting the properties of the Box
box.setWidth(200.0);
box.setHeight(400.0);
box.setDepth(200.0);
将形状对象添加到组
最后,您需要将形状的对象添加到组中,方法是将其作为构造函数的参数传递,如下所示。
//Creating a Group object
Group root = new Group(box);
下表提供了JavaFX提供的各种3D形状的列表。
| S.No | 形状和描述 |
|---|---|
| 1 | Box 长方体是具有length (深度), width和height的三维形状。 在JavaFX中,三维框由名为Box的类表示。 该类属于包javafx.scene.shape 。 通过实例化此类,您可以在JavaFX中创建Box节点。 该类具有double数据类型的3个属性,即 -
|
| 2 | Cylinder 圆柱体是闭合的固体,其具有通过弯曲表面连接的两个平行(大部分为圆形)的基部。 它由两个参数描述,即其圆形底座的radius和圆柱体的height 。 在JavaFX中,圆柱体由名为Cylinder的类表示。 该类属于包javafx.scene.shape 。 通过实例化此类,您可以在JavaFX中创建柱面节点。 该类具有double数据类型的2个属性,即 -
|
| 3 | Sphere 球体被定义为与3D空间中的给定点相距距离r的点集。 该距离r是球体的半径,给定点是球体的中心。 在JavaFX中,球体由名为Sphere的类表示。 该类属于包javafx.scene.shape 。 通过实例化此类,您可以在JavaFX中创建一个球体节点。 此类具有名为radius of double数据类型的属性。 它代表球体的半径。 |
3D对象的属性
对于所有3维对象,您可以设置各种属性,如剔除面,绘图模式,材质。
以下部分讨论3D对象的属性。
剔脸
通常,剔除是去除形状的不正确定向部分(在视图区域中不可见)。
Cull Face属性的类型为CullFace ,它表示3D形状的Cull Face。 您可以使用方法setCullFace()设置形状的剔除面,如下所示 -
box.setCullFace(CullFace.NONE);
形状的笔划类型可以是 -
None - 不执行剔除(CullFace.NONE)。
Front - 所有正面饰面都被剔除。 (CullFace.FRONT)。
Back - 所有面向后方的多边形都被剔除。 (StrokeType.BACK)。
默认情况下,三维形状的剔除面是Back。
例子 (Example)
以下程序是演示球体的各种剔除面的示例。 将此代码保存在名为SphereCullFace.java的文件中。
import javafx.application.Application;
import javafx.scene.Group;
import javafx.scene.Scene;
import javafx.scene.shape.CullFace;
import javafx.stage.Stage;
import javafx.scene.shape.Sphere;
public class SphereCullFace extends Application {
   @Override
   public void start(Stage stage) {
      //Drawing Sphere1
      Sphere sphere1 = new Sphere();
      //Setting the radius of the Sphere
      sphere1.setRadius(50.0);
      //Setting the position of the sphere
      sphere1.setTranslateX(100);
      sphere1.setTranslateY(150);
      //setting the cull face of the sphere to front
      sphere1.setCullFace(CullFace.FRONT);
      //Drawing Sphere2
      Sphere sphere2 = new Sphere();
      //Setting the radius of the Sphere
      sphere2.setRadius(50.0);
      //Setting the position of the sphere
      sphere2.setTranslateX(300);
      sphere2.setTranslateY(150);
      //Setting the cull face of the sphere to back
      sphere2.setCullFace(CullFace.BACK);
      //Drawing Sphere3
      Sphere sphere3 = new Sphere();
      //Setting the radius of the Sphere
      sphere3.setRadius(50.0);
      //Setting the position of the sphere
      sphere3.setTranslateX(500);
      sphere3.setTranslateY(150);
      //Setting the cull face of the sphere to none
      sphere2.setCullFace(CullFace.NONE);
      //Creating a Group object
      Group root = new Group(sphere1, sphere2, sphere3);
      //Creating a scene object
      Scene scene = new Scene(root, 600, 300);
      //Setting title to the Stage
      stage.setTitle("Drawing a Sphere");
      //Adding scene to the stage
      stage.setScene(scene);
      //Displaying the contents of the stage
      stage.show();
   }
   public static void main(String args[]){
      launch(args);
   }
}
使用以下命令从命令提示符编译并执行保存的Java文件。
javac SphereCullFace.java
java SphereCullFace
执行时,上述程序生成一个JavaFX窗口,显示三个球体,其剔除面值分别为FRONT, BACK和NONE ,如下所示 -

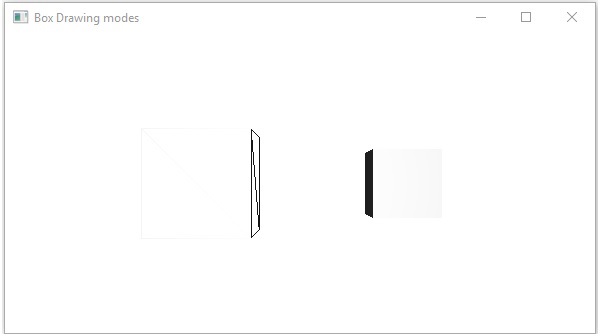
绘图模式
它的属性是DrawMode类型,它表示用于绘制当前3D形状的绘图模式。 您可以使用方法setDrawMode()选择绘制模式来绘制3D形状,如下所示 -
box.setDrawMode(DrawMode.FILL);
在JavaFX中,您可以选择两种绘制模式来绘制3D形状,它们是 -
Fill - 此模式绘制并填充2D形状(DrawMode.FILL)。
Line - 此模式使用线条绘制3D形状(DrawMode.LINE)。
默认情况下,3D维形状的绘制模式为填充。
例子 (Example)
以下程序是演示3D盒子的各种绘制模式的示例。 将此代码保存在名为BoxDrawMode.java的文件中。
import javafx.application.Application;
import javafx.scene.Group;
import javafx.scene.PerspectiveCamera;
import javafx.scene.Scene;
import javafx.scene.shape.Box;
import javafx.scene.shape.DrawMode;
import javafx.stage.Stage;
public class BoxDrawMode extends Application {
   @Override
   public void start(Stage stage) {
      //Drawing a Box
      Box box1 = new Box();
      //Setting the properties of the Box
      box1.setWidth(100.0);
      box1.setHeight(100.0);
      box1.setDepth(100.0);
      //Setting the position of the box
      box1.setTranslateX(200);
      box1.setTranslateY(150);
      box1.setTranslateZ(0);
      //Setting the drawing mode of the box
      box1.setDrawMode(DrawMode.LINE);
      //Drawing a Box
      Box box2 = new Box();
      //Setting the properties of the Box
      box2.setWidth(100.0);
      box2.setHeight(100.0);
      box2.setDepth(100.0);
      //Setting the position of the box
      box2.setTranslateX(450); //450
      box2.setTranslateY(150);//150
      box2.setTranslateZ(300);
      //Setting the drawing mode of the box
      box2.setDrawMode(DrawMode.FILL);
      //Creating a Group object
      Group root = new Group(box1, box2);
      //Creating a scene object
      Scene scene = new Scene(root, 600, 300);
      //Setting camera
      PerspectiveCamera camera = new PerspectiveCamera(false);
      camera.setTranslateX(0);
      camera.setTranslateY(0);
      camera.setTranslateZ(0);
      scene.setCamera(camera);
      //Setting title to the Stage
      stage.setTitle("Drawing a Box");
      //Adding scene to the stage
      stage.setScene(scene);
      //Displaying the contents of the stage
      stage.show();
   }
   public static void main(String args[]){
      launch(args);
   }
}
使用以下命令从命令提示符编译并执行保存的java文件。
javac BoxDrawMode.java
java BoxDrawMode
执行时,上述程序生成一个JavaFX窗口,分别显示两个框,绘图模式值分别为LINE和FILL,如下所示 -
Material
剔除Face属性属于Material类型,它用于选择3D形状材质的表面。 您可以使用setCullFace()方法设置3D形状的材质,如下所示 -
cylinder.setMaterial(material);
如上所述,此方法需要传递Material类型的对象。 包javafx.scene.paint的PhongMaterial类是此类的子类,它提供了7个表示Phong着色材质的属性。 您可以使用这些属性的setter方法将所有这些类型的材质应用于3D形状的表面。
以下是JavaFX中可用的材料类型 -
bumpMap - 表示存储为RGB图像的法线贴图。
diffuseMap - 这表示漫反射贴图。
selfIlluminationMap - 这表示此PhongMaterial的自发光地图。
specularMap - 这表示此PhongMaterial的高光贴图。
diffuseColor - 这表示此PhongMaterial的漫反射颜色。
specularColor - 这表示此PhongMaterial的镜面反射颜色。
specularPower - 这代表了这个PhongMaterial的镜面反射力。
默认情况下,三维形状的材质是PhongMaterial,具有浅灰色的漫反射颜色。
例子 (Example)
以下是在圆筒上显示各种材料的示例。 将此代码保存在名为CylinderMaterials.java的文件中。
import javafx.application.Application;
import javafx.scene.Group;
import javafx.scene.PerspectiveCamera;
import javafx.scene.Scene;
import javafx.scene.image.Image;
import javafx.scene.paint.Color;
import javafx.scene.paint.PhongMaterial;
import javafx.scene.shape.Cylinder;
import javafx.stage.Stage;
public class CylinderMaterials extends Application {
   @Override
   public void start(Stage stage) {
      //Drawing Cylinder1
      Cylinder cylinder1 = new Cylinder();
      //Setting the properties of the Cylinder
      cylinder1.setHeight(130.0f);
      cylinder1.setRadius(30.0f);
      //Setting the position of the Cylinder
      cylinder1.setTranslateX(100);
      cylinder1.setTranslateY(75);
      //Preparing the phong material of type bump map
      PhongMaterial material1 = new PhongMaterial();
      material1.setBumpMap(new Image
         ("http://www.iowiki.com/images/tplogo.gif"));
      //Setting the bump map material to Cylinder1
      cylinder1.setMaterial(material1);
      //Drawing Cylinder2
      Cylinder cylinder2 = new Cylinder();
      //Setting the properties of the Cylinder
      cylinder2.setHeight(130.0f);
      cylinder2.setRadius(30.0f);
      //Setting the position of the Cylinder
      cylinder2.setTranslateX(200);
      cylinder2.setTranslateY(75);
      //Preparing the phong material of type diffuse map
      PhongMaterial material2 = new PhongMaterial();
      material2.setDiffuseMap(new Image
         ("http://www.iowiki.com/images/tp-logo.gif"));
      //Setting the diffuse map material to Cylinder2
      cylinder2.setMaterial(material2);
      //Drawing Cylinder3
      Cylinder cylinder3 = new Cylinder();
      //Setting the properties of the Cylinder
      cylinder3.setHeight(130.0f);
      cylinder3.setRadius(30.0f);
      //Setting the position of the Cylinder
      cylinder3.setTranslateX(300);
      cylinder3.setTranslateY(75);
      //Preparing the phong material of type Self Illumination Map
      PhongMaterial material3 = new PhongMaterial();
      material3.setSelfIlluminationMap(new Image
         ("http://www.iowiki.com/images/tp-logo.gif"));
      //Setting the Self Illumination Map material to Cylinder3
      cylinder3.setMaterial(material3);
      //Drawing Cylinder4
      Cylinder cylinder4 = new Cylinder();
      //Setting the properties of the Cylinder
      cylinder4.setHeight(130.0f);
      cylinder4.setRadius(30.0f);
      //Setting the position of the Cylinder
      cylinder4.setTranslateX(400);
      cylinder4.setTranslateY(75);
      //Preparing the phong material of type Specular Map
      PhongMaterial material4 = new PhongMaterial();
      material4.setSpecularMap(new Image
         ("http://www.iowiki.com/images/tp-logo.gif"));
      //Setting the Specular Map material to Cylinder4
      cylinder4.setMaterial(material4);
      //Drawing Cylinder5
      Cylinder cylinder5 = new Cylinder();
      //Setting the properties of the Cylinder
      cylinder5.setHeight(130.0f);
      cylinder5.setRadius(30.0f);
      //Setting the position of the Cylinder
      cylinder5.setTranslateX(100);
      cylinder5.setTranslateY(300);
      //Preparing the phong material of type diffuse color
      PhongMaterial material5 = new PhongMaterial();
      material5.setDiffuseColor(Color.BLANCHEDALMOND);
      //Setting the diffuse color material to Cylinder5
      cylinder5.setMaterial(material5);
      //Drawing Cylinder6
      Cylinder cylinder6 = new Cylinder();
      //Setting the properties of the Cylinder
      cylinder6.setHeight(130.0f);
      cylinder6.setRadius(30.0f);
      //Setting the position of the Cylinder
      cylinder6.setTranslateX(200);
      cylinder6.setTranslateY(300);
      //Preparing the phong material of type specular color
      PhongMaterial material6 = new PhongMaterial();
      //setting the specular color map to the material
      material6.setSpecularColor(Color.BLANCHEDALMOND);
      //Setting the specular color material to Cylinder6
      cylinder6.setMaterial(material6);
      //Drawing Cylinder7
      Cylinder cylinder7 = new Cylinder();
      //Setting the properties of the Cylinder
      cylinder7.setHeight(130.0f);
      cylinder7.setRadius(30.0f);
      //Setting the position of the Cylinder
      cylinder7.setTranslateX(300);
      cylinder7.setTranslateY(300);
      //Preparing the phong material of type Specular Power
      PhongMaterial material7 = new PhongMaterial();
      material7.setSpecularPower(0.1);
      //Setting the Specular Power material to the Cylinder
      cylinder7.setMaterial(material7);
      //Creating a Group object
      Group root = new Group(cylinder1 ,cylinder2, cylinder3,
      cylinder4, cylinder5, cylinder6, cylinder7);
      //Creating a scene object
      Scene scene = new Scene(root, 600, 400);
      //Setting camera
      PerspectiveCamera camera = new PerspectiveCamera(false);
      camera.setTranslateX(0);
      camera.setTranslateY(0);
      camera.setTranslateZ(-10);
      scene.setCamera(camera);
      //Setting title to the Stage
      stage.setTitle("Drawing a cylinder");
      //Adding scene to the stage
      stage.setScene(scene);
      //Displaying the contents of the stage
      stage.show();
   }
   public static void main(String args[]){
      launch(args);
   }
}
使用以下命令从命令提示符编译并执行保存的java文件。
Javac CylinderMaterials.java
java CylinderMaterials
执行时,上面的程序生成一个JavaFX窗口,分别显示7个圆柱体,包括材质,凹凸贴图,漫反射贴图,自发光贴图,镜面贴图,漫反射颜色,镜面反射颜色,(BLANCHEDALMOND)镜面反射功率,如下面的屏幕截图所示 -
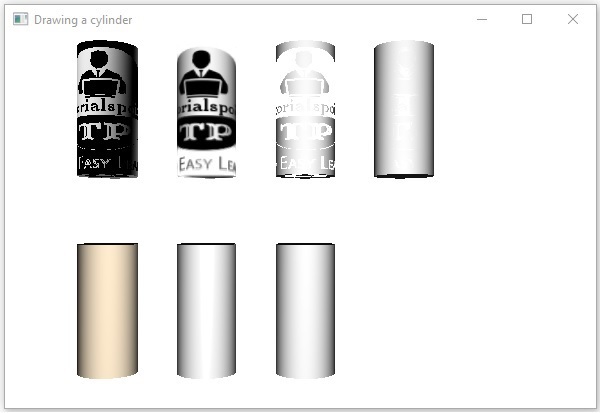
JavaFX - Event Handling
在JavaFX中,我们可以开发GUI应用程序,Web应用程序和图形应用程序。 在这样的应用程序中,每当用户与应用程序(节点)交互时,就说事件已经发生。
例如,单击按钮,移动鼠标,通过键盘输入字符,从列表中选择项目,滚动页面是导致事件发生的活动。
事件类型
这些事件大致可分为以下两类 -
Foreground Events - 需要用户直接交互的事件。 它们是作为人与图形用户界面中的图形组件交互的结果而生成的。 例如,单击按钮,移动鼠标,通过键盘输入字符,从列表中选择项目,滚动页面等。
Background Events - 需要最终用户交互的事件称为后台事件。 操作系统中断,硬件或软件故障,计时器到期,操作完成是后台事件的示例。
JavaFX中的事件
JavaFX提供了处理各种事件的支持。 包javafx.event名为Event的类是事件的基类。
它的任何子类的实例都是一个事件。 JavaFX提供了各种各样的事件。 其中一些列在下面。
Mouse Event - 这是单击鼠标时发生的输入事件。 它由名为MouseEvent的类表示。 它包括鼠标单击,鼠标按下,鼠标释放,鼠标移动,鼠标输入目标,鼠标退出目标等操作。
Key Event - 这是一个输入事件,指示节点上发生的键击。 它由名为KeyEvent的类表示。 此事件包括按下键,释放键和键入键等操作。
Drag Event - 这是拖动鼠标时发生的输入事件。 它由名为DragEvent的类表示。 它包括拖动输入,拖放,拖动输入目标,拖动退出目标,拖动等操作。
Window Event - 这是与窗口显示/隐藏操作相关的事件。 它由名为WindowEvent的类表示。 它包括窗口隐藏,显示窗口,隐藏窗口,窗口显示等操作。
事件处理
事件处理是控制事件并决定事件发生时应该发生什么的机制。 此机制具有代码,该代码称为事件发生时执行的事件处理程序。
JavaFX提供处理程序和过滤器来处理事件。 在JavaFX中,每个事件都有 -
Target - 发生事件的节点。 目标可以是窗口,场景和节点。
Source - 生成事件的源将是事件的来源。 在上面的场景中,鼠标是事件的来源。
Type - 发生事件的类型; 在鼠标事件的情况下 - 鼠标按下,鼠标释放是事件的类型。
假设我们有一个应用程序,它使用组对象插入Circle,Stop和Play Buttons,如下所示 -
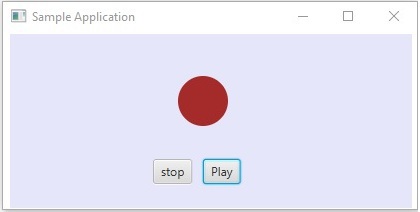
如果单击播放按钮,源将是鼠标,目标节点将是播放按钮,生成的事件类型是鼠标单击。
JavaFX中事件处理的阶段
每当生成事件时,JavaFX都会经历以下阶段。
路线建设
每当生成事件时,事件的默认/初始路由由构建Event Dispatch chain 。 它是从阶段到源节点的路径。
以下是当我们点击上述场景中的播放按钮时生成的事件的事件调度链。
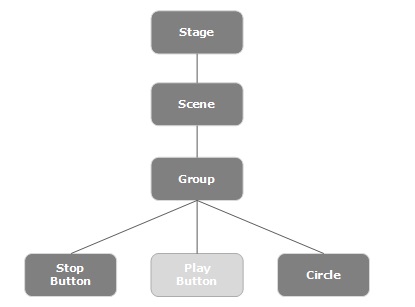
事件捕获阶段
在构建事件调度链之后,应用程序的根节点将调度该事件。 此事件将传递到调度链中的所有节点(从上到下)。 如果这些节点中的任何节点具有为生成的事件注册的filter ,则将执行该filter 。 如果调度链中没有节点具有生成事件的过滤器,则将其传递到目标节点,最后目标节点处理该事件。
事件冒泡阶段
在冒泡阶段,事件从目标节点传播到阶段节点(从下到上)。 如果事件调度链中的任何节点具有为生成的事件注册的handler ,则将执行该handler 。 如果这些节点都没有处理事件的处理程序,则事件到达根节点,最后完成该过程。
事件处理程序和过滤器
事件过滤器和处理程序包含处理事件的应用程序逻辑。 节点可以注册到多个处理程序/过滤器。 在父子节点的情况下,您可以为父节点提供公共过滤器/处理程序,它将作为所有子节点的默认处理。
如上所述,在事件期间,处理是执行的过滤器,并且在事件冒泡阶段期间,执行处理程序。 所有处理程序和过滤器都实现了包javafx.event的接口EventHandler 。
添加和删除事件过滤器
要向节点添加事件过滤器,您需要使用Node类的addEventFilter()方法注册此过滤器。
//Creating the mouse event handler
EventHandler<MouseEvent> eventHandler = new EventHandler<MouseEvent>() {
   @Override
   public void handle(MouseEvent e) {
      System.out.println("Hello World");
      circle.setFill(Color.DARKSLATEBLUE);
   }
};
//Adding event Filter
Circle.addEventFilter(MouseEvent.MOUSE_CLICKED, eventHandler);
以同样的方式,您可以使用removeEventFilter()方法删除过滤器,如下所示 -
circle.removeEventFilter(MouseEvent.MOUSE_CLICKED, eventHandler);
事件处理示例
以下是使用事件过滤器演示JavaFX中的事件处理的示例。 将此代码保存在名为EventFiltersExample.java的文件中。
import javafx.application.Application;
import static javafx.application.Application.launch;
import javafx.event.EventHandler;
import javafx.scene.Group;
import javafx.scene.Scene;
import javafx.scene.input.MouseEvent;
import javafx.scene.paint.Color;
import javafx.scene.shape.Circle;
import javafx.scene.text.Font;
import javafx.scene.text.FontWeight;
import javafx.scene.text.Text;
import javafx.stage.Stage;
public class EventFiltersExample extends Application {
   @Override
   public void start(Stage stage) {
      //Drawing a Circle
      Circle circle = new Circle();
      //Setting the position of the circle
      circle.setCenterX(300.0f);
      circle.setCenterY(135.0f);
      //Setting the radius of the circle
      circle.setRadius(25.0f);
      //Setting the color of the circle
      circle.setFill(Color.BROWN);
      //Setting the stroke width of the circle
      circle.setStrokeWidth(20);
      //Setting the text
      Text text = new Text("Click on the circle to change its color");
      //Setting the font of the text
      text.setFont(Font.font(null, FontWeight.BOLD, 15));
      //Setting the color of the text
      text.setFill(Color.CRIMSON);
      //setting the position of the text
      text.setX(150);
      text.setY(50);
      //Creating the mouse event handler
      EventHandler<MouseEvent> eventHandler = new EventHandler<MouseEvent>() {
         @Override
         public void handle(MouseEvent e) {
            System.out.println("Hello World");
            circle.setFill(Color.DARKSLATEBLUE);
         }
      };
      //Registering the event filter
      circle.addEventFilter(MouseEvent.MOUSE_CLICKED, eventHandler);
      //Creating a Group object
      Group root = new Group(circle, text);
      //Creating a scene object
      Scene scene = new Scene(root, 600, 300);
      //Setting the fill color to the scene
      scene.setFill(Color.LAVENDER);
      //Setting title to the Stage
      stage.setTitle("Event Filters Example");
      //Adding scene to the stage
      stage.setScene(scene);
      //Displaying the contents of the stage
      stage.show();
   }
   public static void main(String args[]){
      launch(args);
   }
}
使用以下命令从命令提示符编译并执行保存的java文件。
javac EventFiltersExample.java
java EventFiltersExample
执行时,上面的程序生成一个JavaFX窗口,如下所示。
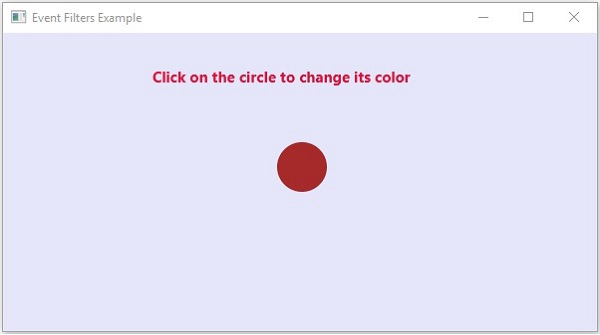
添加和删除事件处理程序
要向节点添加事件处理程序,需要使用Node类的addEventHandler()方法注册此处理程序,如下所示。
//Creating the mouse event handler
EventHandler<javafx.scene.input.MouseEvent> eventHandler =
   new EventHandler<javafx.scene.input.MouseEvent>() {
   @Override
   public void handle(javafx.scene.input.MouseEvent e) {
      System.out.println("Hello World");
      circle.setFill(Color.DARKSLATEBLUE);
   }
};
//Adding the event handler
circle.addEventHandler(javafx.scene.input.MouseEvent.MOUSE_CLICKED, eventHandler);
以同样的方式,您可以使用removeEventHandler()方法删除事件处理程序,如下所示 -
circle.removeEventHandler(MouseEvent.MOUSE_CLICKED, eventHandler);
例子 (Example)
以下程序是使用事件处理程序演示JavaFX中的事件处理的示例。
将此代码保存在名为EventHandlersExample.java的文件中。
import javafx.animation.RotateTransition;
import javafx.application.Application;
import javafx.event.EventHandler;
import javafx.scene.Group;
import javafx.scene.PerspectiveCamera;
import javafx.scene.Scene;
import javafx.scene.control.TextField;
import javafx.scene.input.KeyEvent;
import javafx.scene.paint.Color;
import javafx.scene.paint.PhongMaterial;
import javafx.scene.shape.Box;
import javafx.scene.text.Font;
import javafx.scene.text.FontWeight;
import javafx.scene.text.Text;
import javafx.scene.transform.Rotate;
import javafx.stage.Stage;
import javafx.util.Duration;
public class EventHandlersExample extends Application {
   @Override
   public void start(Stage stage) {
      //Drawing a Box
      Box box = new Box();
      //Setting the properties of the Box
      box.setWidth(150.0);
      box.setHeight(150.0);
      box.setDepth(100.0);
      //Setting the position of the box
      box.setTranslateX(350);
      box.setTranslateY(150);
      box.setTranslateZ(50);
      //Setting the text
      Text text = new Text("Type any letter to rotate the box,
         and click on the box to stop the rotation");
      //Setting the font of the text
      text.setFont(Font.font(null, FontWeight.BOLD, 15));
      //Setting the color of the text
      text.setFill(Color.CRIMSON);
      //setting the position of the text
      text.setX(20);
      text.setY(50);
      //Setting the material of the box
      PhongMaterial material = new PhongMaterial();
      material.setDiffuseColor(Color.DARKSLATEBLUE);
      //Setting the diffuse color material to box
      box.setMaterial(material);
      //Setting the rotation animation to the box
      RotateTransition rotateTransition = new RotateTransition();
      //Setting the duration for the transition
      rotateTransition.setDuration(Duration.millis(1000));
      //Setting the node for the transition
      rotateTransition.setNode(box);
      //Setting the axis of the rotation
      rotateTransition.setAxis(Rotate.Y_AXIS);
      //Setting the angle of the rotation
      rotateTransition.setByAngle(360);
      //Setting the cycle count for the transition
      rotateTransition.setCycleCount(50);
      //Setting auto reverse value to false
      rotateTransition.setAutoReverse(false);
      //Creating a text filed
      TextField textField = new TextField();
      //Setting the position of the text field
      textField.setLayoutX(50);
      textField.setLayoutY(100);
      //Handling the key typed event
      EventHandler<KeyEvent> eventHandlerTextField = new EventHandler<KeyEvent>() {
         @Override
         public void handle(KeyEvent event) {
            //Playing the animation
            rotateTransition.play();
         }
      };
      //Adding an event handler to the text feld
      textField.addEventHandler(KeyEvent.KEY_TYPED, eventHandlerTextField);
      //Handling the mouse clicked event(on box)
      EventHandler<javafx.scene.input.MouseEvent> eventHandlerBox =
         new EventHandler<javafx.scene.input.MouseEvent>() {
         @Override
         public void handle(javafx.scene.input.MouseEvent e) {
            rotateTransition.stop();
         }
      };
      //Adding the event handler to the box
      box.addEventHandler(javafx.scene.input.MouseEvent.MOUSE_CLICKED, eventHandlerBox);
      //Creating a Group object
      Group root = new Group(box, textField, text);
      //Creating a scene object
      Scene scene = new Scene(root, 600, 300);
      //Setting camera
      PerspectiveCamera camera = new PerspectiveCamera(false);
      camera.setTranslateX(0);
      camera.setTranslateY(0);
      camera.setTranslateZ(0);
      scene.setCamera(camera);
      //Setting title to the Stage
      stage.setTitle("Event Handlers Example");
      //Adding scene to the stage
      stage.setScene(scene);
      //Displaying the contents of the stage
      stage.show();
   }
   public static void main(String args[]){
      launch(args);
   }
}
使用以下命令从命令提示符编译并执行保存的java文件。
javac EventHandlersExample.java
java EventHandlersExample
执行时,上面的程序生成一个显示文本字段和3D框的JavaFX窗口,如下所示 -
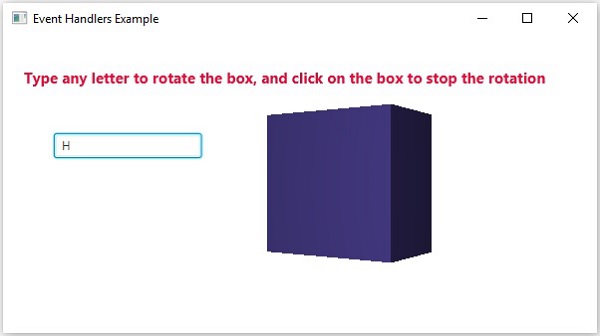
在这里,如果您在文本字段中键入字母,3D框将开始沿x轴旋转。 如果再次单击该框,则旋转停止。
使用便捷方法进行事件处理
JavaFX中的一些类定义了事件处理程序属性。 通过使用各自的setter方法将值设置为这些属性,您可以注册到事件处理程序。 这些方法称为便利方法。
大多数这些方法存在于Node,Scene,Window等类中,并且它们可用于所有子类。
例如,要向按钮添加鼠标事件侦听器,可以使用方便方法setOnMouseClicked() ,如下所示。
playButton.setOnMouseClicked((new EventHandler<MouseEvent>() {
   public void handle(MouseEvent event) {
      System.out.println("Hello World");
      pathTransition.play();
   }
}));
例子 (Example)
以下程序是使用便捷方法演示JavaFX中的事件处理的示例。
将此代码保存在名为ConvinienceMethodsExample.java的文件中。
import javafx.animation.PathTransition;
import javafx.application.Application;
import static javafx.application.Application.launch;
import javafx.event.EventHandler;
import javafx.scene.Group;
import javafx.scene.Scene;
import javafx.scene.control.Button;
import javafx.scene.input.MouseEvent;
import javafx.scene.paint.Color;
import javafx.scene.shape.Circle;
import javafx.scene.shape.LineTo;
import javafx.scene.shape.MoveTo;
import javafx.scene.shape.Path;
import javafx.stage.Stage;
import javafx.util.Duration;
public class ConvinienceMethodsExample extends Application {
   @Override
   public void start(Stage stage) {
      //Drawing a Circle
      Circle circle = new Circle();
      //Setting the position of the circle
      circle.setCenterX(300.0f);
      circle.setCenterY(135.0f);
      //Setting the radius of the circle
      circle.setRadius(25.0f);
      //Setting the color of the circle
      circle.setFill(Color.BROWN);
      //Setting the stroke width of the circle
      circle.setStrokeWidth(20);
      //Creating a Path
      Path path = new Path();
      //Moving to the staring point
      MoveTo moveTo = new MoveTo(208, 71);
      //Creating 1st line
      LineTo line1 = new LineTo(421, 161);
      //Creating 2nd line
      LineTo line2 = new LineTo(226,232);
      //Creating 3rd line
      LineTo line3 = new LineTo(332,52);
      //Creating 4th line
      LineTo line4 = new LineTo(369, 250);
      //Creating 5th line
      LineTo line5 = new LineTo(208, 71);
      //Adding all the elements to the path
      path.getElements().add(moveTo);
      path.getElements().addAll(line1, line2, line3, line4, line5);
      //Creating the path transition
      PathTransition pathTransition = new PathTransition();
      //Setting the duration of the transition
      pathTransition.setDuration(Duration.millis(1000));
      //Setting the node for the transition
      pathTransition.setNode(circle);
      //Setting the path for the transition
      pathTransition.setPath(path);
      //Setting the orientation of the path
      pathTransition.setOrientation(
         PathTransition.OrientationType.ORTHOGONAL_TO_TAN GENT);
      //Setting the cycle count for the transition
      pathTransition.setCycleCount(50);
      //Setting auto reverse value to true
      pathTransition.setAutoReverse(false);
      //Creating play button
      Button playButton = new Button("Play");
      playButton.setLayoutX(300);
      playButton.setLayoutY(250);
      circle.setOnMouseClicked (new EventHandler<javafx.scene.input.MouseEvent>() {
         @Override
         public void handle(javafx.scene.input.MouseEvent e) {
            System.out.println("Hello World");
            circle.setFill(Color.DARKSLATEBLUE);
         }
      });
      playButton.setOnMouseClicked((new EventHandler<MouseEvent>() {
         public void handle(MouseEvent event) {
            System.out.println("Hello World");
            pathTransition.play();
         }
      }));
      //Creating stop button
      Button stopButton = new Button("stop");
      stopButton.setLayoutX(250);
      stopButton.setLayoutY(250);
      stopButton.setOnMouseClicked((new EventHandler<MouseEvent>() {
         public void handle(MouseEvent event) {
            System.out.println("Hello World");
            pathTransition.stop();
         }
      }));
      //Creating a Group object
      Group root = new Group(circle, playButton, stopButton);
      //Creating a scene object
      Scene scene = new Scene(root, 600, 300);
      scene.setFill(Color.LAVENDER);
      //Setting title to the Stage
      stage.setTitle("Convenience Methods Example");
      //Adding scene to the stage
      stage.setScene(scene);
      //Displaying the contents of the stage
      stage.show();
   }
   public static void main(String args[]){
      launch(args);
   }
}
使用以下命令从命令提示符编译并执行保存的java文件。
javac ConvinienceMethodsExample.java
java ConvinienceMethodsExample
执行时,上面的程序生成一个JavaFX窗口,如下所示。 在此处单击播放按钮以启动动画,然后单击停止按钮以停止动画。

JavaFX - UI Controls
每个用户界面都考虑以下三个主要方面 -
UI elements - 这些是用户最终看到并与之交互的核心可视元素。 JavaFX提供了大量广泛使用的常用元素列表,从基本到复杂,我们将在本教程中介绍。
Layouts - 它们定义了如何在屏幕上组织UI元素,并为GUI(图形用户界面)提供最终外观。 这部分将在布局章节中介绍。
Behavior - 这些是用户与UI元素交互时发生的事件。 这部分将在“事件处理”一章中介绍。
JavaFX在包javafx.scene.control提供了几个类。 为了创建各种GUI组件(控件),JavaFX支持多种控件,如日期选择器,按钮文本字段等。
每个控件由一个类表示; 您可以通过实例化其各自的类来创建控件。
以下是使用JavaFX设计GUI时常用控件的列表。
| S.No | 控制和描述 |
|---|---|
| 1 | Label Label对象是用于放置文本的组件。 |
| 2 | Button 该类创建一个带标签的按钮。 |
| 3 | ColorPicker ColorPicker提供了一个控件窗格,旨在允许用户操作和选择颜色。 |
| 4 | CheckBox CheckBox是一个图形组件,可以处于on(true)或off(false)状态。 |
| 5 | RadioButton RadioButton类是一个图形组件,可以在组中处于ON(true)或OFF(false)状态。 |
| 6 | ListView ListView组件向用户显示文本项的滚动列表。 |
| 7 | TextField TextField对象是一个文本组件,允许编辑单行文本。 |
| 8 | PasswordField PasswordField对象是专门用于输入密码的文本组件。 |
| 9 | Scrollbar Scrollbar控件表示滚动条组件,以便用户可以从值范围中进行选择。 |
| 10 | FileChooser FileChooser控件表示用户可以从中选择文件的对话窗口。 |
| 11 | ProgressBar 随着任务进展完成,进度条显示任务的完成百分比。 |
| 12 | Slider 滑块允许用户通过在有界区间内滑动旋钮以图形方式选择值。 |
例子 (Example)
以下程序是在JavaFX中显示登录页面的示例。 在这里,我们使用控件label, text field, password field和button 。
将此代码保存在名为LoginPage.java的文件中。
import javafx.application.Application;
import static javafx.application.Application.launch;
import javafx.geometry.Insets;
import javafx.geometry.Pos;
import javafx.scene.Scene;
import javafx.scene.control.Button;
import javafx.scene.control.PasswordField;
import javafx.scene.layout.GridPane;
import javafx.scene.text.Text;
import javafx.scene.control.TextField;
import javafx.stage.Stage;
public class LoginPage extends Application {
   @Override
   public void start(Stage stage) {
      //creating label email
      Text text1 = new Text("Email");
      //creating label password
      Text text2 = new Text("Password");
      //Creating Text Filed for email
      TextField textField1 = new TextField();
      //Creating Text Filed for password
      PasswordField textField2 = new PasswordField();
      //Creating Buttons
      Button button1 = new Button("Submit");
      Button button2 = new Button("Clear");
      //Creating a Grid Pane
      GridPane gridPane = new GridPane();
      //Setting size for the pane
      gridPane.setMinSize(400, 200);
      //Setting the padding
      gridPane.setPadding(new Insets(10, 10, 10, 10));
      //Setting the vertical and horizontal gaps between the columns
      gridPane.setVgap(5);
      gridPane.setHgap(5);
      //Setting the Grid alignment
      gridPane.setAlignment(Pos.CENTER);
      //Arranging all the nodes in the grid
      gridPane.add(text1, 0, 0);
      gridPane.add(textField1, 1, 0);
      gridPane.add(text2, 0, 1);
      gridPane.add(textField2, 1, 1);
      gridPane.add(button1, 0, 2);
      gridPane.add(button2, 1, 2);
      //Styling nodes
      button1.setStyle("-fx-background-color: darkslateblue; -fx-text-fill: white;");
      button2.setStyle("-fx-background-color: darkslateblue; -fx-text-fill: white;");
      text1.setStyle("-fx-font: normal bold 20px 'serif' ");
      text2.setStyle("-fx-font: normal bold 20px 'serif' ");
      gridPane.setStyle("-fx-background-color: BEIGE;");
      //Creating a scene object
      Scene scene = new Scene(gridPane);
      //Setting title to the Stage
      stage.setTitle("CSS Example");
      //Adding scene to the stage
      stage.setScene(scene);
      //Displaying the contents of the stage
      stage.show();
   }
   public static void main(String args[]){
      launch(args);
   }
}
使用以下命令从命令提示符编译并执行保存的java文件。
javac LoginPage.java
java LoginPage
执行时,上面的程序生成一个JavaFX窗口,如下所示。

以下程序是注册表单的示例,它演示了JavaFX中的控件,如Date Picker, Radio Button, Toggle Button, Check Box, List View, Choice List,等。
将此代码保存在名为Registration.java的文件中。
import javafx.application.Application;
import javafx.collections.FXCollections;
import javafx.collections.ObservableList;
import javafx.geometry.Insets;
import javafx.geometry.Pos;
import javafx.scene.Scene;
import javafx.scene.control.Button;
import javafx.scene.control.CheckBox;
import javafx.scene.control.ChoiceBox;
import javafx.scene.control.DatePicker;
import javafx.scene.control.ListView;
import javafx.scene.control.RadioButton;
import javafx.scene.layout.GridPane;
import javafx.scene.text.Text;
import javafx.scene.control.TextField;
import javafx.scene.control.ToggleGroup;
import javafx.scene.control.ToggleButton;
import javafx.stage.Stage;
public class Registration extends Application {
   @Override
   public void start(Stage stage) {
      //Label for name
      Text nameLabel = new Text("Name");
      //Text field for name
      TextField nameText = new TextField();
      //Label for date of birth
      Text dobLabel = new Text("Date of birth");
      //date picker to choose date
      DatePicker datePicker = new DatePicker();
      //Label for gender
      Text genderLabel = new Text("gender");
      //Toggle group of radio buttons
      ToggleGroup groupGender = new ToggleGroup();
      RadioButton maleRadio = new RadioButton("male");
      maleRadio.setToggleGroup(groupGender);
      RadioButton femaleRadio = new RadioButton("female");
      femaleRadio.setToggleGroup(groupGender);
      //Label for reservation
      Text reservationLabel = new Text("Reservation");
      //Toggle button for reservation
      ToggleButton Reservation = new ToggleButton();
      ToggleButton yes = new ToggleButton("Yes");
      ToggleButton no = new ToggleButton("No");
      ToggleGroup groupReservation = new ToggleGroup();
      yes.setToggleGroup(groupReservation);
      no.setToggleGroup(groupReservation);
      //Label for technologies known
      Text technologiesLabel = new Text("Technologies Known");
      //check box for education
      CheckBox javaCheckBox = new CheckBox("Java");
      javaCheckBox.setIndeterminate(false);
      //check box for education
      CheckBox dotnetCheckBox = new CheckBox("DotNet");
      javaCheckBox.setIndeterminate(false);
      //Label for education
      Text educationLabel = new Text("Educational qualification");
      //list View for educational qualification
      ObservableList<String> names = FXCollections.observableArrayList(
         "Engineering", "MCA", "MBA", "Graduation", "MTECH", "Mphil", "Phd");
      ListView<String> educationListView = new ListView<String>(names);
      //Label for location
      Text locationLabel = new Text("location");
      //Choice box for location
      ChoiceBox locationchoiceBox = new ChoiceBox();
      locationchoiceBox.getItems().addAll
         ("Hyderabad", "Chennai", "Delhi", "Mumbai", "Vishakhapatnam");
      //Label for register
      Button buttonRegister = new Button("Register");
      //Creating a Grid Pane
      GridPane gridPane = new GridPane();
      //Setting size for the pane
      gridPane.setMinSize(500, 500);
      //Setting the padding
      gridPane.setPadding(new Insets(10, 10, 10, 10));
      //Setting the vertical and horizontal gaps between the columns
      gridPane.setVgap(5);
      gridPane.setHgap(5);
      //Setting the Grid alignment
      gridPane.setAlignment(Pos.CENTER);
      //Arranging all the nodes in the grid
      gridPane.add(nameLabel, 0, 0);
      gridPane.add(nameText, 1, 0);
      gridPane.add(dobLabel, 0, 1);
      gridPane.add(datePicker, 1, 1);
      gridPane.add(genderLabel, 0, 2);
      gridPane.add(maleRadio, 1, 2);
      gridPane.add(femaleRadio, 2, 2);
      gridPane.add(reservationLabel, 0, 3);
      gridPane.add(yes, 1, 3);
      gridPane.add(no, 2, 3);
      gridPane.add(technologiesLabel, 0, 4);
      gridPane.add(javaCheckBox, 1, 4);
      gridPane.add(dotnetCheckBox, 2, 4);
      gridPane.add(educationLabel, 0, 5);
      gridPane.add(educationListView, 1, 5);
      gridPane.add(locationLabel, 0, 6);
      gridPane.add(locationchoiceBox, 1, 6);
      gridPane.add(buttonRegister, 2, 8);
      //Styling nodes
      buttonRegister.setStyle(
         "-fx-background-color: darkslateblue; -fx-textfill: white;");
      nameLabel.setStyle("-fx-font: normal bold 15px 'serif' ");
      dobLabel.setStyle("-fx-font: normal bold 15px 'serif' ");
      genderLabel.setStyle("-fx-font: normal bold 15px 'serif' ");
      reservationLabel.setStyle("-fx-font: normal bold 15px 'serif' ");
      technologiesLabel.setStyle("-fx-font: normal bold 15px 'serif' ");
      educationLabel.setStyle("-fx-font: normal bold 15px 'serif' ");
      locationLabel.setStyle("-fx-font: normal bold 15px 'serif' ");
      //Setting the back ground color
      gridPane.setStyle("-fx-background-color: BEIGE;");
      //Creating a scene object
      Scene scene = new Scene(gridPane);
      //Setting title to the Stage
      stage.setTitle("Registration Form");
      //Adding scene to the stage
      stage.setScene(scene);
      //Displaying the contents of the stage
      stage.show();
   }
   public static void main(String args[]){
      launch(args);
   }
}
使用以下命令从命令提示符编译并执行保存的java文件。
javac Registration.java
java Registration
执行时,上面的程序生成一个JavaFX窗口,如下所示。
JavaFX - Charts
通常,图表是数据的图形表示。 有各种各样的图表来表示数据,如Bar Chart, Pie Chart, Line Chart, Scatter Chart,等。
JavaFX支持各种Pie Charts和XY Charts 。 在XY平面上表示的图表包括AreaChart, BarChart, BubbleChart, LineChart, ScatterChart, StackedAreaChart, StackedBarChart,等。
每个图表由一个类表示,所有这些图表都属于包javafx.scene.chart 。 名为Chart的类是JavaFX中所有图表的基类, XYChart是在XY平面上绘制的所有图表的基类。
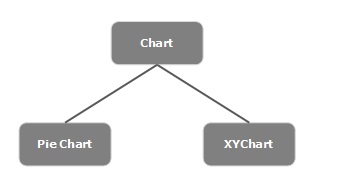
创建图表
要创建图表,您需要 -
- 定义图表的轴
- 实例化相应的类
- 准备并将数据传递到图表
实例化各个类
要创建图表,请实例化其各自的类。 例如,如果要创建折线图,则需要实例化名为Line的类,如下所示 -
LineChart linechart = new LineChart(xAxis, yAxis);
如上面的代码所示,在实例化时,需要传递两个分别代表图表X轴和Y轴的对象。
定义轴
一般来说,图表的轴可以表示为 -
- 人口,年龄和人口等数字
- 类别,例如一周中的天数,国家/地区。
在JavaFX中,轴是表示X或Y轴的抽象类。 它有两个子类来定义每种类型的轴,即CategoryAxis和NumberAxis ,如下图所示 -
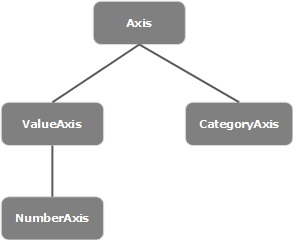
Category Axis - 通过实例化此类,您可以定义(创建)X轴或Y轴,每个值代表一个类别。 您可以通过实例化此类来定义类别轴,如下所示 -
CategoryAxis xAxis = new CategoryAxis();
对于此轴,您需要设置类别列表和标签到轴,如下所示 -
//setting the list of categories.
xAxis.setCategories(FXCollections.<String>observableArrayList
   (Arrays.asList("n ame1", "name2"….)));
//Setting label to the axis
xAxis.setLabel("name of the axis ");
NumberAxis - 通过实例化此类,您可以定义(创建)X轴或Y轴,每个值表示一个数值。 您可以对此Axis, Long, Double, BigDecimal等使用任何Number类型。您可以通过实例化此类来定义Number轴,如下所示 -
//Defining the axis
NumberAxis yAxis = new NumberAxis();
//Setting labelto the axis
yAxis.setLabel("name of the axis");
将数据传递到XY图表
所有XY图表都沿XY平面表示。 要在图表中绘制一组点,我们需要指定一系列XY坐标。
javafx.scene.chart包的《X,Y》类是一个类,使用它可以将数据发送到图表。 该类包含一个可观察的命名系列列表。 您可以使用XYChart.Series类的getData()方法获取此列表,如下所示 -
ObservableList list = series.getData();
其中, series是XYChart.Series类的对象。 您可以使用add()方法将数据添加到此列表中,如下所示 -
list.add(new XYChart.Data(x-axis data, y-axis data));
这两行可以一起写,如下所示 -
series.getData().add(new XYChart.Data(x-axis data, y-axis data));
下表给出了JavaFX提供的各种图表(类)的描述 -
| S.No | 图表和描述 |
|---|---|
| 1 | 饼形图 饼图是将值表示为具有不同颜色的圆的切片。 标记这些切片,并且在图表中表示与每个切片对应的值。 在JavaFX中,饼图由名为PieChart的类表示。 该类属于包javafx.scene.chart 。 |
| 2 | 折线图 折线图或折线图将信息显示为由直线段连接的一系列数据点(标记)。 折线图显示数据如何以相等的时间频率变化。 在JavaFX中,折线图由名为LineChart的类表示。 该类属于包javafx.scene.chart 。 通过实例化此类,您可以在JavaFX中创建LineChart节点。 |
| 3 | 面积图 面积图用于绘制基于区域的图表。 它绘制给定系列点与轴之间的区域。 通常,此图表用于比较两个数量。 在JavaFX中,Area图表由名为AreaChart的类AreaChart 。 该类属于包javafx.scene.chart 。 通过实例化此类,您可以在JavaFX中创建AreaChart节点。 |
| 4 | 条形图 条形图用于表示使用矩形条的分组数据。 这些条的长度描绘了这些值。 条形图中的条形可以垂直或水平绘制。 在JavaFX中,条形图由名为BarChart的类表示。 该类属于包javafx.scene.chart 。 通过实例化此类,您可以在JavaFX中创建BarChart节点。 |
| 5 | 气泡图 气泡图用于平铺三维数据。 第三个维度将由气泡的大小(半径)表示。 在JavaFX中,气泡图由名为BubbleChart的类BubbleChart 。 该类属于包javafx.scene.chart 。 通过实例化此类,您可以在JavaFX中创建BubbleChart节点。 |
| 6 | 散点图 散点图是一种图形,它使用在笛卡尔平面中绘制的两个变量的值。 它通常用于找出两个变量之间的关系。 在JavaFX中,Scatter图表由名为ScatterChart的类表示。 该类属于包javafx.scene.chart 。 通过实例化此类,您可以在JavaFX中创建ScatterChart节点。 |
| 7 | 堆积面积图 在JavaFX中,堆积区域图表由名为StackedAreaChart的类StackedAreaChart 。 该类属于包javafx.scene.chart 。 通过实例化此类,您可以在JavaFX中创建StackedAreaChart节点。 |
| 8 | 堆积条形图 在JavaFX中,Stacked Bar图表由名为StackedBarChart的类StackedBarChart 。 该类属于包javafx.scene.chart 。 通过实例化此类,您可以在JavaFX中创建StackedBarChart节点。 |
JavaFX - Layout Panes(Containers)
在构建场景中的所有必需节点之后,我们通常会按顺序排列它们。
容器内部件的这种布置称为容器的布局。 我们还可以说我们遵循布局,因为它包括将所有组件放置在容器内的特定位置。
JavaFX提供了几种预定义的布局,如HBox, VBox, Border Pane, Stack Pane, Text Flow, Anchor Pane, Title Pane, Grid Pane, Flow Panel等。
上面提到的每个布局都由一个类表示,所有这些类都属于包javafx.layout 。 名为Pane的类是JavaFX中所有布局的基类。
创建布局
要创建布局,您需要 -
- 创建节点。
- 实例化所需布局的相应类。
- 设置布局的属性。
- 将所有创建的节点添加到布局中。
创建节点
首先,通过实例化各自的类来创建JavaFX应用程序所需的节点。
例如,如果您想要一个文本字段和两个按钮,即在HBox布局中播放和停止 - 您必须最初创建这些节点,如下面的代码块所示 -
//Creating a text field
TextField textField = new TextField();
//Creating the play button
Button playButton = new Button("Play");
//Creating the stop button
Button stopButton = new Button("stop");
实例化各个类
在创建节点(并完成对它们的所有操作)之后,实例化所需布局的类。
例如,如果要创建Hbox布局,则需要按如下方式实例化此类。
HBox hbox = new HBox();
设置布局的属性
实例化类之后,您需要使用各自的setter方法设置布局的属性。
例如 - 如果要在HBox布局中的已创建节点之间设置空间,则需要将值设置为名为spacing的属性。 这可以通过使用setter方法setSpacing()来完成,如下所示 -
hbox.setSpacing(10);
将形状对象添加到组
最后,您需要将形状的对象添加到组中,方法是将其作为构造函数的参数传递,如下所示。
//Creating a Group object
Group root = new Group(line);
布局窗格
以下是JavaFX提供的各种布局窗格(类)。 这些类存在于包javafx.scene.layout 。
| S.No | 形状和描述 |
|---|---|
| 1 | HBox HBox布局将应用程序中的所有节点排列在一个水平行中。 包javafx.scene.layout名为HBox的类表示文本水平框布局。 |
| 2 | VBox VBox布局将我们应用程序中的所有节点排列在一个垂直列中。 包javafx.scene.layout名为VBox的类表示文本垂直框布局。 |
| 3 | BorderPane 边框窗格布局将应用程序中的节点排列在顶部,左侧,右侧,底部和中心位置。 包javafx.scene.layout名为BorderPane的类表示边框窗格布局。 |
| 4 | StackPane 堆栈窗格布局将应用程序中的节点排列在另一个上面,就像在堆栈中一样。 首先添加的节点位于堆栈的底部,下一个节点位于堆栈的顶部。 包javafx.scene.layout名为StackPane的类表示堆栈窗格布局。 |
| 5 | TextFlow 文本流布局在单个流中排列多个文本节点。 包javafx.scene.layout名为TextFlow的类表示文本流布局。 |
| 6 | AnchorPane “锚点”窗格布局将应用程序中的节点锚定在距窗格特定距离处。 包javafx.scene.layout名为AnchorPane的类表示Anchor窗格布局。 |
| 7 | TilePane Tile窗格布局以均匀大小的tile的形式添加应用程序的所有节点。 包javafx.scene.layout名为TilePane的类表示TilePane布局。 |
| 8 | GridPane 网格窗格布局将应用程序中的节点排列为行和列的网格。 使用JavaFX创建表单时,此布局非常方便。 包javafx.scene.layout名为GridPane的类表示GridPane布局。 |
| 9 | FlowPane 流窗格布局包装流中的所有节点。 水平流动窗格将窗格的元素包裹在其高度,而垂直流动窗格将元素包裹在其宽度处。 名为FlowPane的类javafx.scene.layout表示Flow Pane布局。 |
JavaFX - CSS
Cascading Style Sheets (也称为CSS)是一种简单的设计语言,旨在简化使网页呈现的过程。
CSS处理网页的外观和感觉部分。 使用CSS,您可以控制文本的颜色,字体的样式,段落之间的间距,列的大小和布局。 除此之外,您还可以控制所使用的背景图像或颜色,布局设计,不同设备和屏幕尺寸的显示变化以及各种其他效果。
JavaFX中的CSS
JavaFX为您提供了使用CSS来增强应用程序外观的功能。 包javafx.css包含用于为JavaFX应用程序应用CSS的类。
CSS包含样式规则,这些样式规则由浏览器解释,然后应用于文档中的相应元素。
样式规则由三部分组成,它们是 -
Selector - 选择器是将应用样式的HTML标记。 这可以是任何标签,如《h1》或《table》等。
Property - 属性是HTML标记的一种属性。 简单来说,所有HTML属性都转换为CSS属性。 它们可以是颜色, border等。
Value - 将值分配给属性。 例如,颜色属性可以具有red或#F1F1F1 。
您可以按如下方式放置CSS样式规则语法 -
selector { property: value }

JavaFX使用的默认样式表是modena.css 。 它位于JavaFX运行时jar中。
添加自己的样式表
您可以将自己的样式表添加到JavaFX中的场景,如下所示 -
Scene scene = new Scene(new Group(), 500, 400);
scene.getStylesheets().add("path/stylesheet.css");
添加内联样式表
您还可以使用setStyle()方法添加setStyle()样式。 这些样式仅由键值对组成,它们适用于设置它们的节点。 以下是将内联样式表设置为按钮的示例代码。
.button {
   -fx-background-color: red;
   -fx-text-fill: white;
}
例子 (Example)
假设我们开发了一个JavaFX应用程序,它显示一个带有文本字段,密码字段,两个按钮的表单。 默认情况下,此表单如下面的屏幕截图所示 -
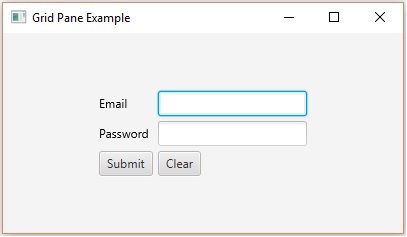
以下程序是演示如何在JavaFX中向上述应用程序添加样式的示例。
将此代码保存在名为CssExample.java的文件中
import javafx.application.Application;
import static javafx.application.Application.launch;
import javafx.geometry.Insets;
import javafx.geometry.Pos;
import javafx.scene.Scene;
import javafx.scene.control.Button;
import javafx.scene.control.PasswordField;
import javafx.scene.layout.GridPane;
import javafx.scene.text.Text;
import javafx.scene.control.TextField;
import javafx.stage.Stage;
public class CssExample extends Application {
   @Override
   public void start(Stage stage) {
      //creating label email
      Text text1 = new Text("Email");
      //creating label password
      Text text2 = new Text("Password");
      //Creating Text Filed for email
      TextField textField1 = new TextField();
      //Creating Text Filed for password
      PasswordField textField2 = new PasswordField();
      //Creating Buttons
      Button button1 = new Button("Submit");
      Button button2 = new Button("Clear");
      //Creating a Grid Pane
      GridPane gridPane = new GridPane();
      //Setting size for the pane
      gridPane.setMinSize(400, 200);
      //Setting the padding
      gridPane.setPadding(new Insets(10, 10, 10, 10));
      //Setting the vertical and horizontal gaps between the columns
      gridPane.setVgap(5);
      gridPane.setHgap(5);
      //Setting the Grid alignment
      gridPane.setAlignment(Pos.CENTER);
      //Arranging all the nodes in the grid
      gridPane.add(text1, 0, 0);
      gridPane.add(textField1, 1, 0);
      gridPane.add(text2, 0, 1);
      gridPane.add(textField2, 1, 1);
      gridPane.add(button1, 0, 2);
      gridPane.add(button2, 1, 2);
      //Styling nodes
      button1.setStyle("-fx-background-color: darkslateblue; -fx-text-fill: white;");
      button2.setStyle("-fx-background-color: darkslateblue; -fx-text-fill: white;");
      text1.setStyle("-fx-font: normal bold 20px 'serif' ");
      text2.setStyle("-fx-font: normal bold 20px 'serif' ");
      gridPane.setStyle("-fx-background-color: BEIGE;");
      // Creating a scene object
      Scene scene = new Scene(gridPane);
      // Setting title to the Stage
      stage.setTitle("CSS Example");
      // Adding scene to the stage
      stage.setScene(scene);
      //Displaying the contents of the stage
      stage.show();
   }
   public static void main(String args[]){
      launch(args);
   }
}
使用以下命令从命令提示符编译并执行保存的java文件。
javac CssExample.java
java CssExample
执行时,上面的程序生成一个JavaFX窗口,如下所示。
